Recipes
Recipes
by Jason McGinn on Dec 16 2019
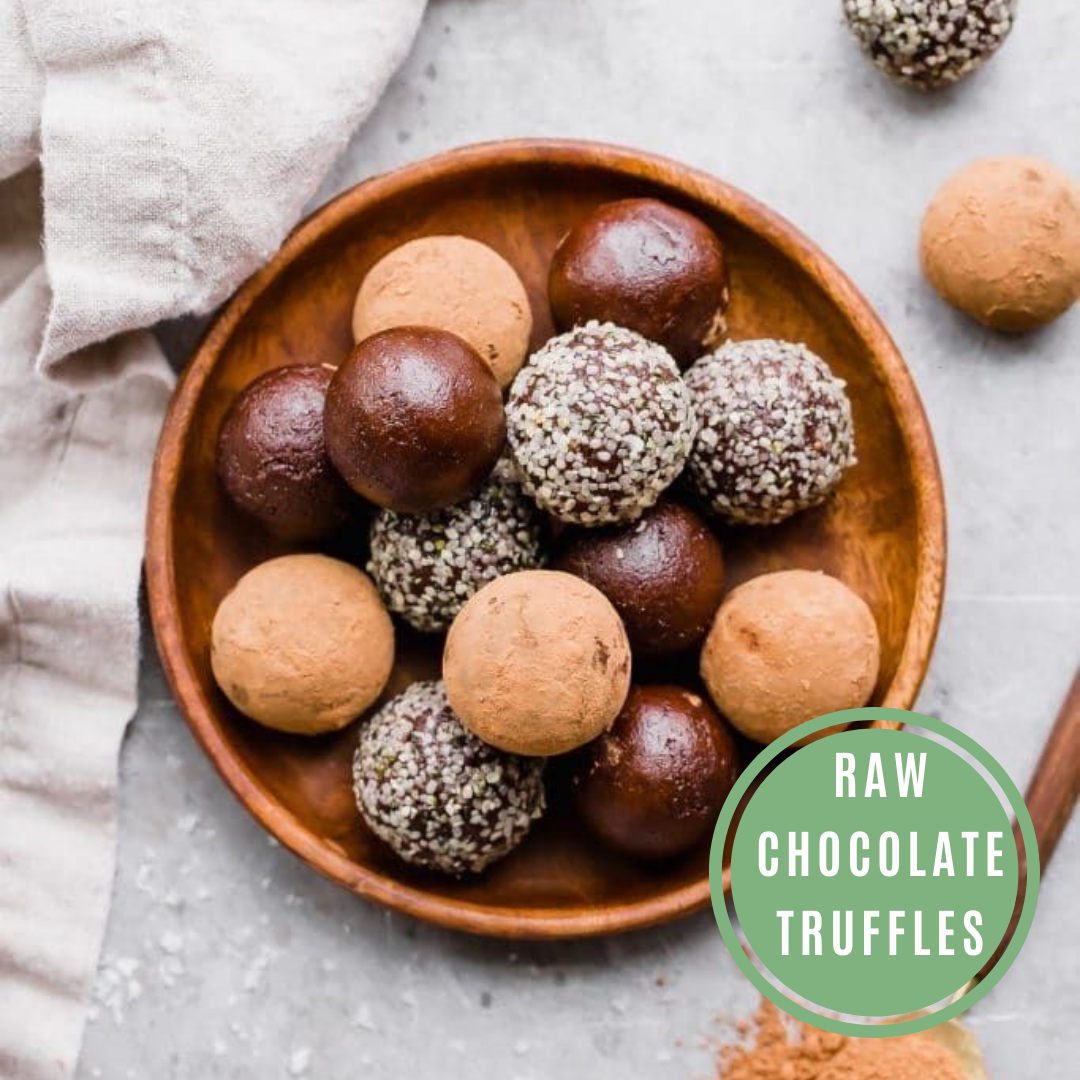
Meatless Monday during December is my favorite. We get to enjoy all of these delicious & raw treats while jamming in as much nutrients as possible. Indulging with a little less guilt!
These chewy, rich truffles are vegan, paleo & raw and a real hit. They’re loaded with healthy fats, omega, antioxidants are more! Enjoy.
Raw Chocolate Truffles
Author: Rachel @ www.bakerita.com
Ingredients:
12 Medjool dates soaked in hot water to soften if not already soft, drain before using
⅔ cup (170g) almond butter
½ cup (48g) almond flour
3 tablespoons cacao powder
1 tablespoon maca powder, which is optional but recommended - can also add any other superfood powders you like
¼ teaspoon sea salt
To roll:
Hemp seeds and/or cacao powder
Instructions:
Add the Medjool dates to the blender and blend until smooth, scraping down the sides of the blender as necessary. Add the almond flour, almond butter, cacao powder, maca powder, and sea salt.
Blend until completely combined and smooth, using the tamper to make sure everything is incorporated and scraping down the sides as necessary.
Use a small cookie scoop or a tablespoon to make tablespoon-sized balls. Roll into balls between your hands. Place the hemp seeds and cacao powder in separate bowls, and then roll each ball in hemp seeds or cacao powder.
Store in an airtight container in the refrigerator for up to a week.
Recipes
by Jason McGinn on Dec 09 2019
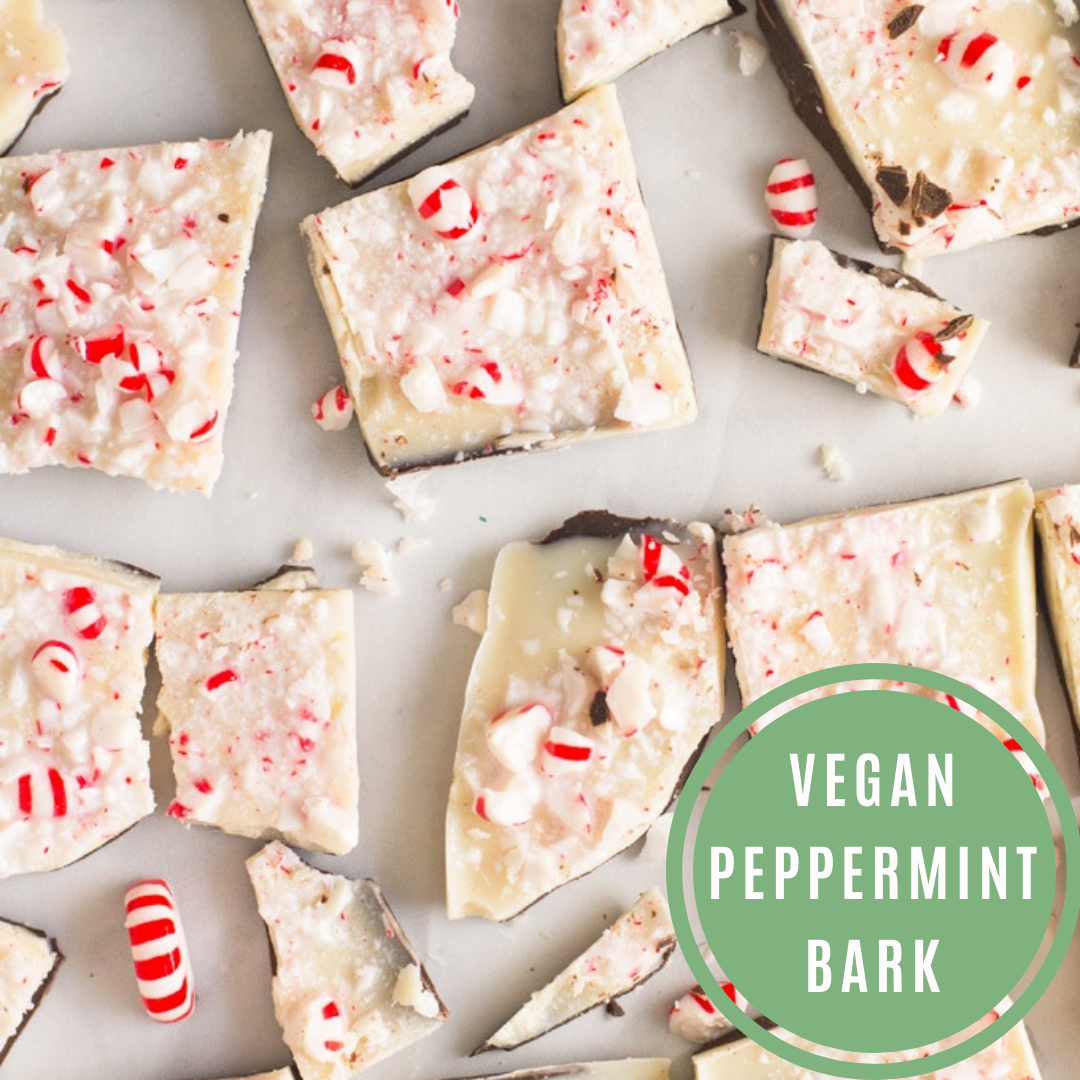
A vegan Christmas just got even more delicious! Is there any other flavour that's more Christmasy than peppermint? We love all things peppermint in our household. Its a cooling flavour that's refreshing and also helps settle the tummy. We love it in our tea, our drinks, our salads and especially our baking.
This vegan recipe makes 15 portions and is perfect as a baking gift, bring to a holiday party, an office treat or to munch on while watching a Christmas movie in the air-conditioning. Its sweet and refreshing, that perfect balance of flavours.
Enjoy this one!
Vegan Peppermint Bark
Author: www.mindfulavocado.com
Serves: 15
Prep time: 20 minutes
Freeze time: 2 hours
Ingredients:
1 cup dark chocolate chips
1/2 cup coconut oil softened
1/2 cup coconut butter softened
1 Tablespoon pure maple syrup
1/2 teaspoon peppermint extract
1 teaspoon vanilla extract
2-3 candy canes or crushed peppermint candies
Instructions:
Place chocolate chips in a double boiler or a glass bowl over a boiling pot of water and melt until the chocolate is a smooth consistency.
Pour melted chocolate into an 8x8 inch pan lined with parchment paper.
Place pan in the freezer for 10 minutes to let chocolate solidify.
Slightly melt the coconut oil and coconut butter until it's a thick icing consistency. Add remaining ingredients and whisk together.
Take pan out of the freezer and spread coconut mixture over the chocolate using a rubber spatula.
Top with crushed candy canes or peppermint candies. Place in the freezer to set completely (about 1-2 hours)
Once set, remove from the freezer and break into pieces.
Store in freezer.

Recipes
Gingerbread Cookie Dough Bites
by Jason McGinn on Dec 02 2019
Its the best time of year for foods that make you feel festive. The spices and flavors can really bring you that Christmas feeling! These no-bake Gingerbread Cookie Dough Bites are perfect for just that. Not too indulgent and really adding in those extra nutrients and healthy fats that we tend to lack over the holidays. Enjoy! These guys are vegan, gluten free and paleo!
Gingerbread Cookie Dough Bites
Author: www.theloopywhisk.com
Ingredients:
2 cups (220 g) ground almonds
1/3 cup (30 g) ground walnuts
1/2 cup (45 g) gluten free oats, ground
3/8 - 1/2 cup (130 - 170 g) maple syrup (or honey)
1 1/2 tbsp molasses
1 1/2 tsp ground cinnamon
1/2 tsp ground ginger
pinch of ground nutmeg
pinch of ground cloves
pinch of salt
drizzle of choice (you can use icing, white chocolate – anything you fancy)
Instructions:
Add the ground almonds and ground walnuts to the food processor and blend for 5 - 7 minutes, until the mixture starts starts clumping together. At this point, it will be half-way to a nut butter, but we'll stop at this stage.
Add the ground oats and blend for a further 1 - 2 minutes, until the oats are evenly distributed and absorbed by the nut mixture.
In a small bowl, mix together the sweetener of choice, molasses, spices and salt. Add the sweet mixture to the food processor and blend until the "cookie dough" becomes smooth and clumps together into a single ball.
Roll about 1 1/2 tbsp worth of the "cookie dough" into balls and put them onto a lined baking sheet. Refrigerate the balls while you prepare the icing of choice.
Drizzle the slightly chilled balls with the icing of choice, and tuck in!
The healthy gingerbread cookie dough bites keep well in a closed container the fridge for about 1 week, and in the freezer for 2 - 3 weeks. (They also make a wonderful edible DIY Christmas gift!)
Recipes
by Jason McGinn on Nov 25 2019
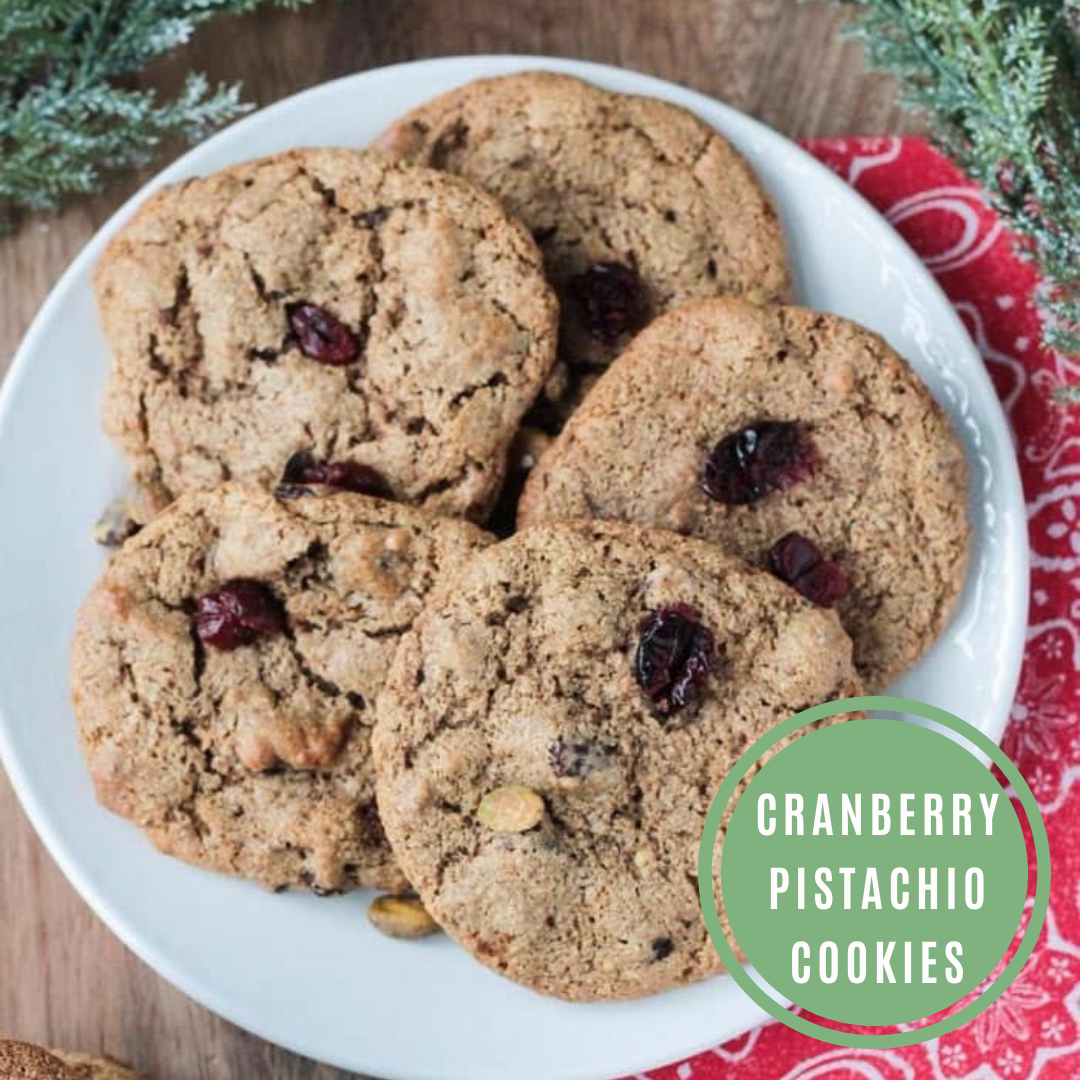
One of my favourite parts of Christmas is the baking. We turn on the Christmas carols or a Christmas movie in the background and the lights on the tree while we warm the oven and bring out the cookie cutters!
While Christmas is a time of year for eating and indulging, we try and keep our recipes as clean and as yummy as possible. This cookie recipe has become a new favourite in our household. The crunch of the pistachio, the tartness of the cranberry and the sweetness of the batter is a winning combination for all of us.
The recipe is gluten free, egg free, refined sugar free, soy free and vegan.
Cranberry Pistachio Cookies
Author: www.veggieinspired.com
Yields 24 cookies
Ingredients:
2 1/2 cups almond flour
1/2 cup coconut sugar
1 tsp bicarb soda
1/2 tsp salt
1/2 cup almond butter
1/2 cup pure maple syrup
1/2 cup unsweetened original almond milk
2 tsp pure vanilla extract
1/2 cup dried cranberries
1/4 cup chopped shelled pistachios
Instructions:
Preheat oven to 175 degrees. Line a baking sheet with parchment paper and set aside.
In a medium mixing bowl, whisk together the almond flour, coconut sugar, bicarb soda, and salt.
In a large mixing bowl, whisk together the almond butter, maple syrup, almond milk, and vanilla.
Stir the dry ingredients into the wet ingredients, making sure to scrape the bottom of the bowl to fully combine all the ingredients.
Stir in the cranberries and pistachios and mix well.
Scoop out 1-2 tbsp of dough and place onto the parchment lined cookie sheet. Leave at least a couple inches in between each scoop of dough because these cookies will spread.
Bake for 9-11 minutes until golden brown and starting to firm up.
Transfer to a cooling rack to continue to cool completely. Cookies will continue to firm up as they cool.
Enjoy!
Recipes
Raw Vegan Gingerbread Cheesecake
by Jason McGinn on Nov 18 2019
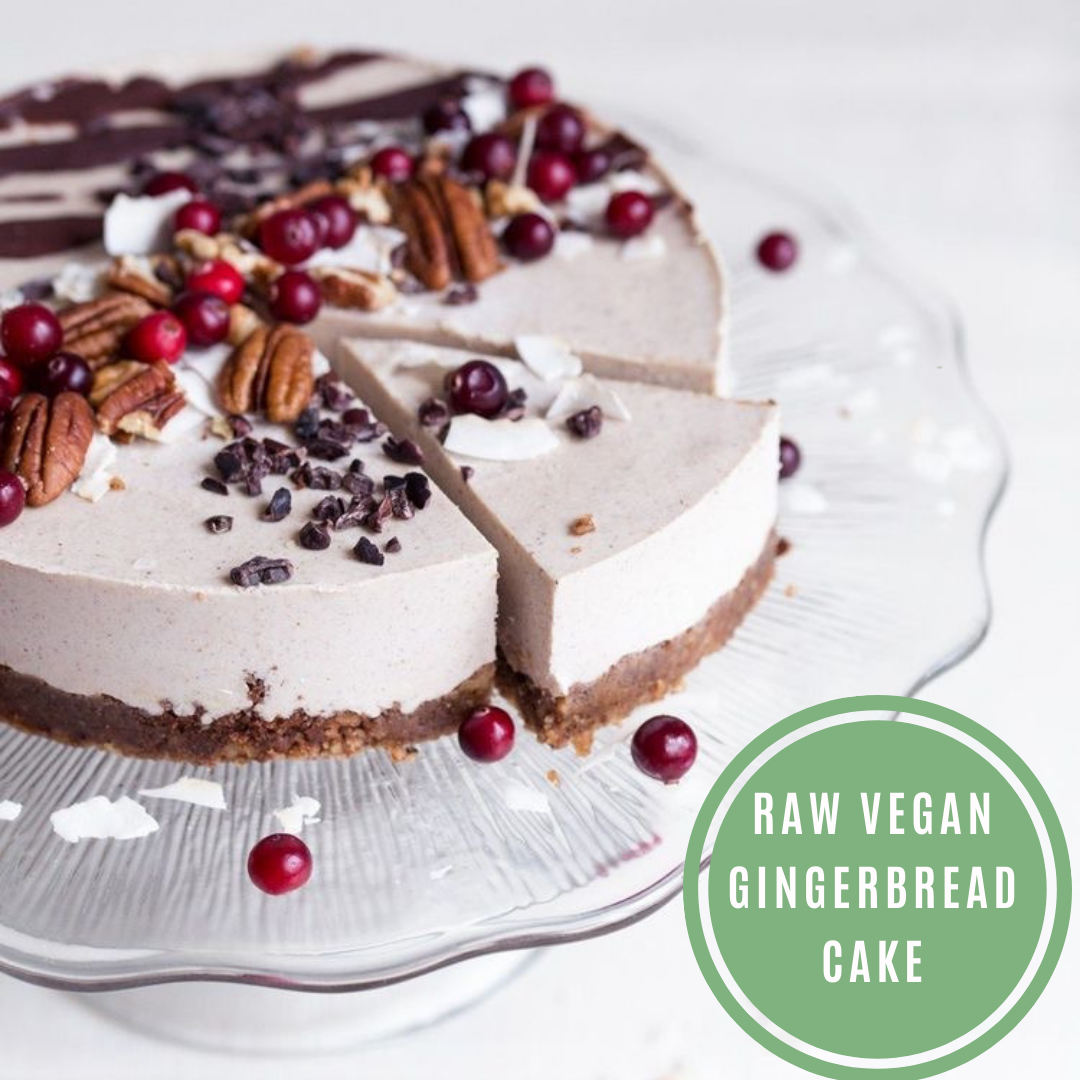
‘Tis the season to be baking! Holiday parties are nearly upon us. What do you bring? Holidays can be a time of indulgence but that doesn’t mean sacrificing our health in the process. This cheesecake recipe is a winner all around. No nasty ingredients, looks and tastes delicious.
Have a try of this one and let us know what you think!
Raw Vegan Gingerbread Cheesecake
Author: www.tuulia.co
Ingredients:
Crust:
2 cups walnuts (or pecan nuts and/or almonds)2 teaspoons ceylon cinnamona pinch of sea salt6-8 fresh dates, pitted
Filling:
2 cups / 225g cashew nuts (soaked overnight)1 (400ml / 14oz) can full-fat coconut milk (refrigerated overnight)1/2 cup extra virgin coconut oil3-5 tablespoons organic honey (or coconut syrup or maple syrup)2 teaspoons ceylon cinnamon1/2 teaspoon ground cardamom1/2 teaspoon ground ginger1/2 teaspoon ground clove
Toppings:
about 50g raw chocolate (or dark chocolate)pecansdried coconut flakesraw cacao nibsfresh berries (I used cranberries
METHOD:
1. Place the cashews in a big bowl, cover with water and soak overnight or for at least 4-6 hours until making the cake.
2. Start by preparing the crust. Add walnuts, cinnamon and salt into a blender or a food processor and grind until fine crumble. Cut the dates into smaller pieces and add in couple turns. Blend until you get a sticky dough. Line the bottom of a cake tin with baking paper and press the dough to the bottom of the cake tin. Place it in the freezer while making the filling.
3. Rinse the blender. Melt the coconut oil in a small saucepan on low heat until liquid. Drain and rinse the soaked cashews and add them into the blender. Open the coconut milk can and scoop out the white thick cream into the blender (don’t throw away the water left in the can). Add coconut oil, honey and spices and blend until smooth. If needed, add a bit of the coconut water left in the can to ease out the blending. Taste, and add sweetener or spices, if desired.
4. Take the cake tin from the freezer and pour the filling on top of the crust. Return to the freezer for 4-6 hours until the filling has set.
5. When the filling has set, take the cake from the freezer and remove the sides of the cake tin carefully. Melt the raw chocolate in a small saucepan on low heat and once it’s melted, pour the chocolate on top of the cake. Top with pecans, coconut flakes, raw cacao nibs and fresh berries and let thaw for about 15 minutes until cutting the cake.
6. The cake will remain good in the fridge for a couple of days, for longer periods, store in the freezer.
Recipes
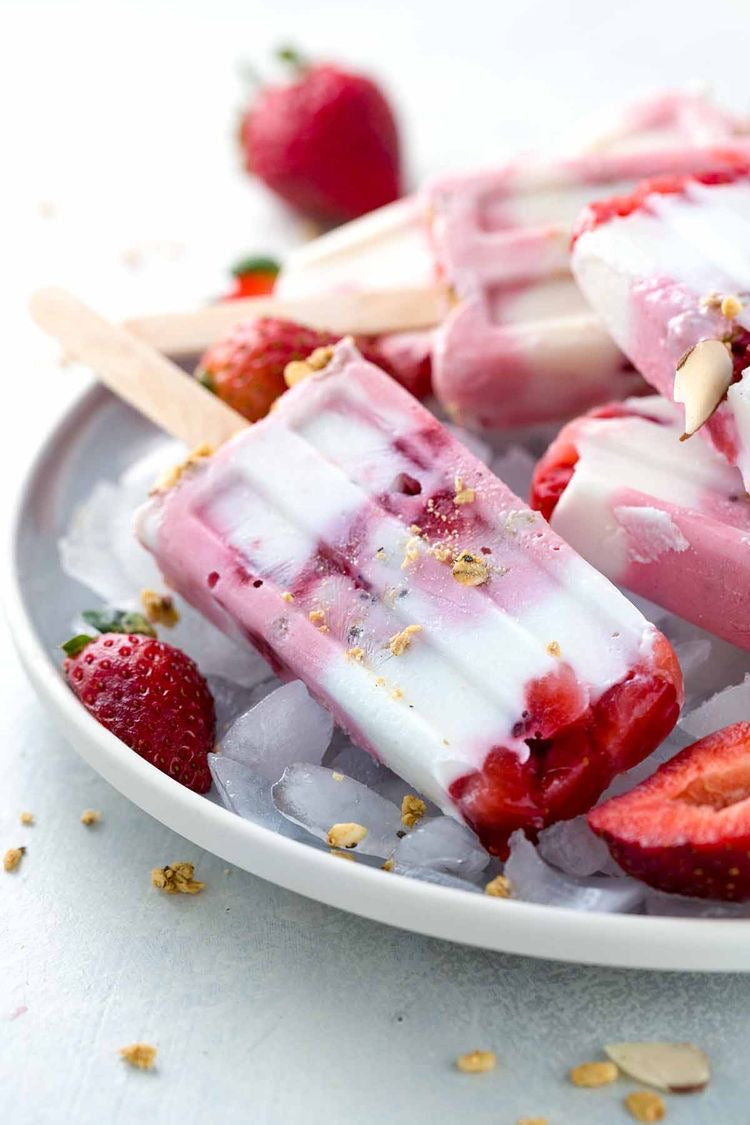
by Jason McGinn on Nov 12 2019
Keeping cool & keeping healthy never tasted so good! Be gone with the sugary icey poles and add these into your repertoire.
Strawberry Yogurt Pops
Author: www.jessicagavin.com
Ingredients:
2 cups Greek vanilla yogurt, or regular yogurt, divided
3/4 cup strawberries, sliced
1 cup strawberries, diced ¼-inch by ¼ inch
1/2 cup muesli, your favorite kind
Instructions:
In a blender, puree 3/4 cup sliced strawberries and 3/4 cup vanilla yogurt together until a smooth, consistent texture is reached, about 1 minute.
Layer the popsicles as follows: 1 teaspoon cubed strawberries, 1 tablespoon vanilla yogurt, 1 tablespoon blended strawberry yogurt, 1 teaspoon muesli. Repeat layers once more, or until the mold is filled to the top.
Place cover on the mold and insert the popsicle sticks. Freeze for at least 6 hours, or overnight.
Recipes
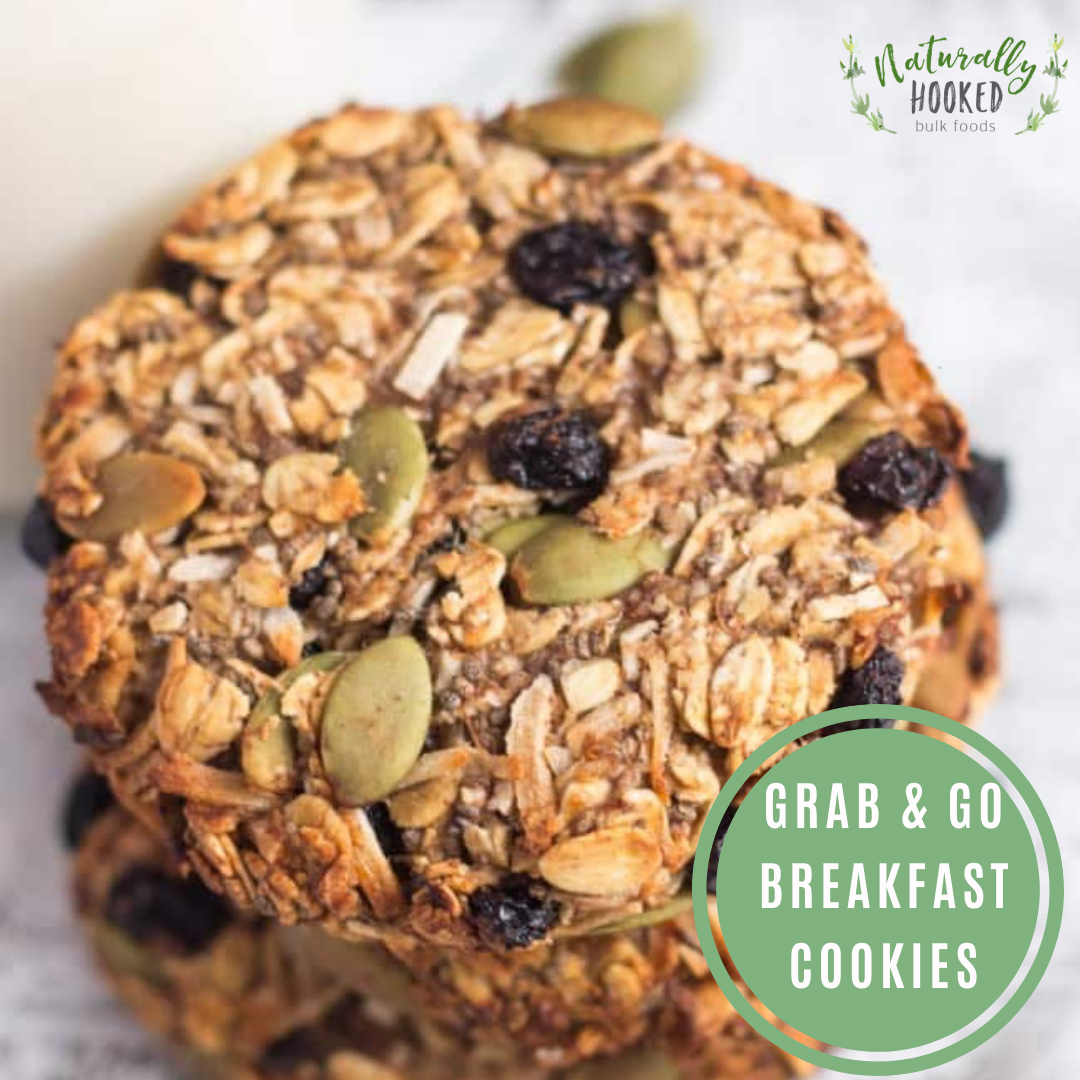
by Jason McGinn on Nov 11 2019
If you’re anything like us, mornings can be chaos. It seems everyone else gets fed, dressed and meals prepared but me! Easy & healthy food that I can eat on the run (naughty, I know) is essential. This recipe is great for a top up of breakfast or a snack to beat that 3pm slump.
Grab & Go Breakfast Cookies
Author: The Cooks Pyjamas
Ingredients:
2 ripe bananas
1 cup of rolled oats
1/4 cup pepitas
1/4 cup shredded coconut
1/4 cup currants
1 tbsp chia seeds
1/2 tsp cinnamon
Pinch of salt
Instructions:
Preheat the oven to 175C (155C fan forced).
Line a baking tray with paper and set aside.
In a small bowl, mash the banana until smooth. Set aside.
Combine the remainder of the ingredients in a large bowl.
Add the mashed banana to the dry ingredients.
Mix well to ensure all of the dry ingredients are coated with the banana.
Let the mixture stand for five minutes to absorb the moisture from the banana.
Take a scant 1/4 cup of the mixture and press it together to form a solid round cookie. If the mixture does not hold together, wait a few minutes and try again.
Place the cookie on the lined tray and pat gently until it is about 7cm wide and 1.5cm high. These cookies will not spread in the oven, so the shape on the tray is the shape of the finished cookie.
Repeat with the remainder of the mixture.
Bake for 15 - 20 minutes, or until the cookies are golden.
Remove from the oven, then transfer to a rack to cool completely.
Keep for up to two days in an airtight container, or freeze until required.
Recipes
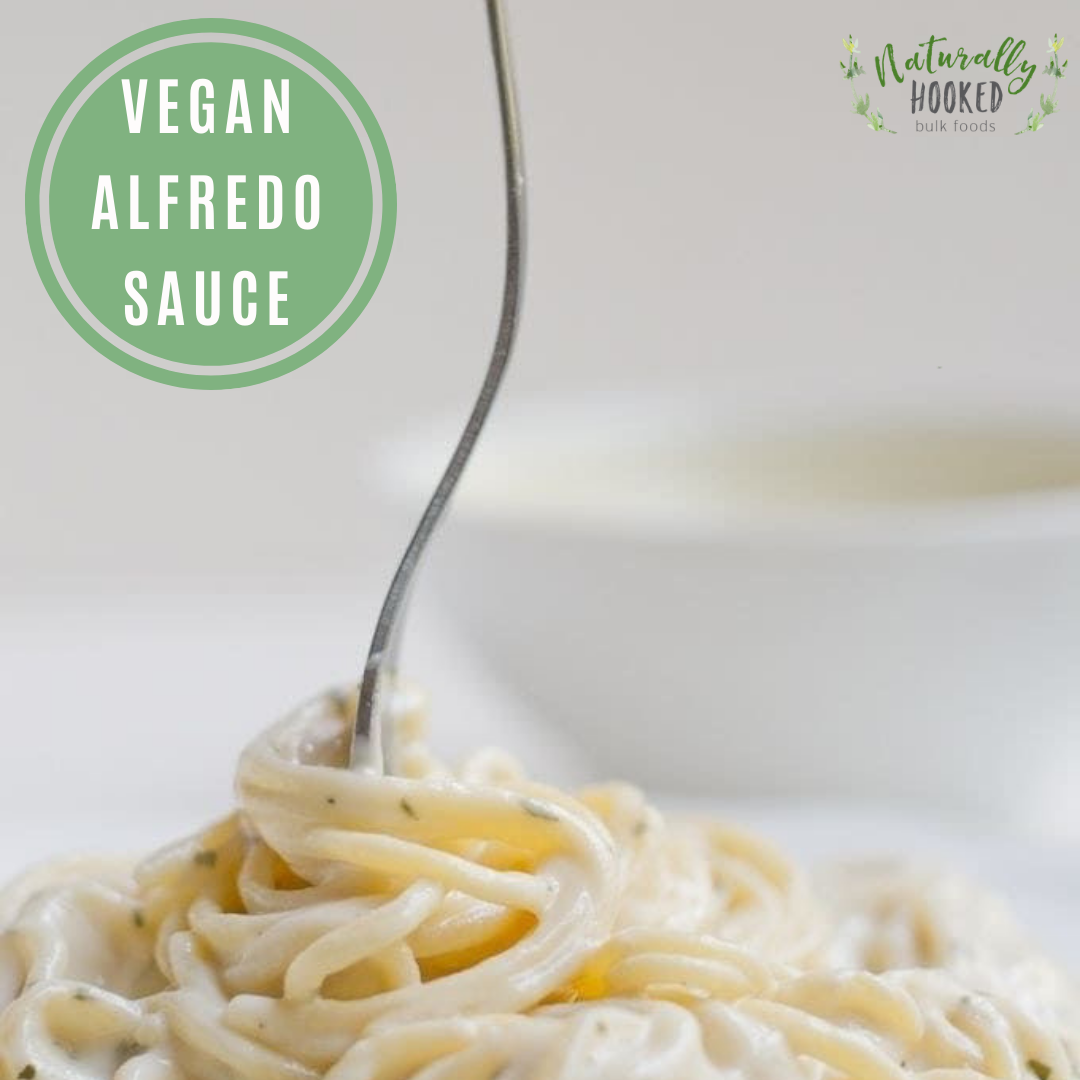
by Jason McGinn on Nov 04 2019
Compromise no longer! This vegan Alfredo sauce brings back the creamy, delicious pastas into your life. It’s dairy free and easy to whip up with a bit of forward thinking.
Reaping the benefits of vitamins, antioxidants, and all the cashew perks such as copper, manganese, magnesium and phosphorus.
A big thank you to Downshiftology for bringing this one into our lives!
Vegan Alfredo Sauce
Author: www.downshiftology.com
Ingredients:
1 cup raw cashews, soaked overnight, drained and rinsed
3/4 cup water
2 garlic cloves, peeled
1/2 tbsp lemon juice
1/2 cup diced onion
2 tbsp nutritional yeast
1 tsp salt
1/4 tsp dried rosemary
1/4 tsp black pepper
Instructions:
1. After the cashews have soaked overnight (or at least 6 hours), drain and rinse them.
2. Add the cashews and all other ingredients to a high-powered blend and blend until smooth.
3. Use immediately in a recipe or store in a sealed container in the fridge.
Recipes
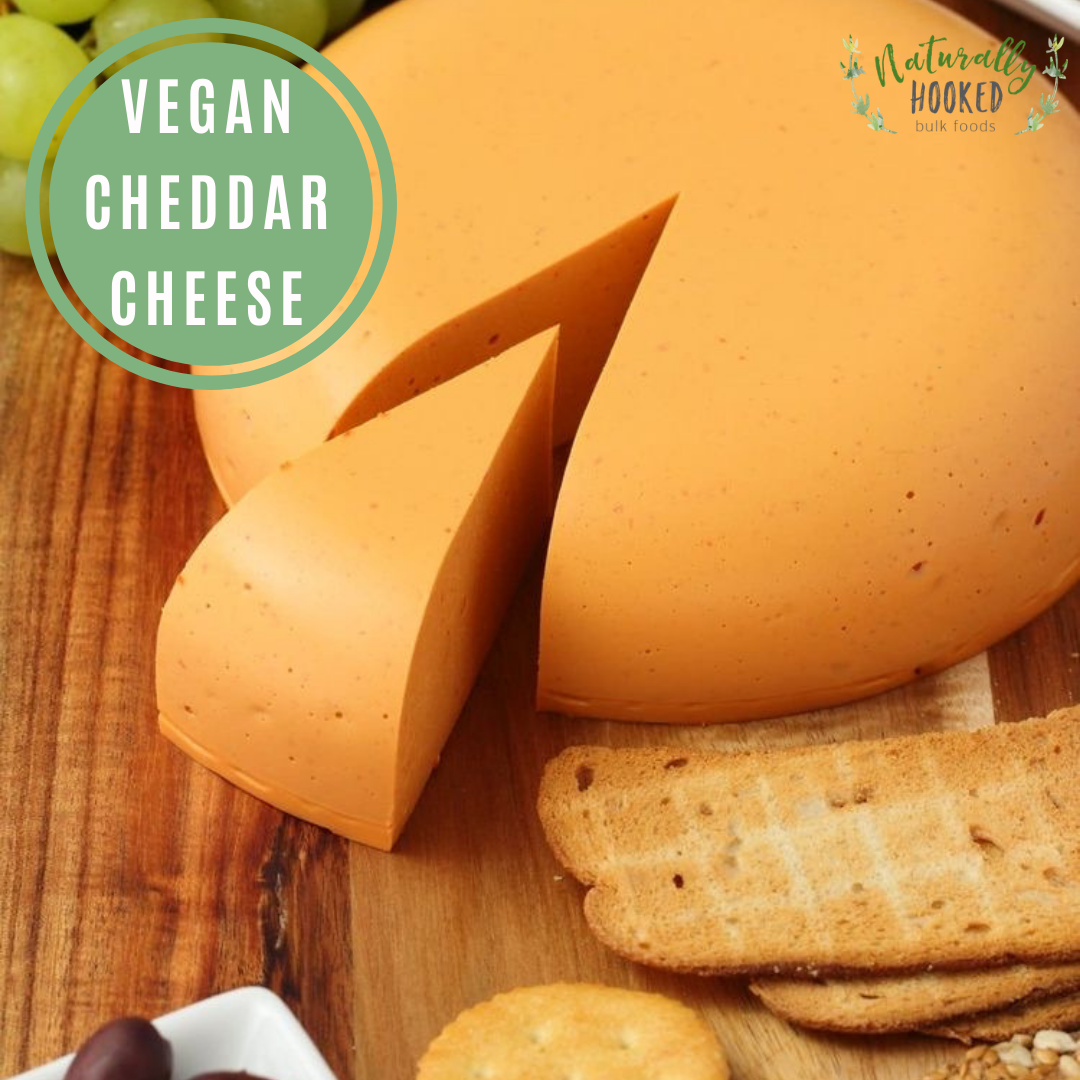
by Jason McGinn on Oct 28 2019
Let’s face it, for a lot of us cheese is life. It could arguably be one of the main reasons a lot of people hesitate in going fully vegan. Who can live without pizza? Or a cheeseboard with a glass of wine? While the real deal is hard to beat, this recipe for a vegan cheddar cheese certainly is a contender. Be sure to let us know what you think!
Vegan Cheddar Cheese
Author: www.lovingitvegan.com
Ingredients:
1 cup (150g) Raw Cashews
1/3 cup (80ml) Water
5 Tbsp Lemon Juice
2 Tbsp Coconut Oil
1/4 cup (60g) Tahini
1 Tbsp Soy Sauce* or tamari
1 Tbsp Tomato Paste
2 tsp Apple Cider Vinegar
1 Medium Red Capsicum (deseeded and chopped, about 3/4 cup)
2 and 1/2 tsp Salt
1/2 tsp Smoked Paprika
1/8 tsp Cayenne Pepper
1 Tbsp Dijon Mustard
1/4 cup (15g) Nutritional Yeast
1 tsp Garlic Powder
2 tsp Onion Powder
1 cup (240ml) Water
1 Tbsp Agar Agar Powder (not flakes)
Instructions:
Add the cashews, 1/3 cup water, lemon juice, coconut oil, tahini, soy sauce, tomato paste, apple cider vinegar, red capsicum, salt, smoked paprika, cayenne pepper, dijon mustard, nutritional yeast, garlic powder and onion powder to the blender jug. Blend until smooth. Set aside, but do not remove from the blender.
Add the 1 cup of water and agar agar powder to a saucepan and bring to the boil, stirring constantly. Once boiling let it boil for 1 minute.
Remove from the heat and pour it into the blender on top of the cheese mix.
Blend until smooth.
Working quickly, as it will start to set very fast, pour it out into a round dish sprayed with non-stick spray.
Smooth it down and then place it into the fridge to set.
To remove from the bowl, turn it upside down onto a plate.
Recipes
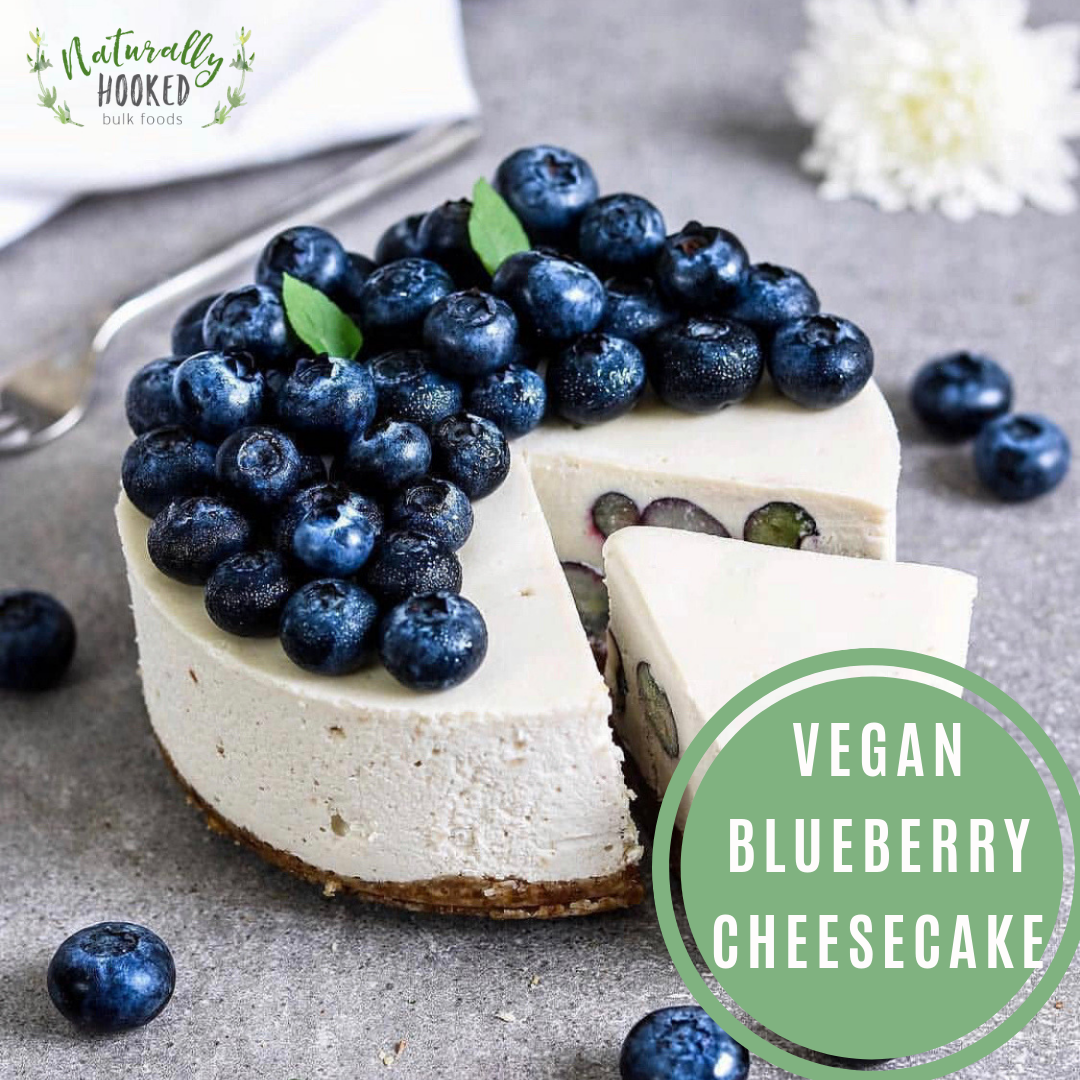
by Jason McGinn on Oct 20 2019
There are not many things in this world I love more than a good cheesecake. Even better is when I find a cheesecake thats delicious, easy and not loaded with sugar and nasty additives.
This vegan, raw cheesecake ticks all of those boxes. Its easy, a crowd pleaser and allergen friendly and also doesn't have any wild ingredients that break the bank. Read on, my friends!
Vegan Blueberry Cheesecake
Author: @byanjushka
Recipe for 16cm springform tin
Ingredients:
For the crust:
70g almonds
50g dates
1/2 tsp vanilla extract
1/2 tsp coconut oil
Lightly grease a 16cm round springform tin with coconut oil and line base and sides with baking paper.
Place in a food processor and mix until you get the texture of crumbs.
Press the mixture into the base of your pan and put in the freezer while you make the filling.
For the Filling:
200g raw cashews (soaked for at least 8 hours)
200g coconut cream
45g coconut oil
40g of sweetener
pinch of salt
1/4 tsp vanilla extract
Blend all ingredients at high speed until smooth.
Pour the mixture on top of the crust, add some blueberries (about 80g) and place in the freezer for 30-40 minutes.
Meanwhile, place 200g of fresh or frozen raspberries to the other half of the cream and blend until smooth.
Pour it on the top of the cheesecake layer and return to the freezer for 45 minutes.
Enjoy!
Recipes
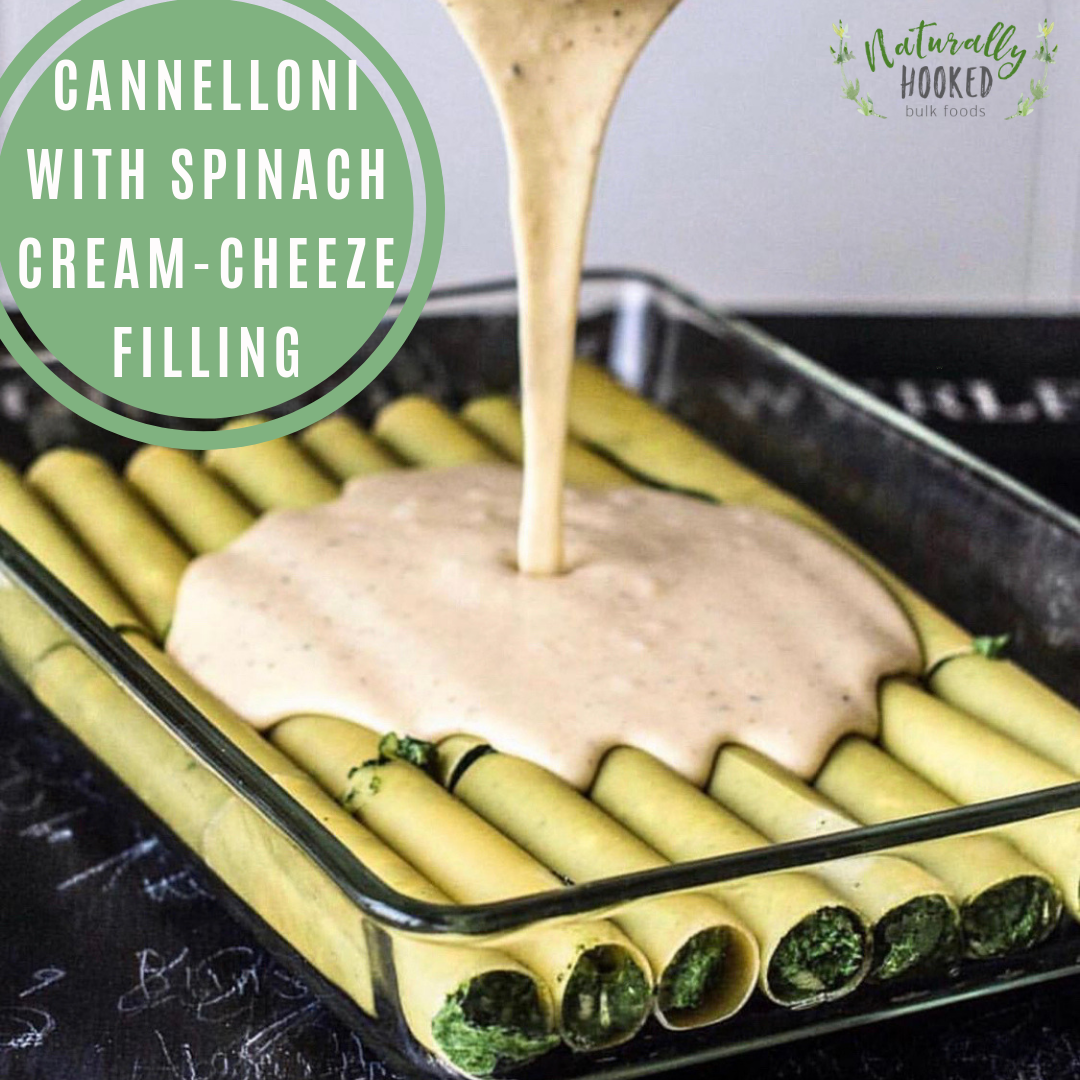
Cannelloni with Spinach Cream-Cheeze Filling
by Jason McGinn on Oct 13 2019
Another fantastic vegan recipe from Vegaliciously!
This Italian dish is a family comfort food staple. It’s full of the healthy stuff yet still full of flavor. It makes 6 servings so it’s perfect for the family + leftovers for lunch!
Whip this baby up and you won’t be disappointed. In fact, take a photo of your version and be sure to tag us with your results!
Enjoy xx
Canelloni with Spinach-Cream Cheeze
Ingredients:
800g of fresh spinach
2 red onions
2 cloves of garlic
2 tsp of coconut oil
1/3 tsp of nutmeg
250g of almond/cashew or normal cream cheese
salt & pepper
350g of cannelloni
4 tbsp coconut oil
4 tbsp all purpose flour
300g of soy milk (unsweetened)
300g of almond milk (unsweetened)
1/2tsp of nutmeg
salt & pepper
100g of Vegan or normal Parmesan
50g of Vegan or normal Parmesan
Method:
1. Mince the onion and the garlic. Heat a saucepan and melt oil and cook onion and garlic until golden.
2. Add the spinach leaves and cook for 10 minutes.
3. Add the spices and mix.
4. Place the spinach mixture and mix in a food processor with the cream cheese. Blend until smooth.
5. Place the mixture in a piping bag and fill the cannelloni.
6. Preheat the oven to 190 degrees.
7. Heat a saucepan, melt the oil and add the flour and whisk until it cools.
8. Heat the milk and add to the flour mixture once it’s warm.
9. Whisk thoroughly, add the spices and bring to a boil.
10. Once the sauce gets thick, add the Parmesan cheese and whisk. Pour over the cannelloni.
11. Top the cannelloni with more Parmesan and cook in the oven for around 30 minutes, until golden.
Enjoy!!
Recipes
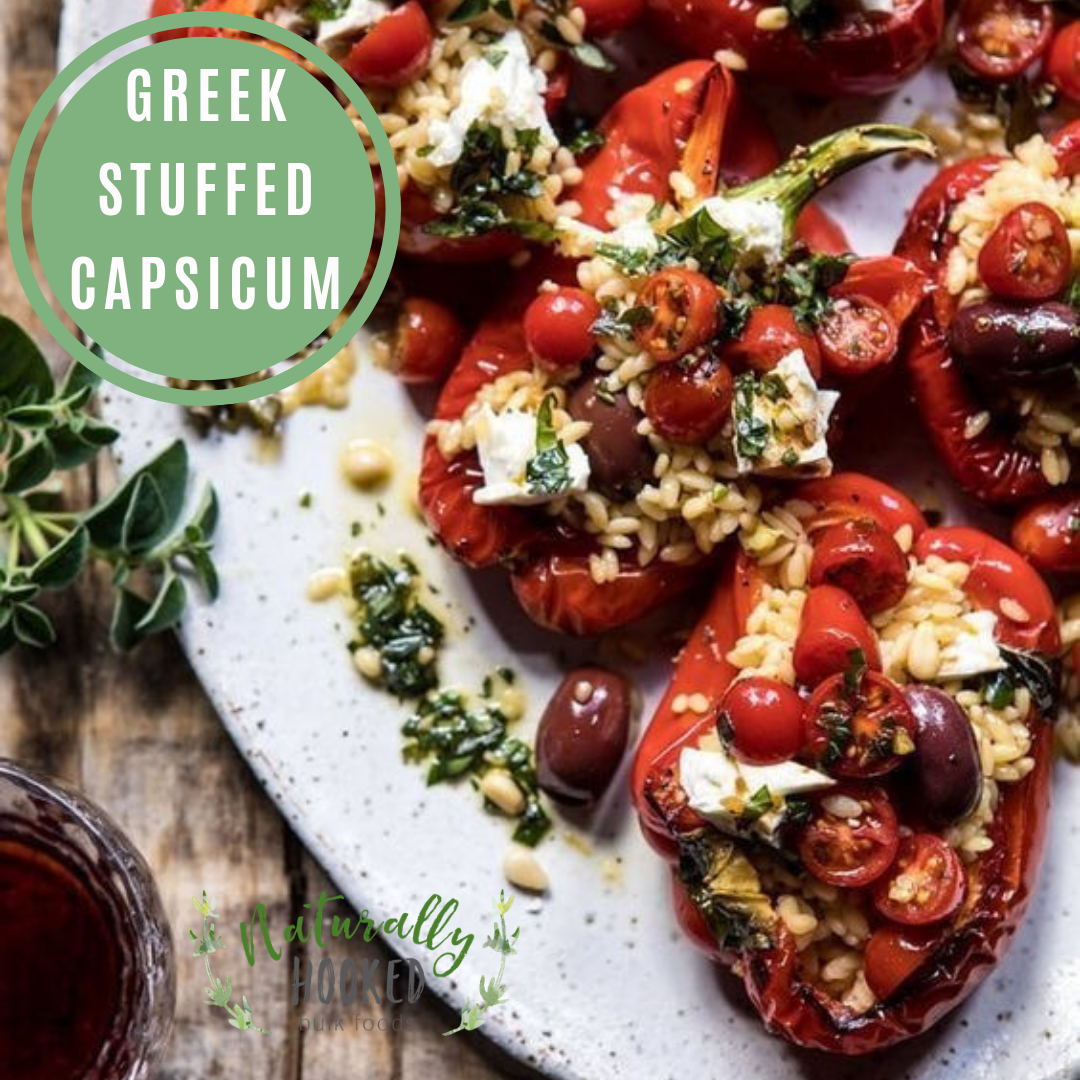
by Jason McGinn on Oct 06 2019
The warmer months get us feeling a bit lazy in the kitchen. Its easy to lose your mojo in the warmer months which can lead to some unhealthy and uninspired choices. Thats why we love this Greek Stuffed Capsicum recipe. Its ticks all of the boxes.
Easy with simple ingredients
Colourful
Full of flavour
Full of vitamins & minerals
It can be enjoyed as a side dish or a main meal, depending on the amount of mouths to feed!
Have a fabulous week and enjoy!
Greek Stuffed Capsicum
Author: www.adelineandlumiere.com
Ingredients:
250g cherry tomato1 cup brown rice3 cups vegetable stock4 medium capsicums , halved and deseeded1 onion, finely diced2 large garlic cloves, finely chopped1 tbsp dried oregano½ cup kalamarta olives, quartered6 handfuls baby spinach150g fetalemon juicelemon zestsalt and pepperolive oilsunflower seeds
Instructions:
Preheat oven to 180° degrees.
In a large heavy roasting tray, add a large glug of olive oil. Add the halved tomato to the pan and season well with salt and pepper and place in the oven for 15 mins or until well roasted.
Meanwhile, add the stock to a pot and add rice, wait until it comes to the boil, then reduce heat to simmer and cover for 20 minutes.
Once tomatoes are cooked, remove the tray from the oven and gently slide the tomatoes on a plate.
Wash and dry the same tray, then add a good glug of olive oil again and place the capsicums facing up. Spray the insides with a little oil and palce in the oven for 10-15 minutes, just so they’re tender.
Whilst the capsicums are cooking, in a frypan add a couple of tablespoons of olive oil and once hot, add onion and cook until brown and translucent. Add garlic and oregano and cook until you fragrant – which won’t take long – then add the rice, spoonfuls at a time. Add olives, tomatoes, half the feta and baby spinach and cook until just wilted.
Add the juice of half a lemon and give the rice once quick last stir.
Carefully spoon the rice mixture into the capsicum halves and place back in the oven for 15 minutes.
Remove from oven, top with the remaining feta and grate lemon zest over the top.
Recipes
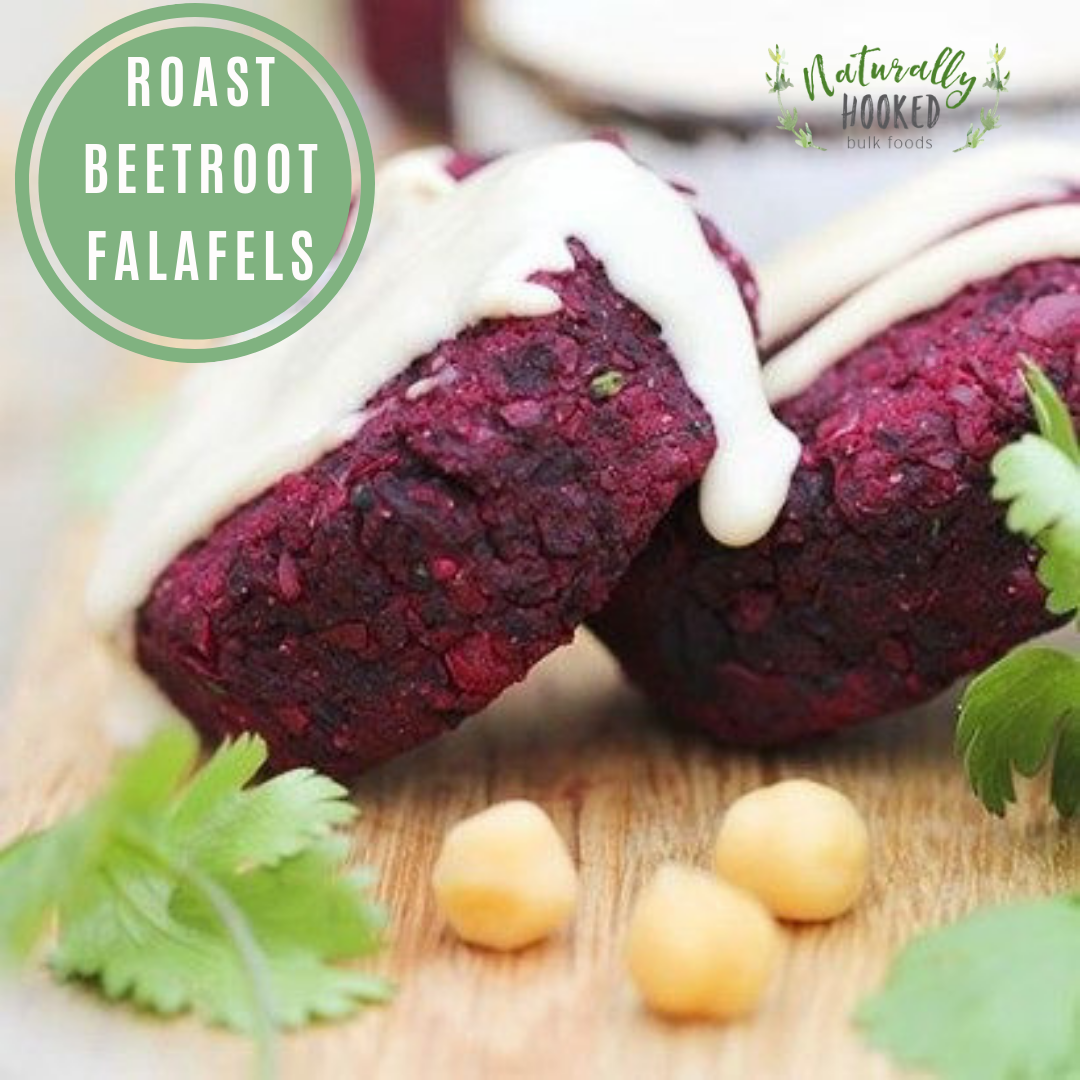
by Jason McGinn on Sep 20 2019
Ah, a good old falafel recipe. We love falafels in our household. They're so versatile. Great in a salad, a wrap, on toast, on a platter for entertaining or as a side dish. So easy to make, full of protein and the perfect finger food for little bellies. A great Sunday meal prep too!
With only a handful of ingredients, this one is budget friendly, simple but really delicious.
Did I mention they're loaded with antioxidants, essential nutrients AND plant based protein!
Roast Beetroot Falafels
Author: www.kindearth.net
Makes 10
Ingredients:
2 beetroots (just under tennis ball size)
2 large garlic cloves
250g (2 cups) cooked chickpeas
1 handful fresh coriander leaves
1 tablespoon ground coriander
1 heaped teaspoon ground cumin
1 teaspoon sea salt
Instructions:
Ahead of time: Slice the rough neck/top off the beetroots and discard. Chop the remaining beetroot into cubes (1.5cm/half an inch cubed in size). Bake in the oven on a baking tray for about 45 minutes on a high heat. When done, take out and leave to cool until you are ready to make the falafels. This can be done ahead of time, or the night before when you are using the oven for something else.
When beetroot is ready...
Add all ingredients into a food processor and blend until everything has broken down. It doesn’t need to be pureed completely, just broken down into tiny pieces so that when you compress, everything binds together.
Roll into balls (a little smaller than golf balls in size).
Press the balls down into mini patty shapes.
Place onto a grill tray (broiler in the USA) and grill on a medium/low heat for about 8 minutes on each side. (You can also bake these in the oven as an alternative to grilling).
Serve right away.
This served really well with tahini sauce.
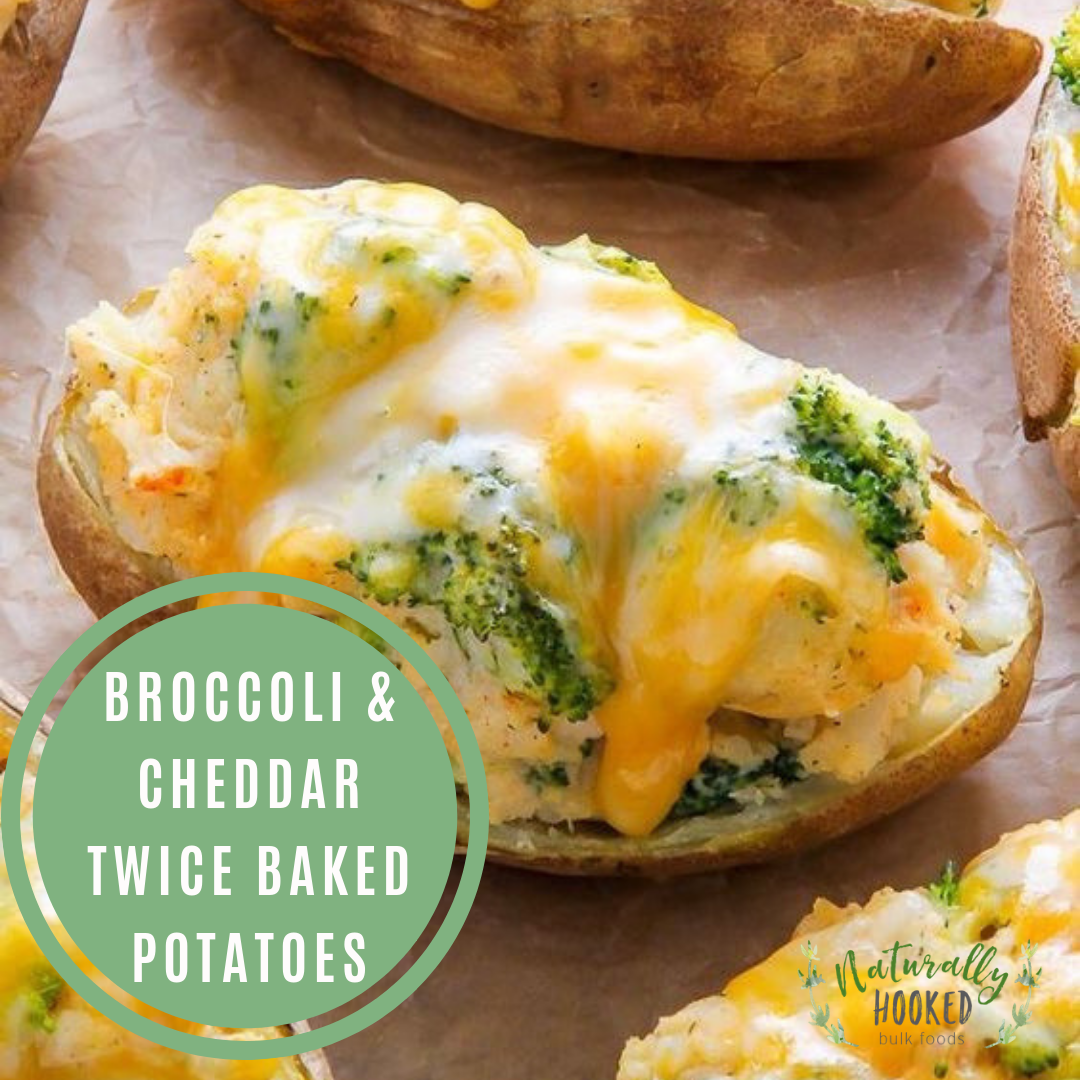
Recipes
Broccoli & Cheddar Twice Baked Potatoes
by Jason McGinn on Sep 13 2019
Ah, good old comfort food. These guys are warm, crispy, cheesy, nutritious and oh so delicious! The fussy ones will love this recipe. They suit as a side dish or as a main dish, it just depends on how creative and ambitious you're feeling in the kitchen. They can easily become a vegan dish as well.
These guys are loaded with calcium, potassium, vitamin B6, fibre, vitamin C and more.
Broccoli & Cheddar Twice Baked Potatoes
Author: Baker By Nature
Prep time: 20 minutes
Cook time: 1.5 hours
Ingredients:
4 medium potatoes, washed well and dried
1 teaspoon olive oil
3 and 1/2 tablespoons salted butter, very soft
1/2 cup Greek yogurt
1/4 cup milk or alternative milk
1/2 teaspoon salt
1/2 teaspoon pepper
3/4 teaspoon chives
3/4 teaspoon garlic powder
1/2 teaspoon onion powder
1/2 teaspoon dried onion flakes
1/2 teaspoon dried dill
1/2 teaspoon paprika
1 and 1/2 cups cooked broccoli, chopped, divided
2 cups cheddar cheese, shredded, divided
Instructions:
Preheat oven to 200 degrees. Line a small baking sheet with baking paper; set aside.
Place potatoes in a small baking dish and bake for 1 hour, or until soft. Remove from oven and set aside to cool. Once the potatoes are cool enough to safely handle, slice each one in half, lengthwise. Scoop out the potato pulp and place it into a large bowl, being careful to leave the skins intact. Rub the outsides of the potato skins with a little olive oil. Place the skins on the prepared baking sheet and set aside.
Add the butter to the potato pulp and mash - using an electric mixer or a potato masher - until fairly smooth; add Greek yogurt, milk, salt, pepper, chives, garlic powder, onion powder, dried onion flakes, dill, paprika, broccoli and 3/4 cup of the cheese. Divide the filling evenly among the potato shells then top with remaining cheese. Bake for 20-25 minutes or until the cheese is melted and the potatoes are heated through. Serve at once!
Recipes
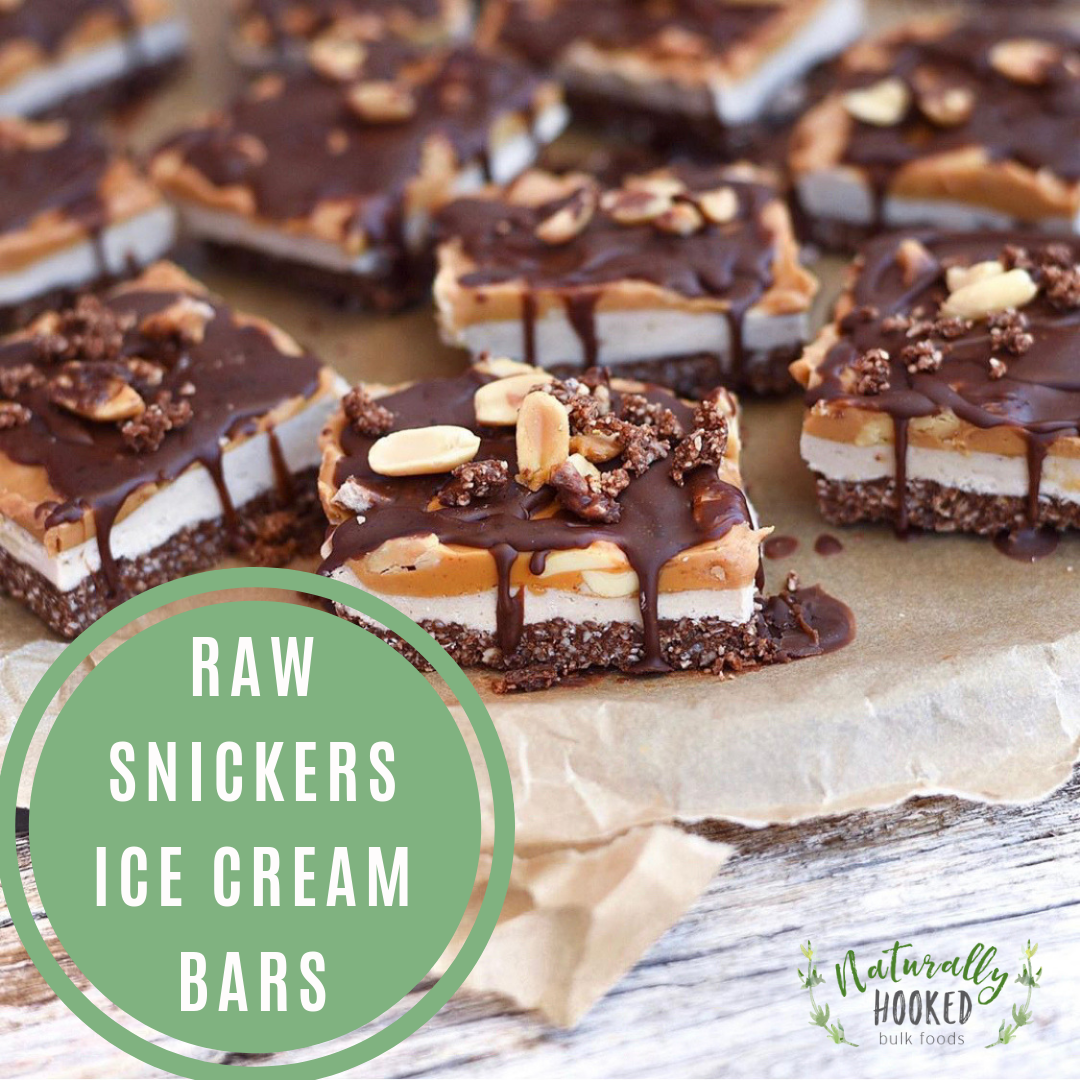
by Jason McGinn on Sep 06 2019
Bring on summer! The heat has certainly turned up a notch and we're basically in summer already. We often turn to cooler foods during these hot months, so lets kick off this new season with a sweet raw treat!
This recipe is so delicious. It takes a few more steps and a few more ingredients than our usual recipes, but is it ever worth it! Perfect for a birthday party, afternoon or evening indulgence, or even for breakfast (we're not judging).
Raw Snickers Ice Cream Bars
Author: www.rawspirations.com
Ingredients
Base Ingredients
1 cup raw almonds
1/2 cup unsweetened coconut shreds
1 tbs nut butter (I used ABC)
1 heaped tbs coconut oil
7 pitted medjool dates
1 heaped tbs cacao powder
Peanut butter Ice cream layer ingredients;
1 cup thickened coconut cream (full fat)
1 large ripe banana
1/4 – 1/3 cup pure maple syrup
Few drops vanilla
1 tbs coconut oil
1 tbs smooth peanut butter
Pinch cinnamon
Peanut butter brittle layer Ingredients
1 cup smooth peanut butter
1/3 cup peanuts
1 tsp pure maple syrup
Chocolate layer ingredients
1 cup cacao butter (melted)
1 tbs coconut oil (melted)
2 tbs cacao powder
2 tbs coconut nectar or pure maple syrup
Pinch cinnamon
1/2 tsp vanilla powder
Pinch Himalayan crystal salt
1 level tsp mesquite powder (optional)
Method
Method for Base
Method: process all base ingredients in food processor until they stick together. Press into flan tin that has push out base or spring release.
Method for Ice cream layer
Blend all ingredients in food processor or blender until smooth & creamy. Pour over base and freeze for 1.5-2 hours to set.
Peanut Butter Brittle layer
Mix together and spread layer over ice cream.
Chocolate Layer Method
Combine all ingredients until uniform, drizzle over slice. Return to freezer for 4-5 hours. Slice and serve
Alternatively you can buy a block of your favourite chocolate, melt and drizzle on top!
Recipes
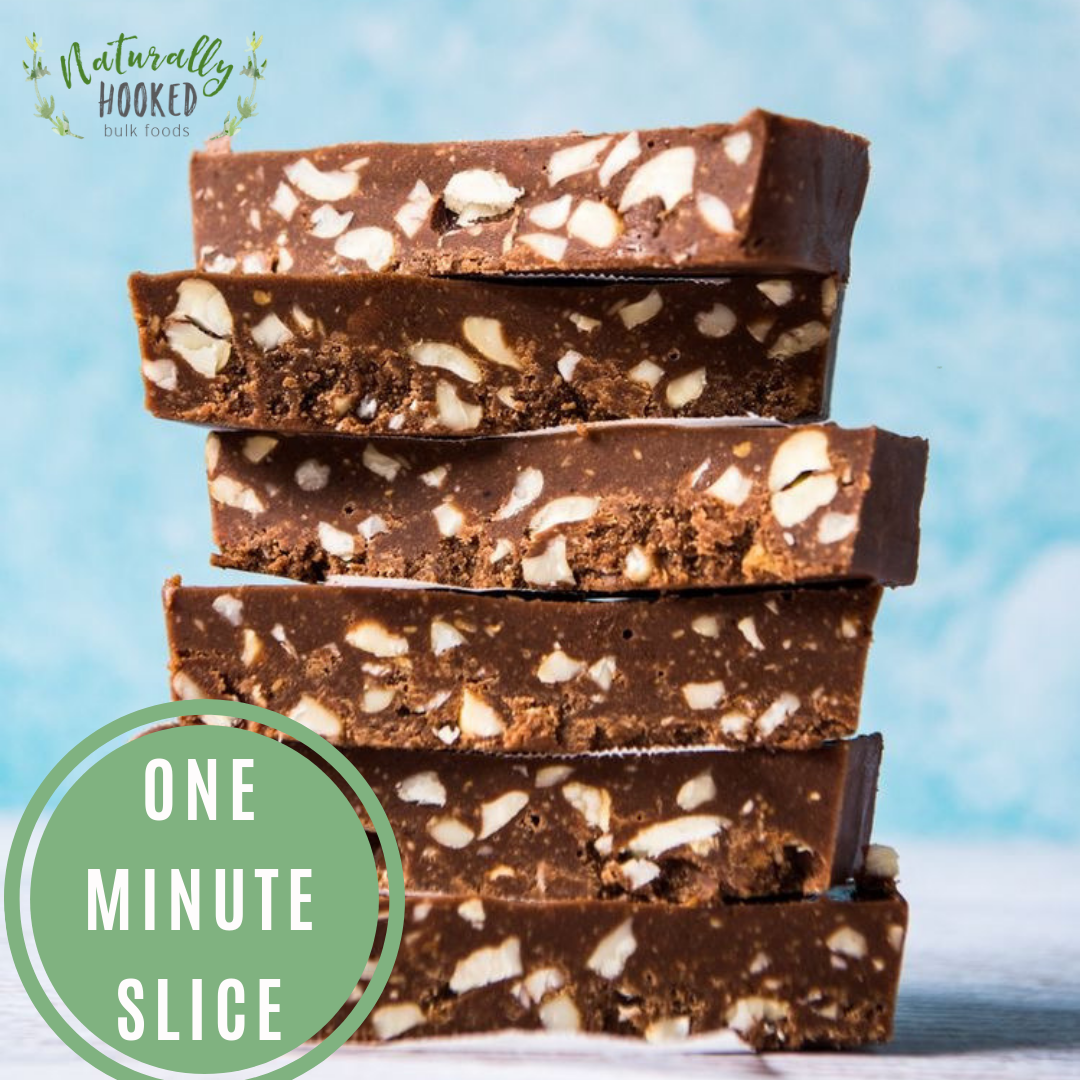
by Jason McGinn on Aug 23 2019
Let’s be honest, eating a whole food lifestyle can quickly get time consuming. We aim to make it quick and easy, providing optimal nutrients while still making those tastebuds dance. This recipe by Whole Food Simply does just that.
This one minute recipe is great for the 3pm slump, an after school snack or a Friday night treat. Whatever tickles your fancy!
One Minute Slice
Author: Whole Food Simply
Ingredients:
6 tablespoons peanut butter*
3 tablespoons coconut oil, melted
3 tablespoons honey**
2 tablespoons cacao or cocoa
1/2 teaspoon concentrated natural vanilla extract
pinch of salt
1/2 cup cashews
Instructions:
Place all ingredients into a bowl and mix until it is well combined and looking delicious. Pour the mixture into a silicon loaf tin or mini silicon muffin moulds. Place in the fridge or freezer to set and to store.
Eat and enjoy!
Recipes
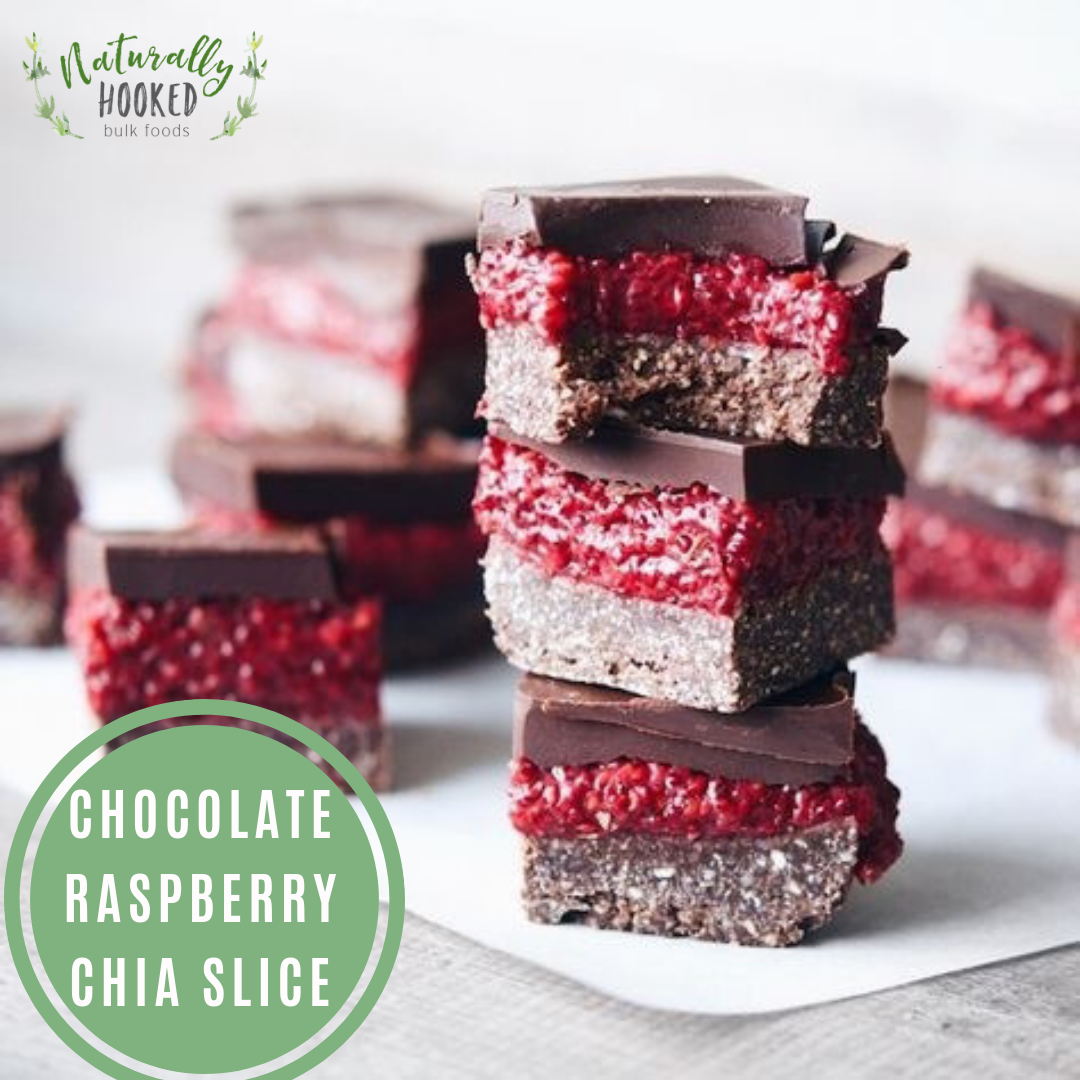
Chocolate Raspberry Chia Slice
by Jason McGinn on Aug 16 2019
Okay guys, if this one doesn't get your mouth watering, I don't know what will. The combo of the sweetness of chocolate + the tartness of raspberry is a match made in heaven. Keeping it raw, sugar free, & dairy free to meet even the hardest guests to impress.
Hoping for gluten free? Swap out the rolled oats for our uncontaminated organic oats for a low-gluten option.
Warning: these suckers don't last long!
Chocolate Raspberry Chia Slice
Author: Real Food Healthy Body
Makes 12 serves
Ingredients:
For the base:
3/4 cup rolled oats
3/4 cup unsweetened desiccated coconut
2 x 20ml tablespoons raw cacao powder (or cocoa powder)
Pinch of sea salt
2 x 20ml tablespoons maple syrup
1 x 20ml tablespoon extra virgin coconut oil, melted
1/2 teaspoon pure vanilla extract
For the raspberry layer:
2 cups frozen raspberries
4 x 20ml tablespoons chia seeds
2 x 20ml tablespoons water
2 x 20ml tablespoons maple syrup
1 x 20ml tablespoon extra virgin coconut oil
For the chocolate topping:
100g dark chocolate
2 x 20ml tablespoons extra virgin coconut oil, melted
Instructions:
Line a 10 x 16cm container with baking paper or cling film.
Process the base ingredients in a food processor until well combined. Press the mixture into the prepared container and set aside in the freezer.
To make the raspberry layer, place the frozen raspberries in a small frypan or saucepan over a medium heat. As the berries start to defrost and soften, squash them with the back of a spoon to turn them into a paste. Add the chia seeds, water, rice malt syrup and coconut oil and stir everything together. Reduce the heat to low and allow the mixture to simmer, continuing to stir regularly. The mixture should thicken as the chia seeds absorb the liquid. Once the mixture has thickened into a thick paste, take it off the heat, allow to cool slightly and then spread it over the base. Place the slice back in the freezer to chill.
To make the chocolate topping, melt the chocolate and coconut oil in a double boiler or in the microwave, stirring to combine. Remove the slice from the freezer and pour over the chocolate mixture. Return the slice to the fridge for a few hours to set.
Once set, leave the slice at room temperature for a few minutes before cutting into squares. (If the chocolate topping is still quite hard, the pressure required to cut the slice may cause the raspberry filling to squish out a bit. So I recommend turning the slice onto its side and then carefully cutting it that way).
Recipes
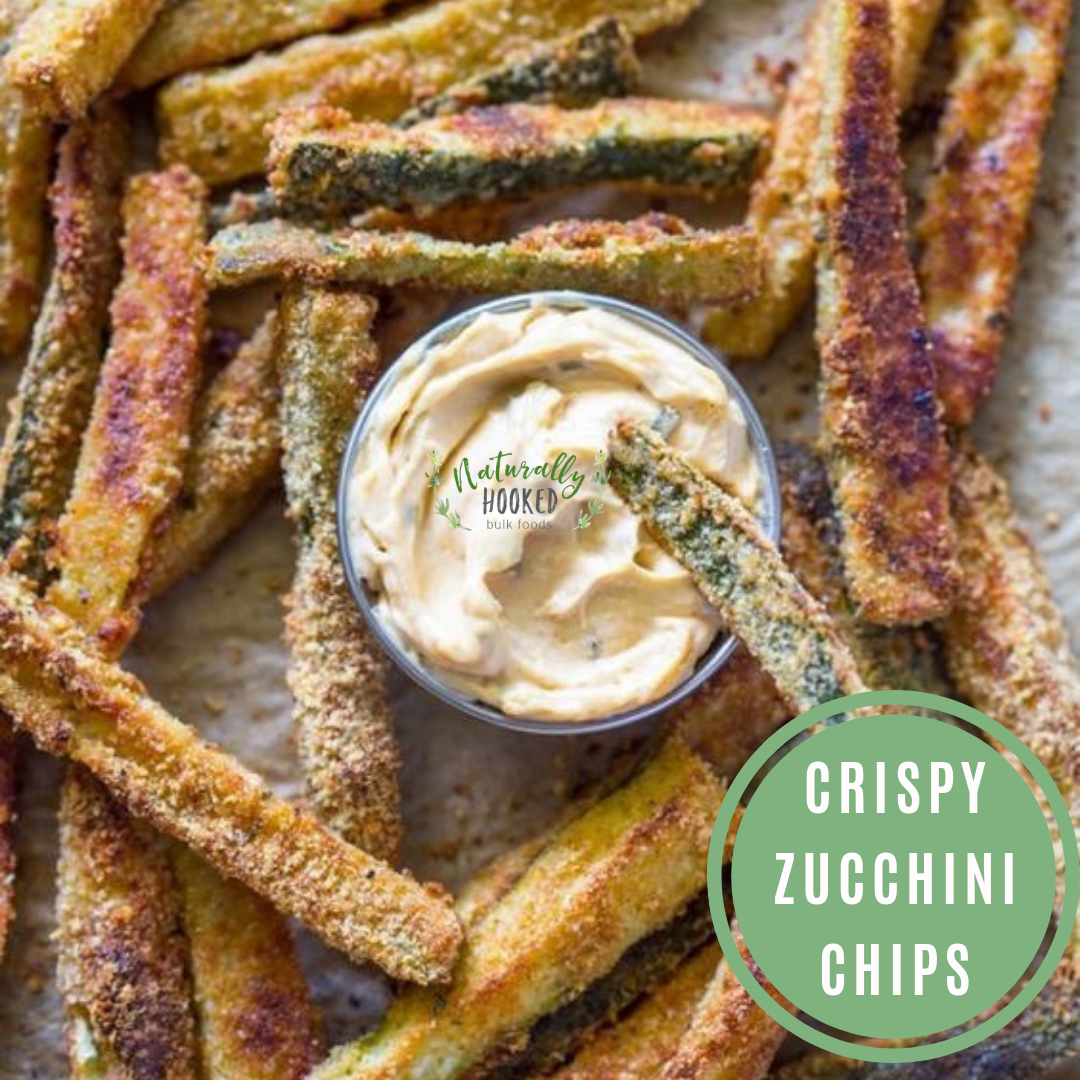
by Jason McGinn on Aug 16 2019
We love a good side dish. One thats healthy, budget friendly and family friendly makes it even better. Meet the crispy zucchini chips. Bound to impress the family and quick to make it one of the favourites.
This guy takes a little more time to make but a big enough batch to make it well worth it. Let us know what you think!
Crispy Zucchini Chips
Author: Gimmie Delicious
Serves: 4
Total time: 40 minutes
Ingredients:
3-4 large zucchini
1 cup bread crumbs panko or Italian or a mixture of both
1/4 cup grated Parmesan cheese optional
2 eggs
2 tablespoons olive oil
1/2 tsp garlic powder optional
salt and pepper to taste
Instructions:
Pre-heat oven to 220 degrees. Line a baking sheet with parchment paper and lightly grease with oil. Set aside.
Combine 2 eggs in a small shallow bowl and set aside. Combine the breadcrumbs and parmesan cheese in another bowl and set aside. Prepare zucchini by trimming the ends and cutting into 1/2 inch strips or slices.
Dip zucchini strips into egg mixture then in the breadcrumb mixture and transfer to pre-greased baking sheet. Repeat until all the zucchini strips are coated with egg and breadcrumbs.
Seasoning with salt, pepper and garlic powder then drizzle with olive oil or generously spray with cooking spray.
Bake in the preheated oven, turning once, until golden and crisp, 30 to 35 minutes or until golden and crispy. Enjoy hot with your favourite sauce!
Recipes
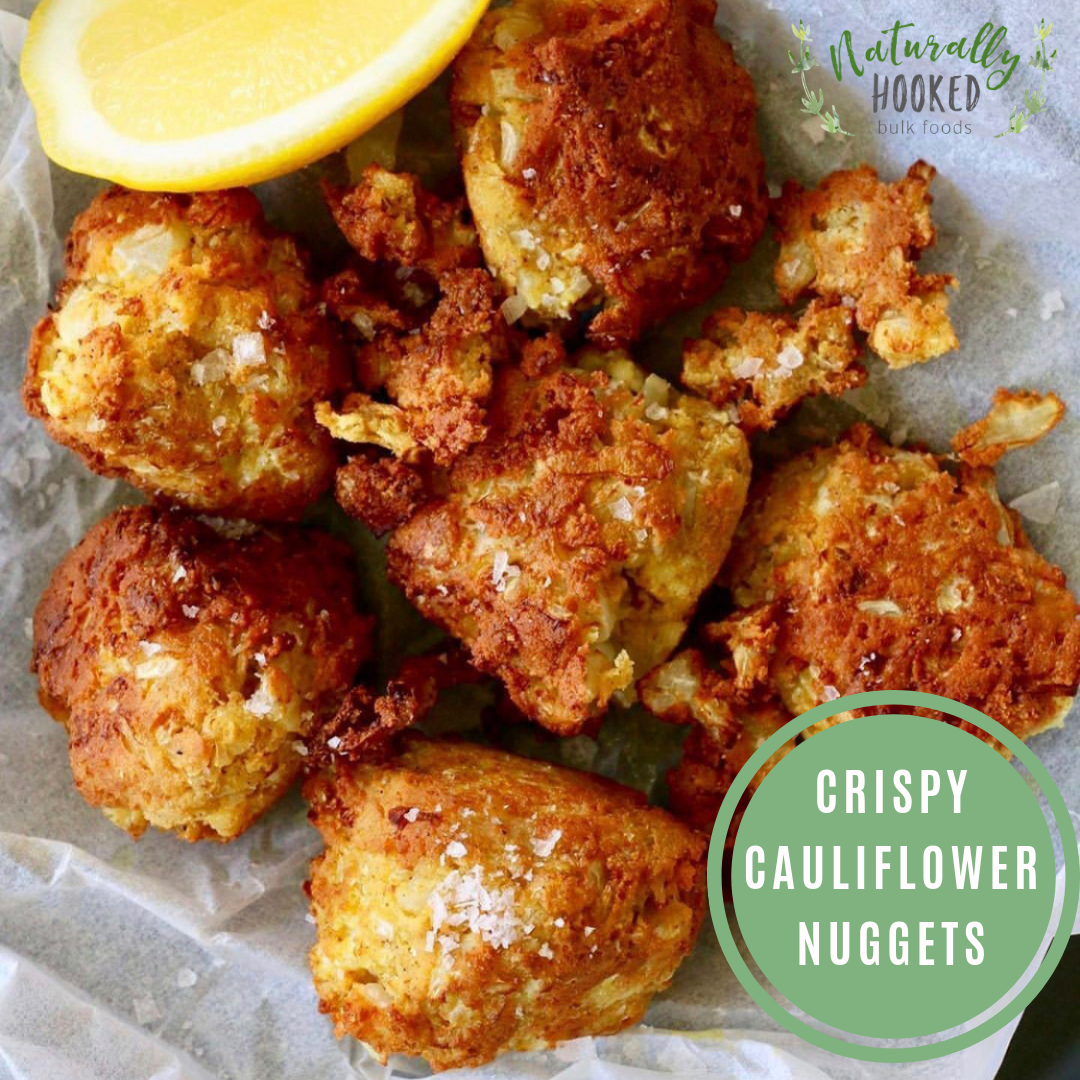
by Jason McGinn on Aug 12 2019
All hail the cauliflower! What a comeback this veggie has made in the last few years. It’s like the coconut oil of the vegetable world, what can’t it do?
This recipe ticks all the boxes for those craving something a bit crispy & savory and for those with little fussy mouths to feed. Easy, quick & dairy free and gluten free.
You’ll love these guys!! Enjoy xx
Crispy Cauliflower Nuggets
Author: Luke Hines Healthy Cook
Ingredients:
2 cups of cauliflower rice
2 free-range eggs, whisked
1 tablespoon of curry spice mix
2 tablespoons of coconut flour
1/2 teaspoon of baking powder
1/2 cup of coconut oil for shallow frying
Fresh lemon to serve
Drizzle of extra virgin avocado oil to serve
Salt to season
Instructions:
In a bowl, combine your cauliflower rice, eggs, curry spice mix, coconut flour, baking powder & salt to season. Mix until it becomes a thick paste. If your mixture is too wet, add some more coconut flour so it holds together. If it’s too thick, add another egg. The mixture is perfect if you can roll it into small clusters.
Using your hands, roll the mixture into evenly sized, ping pong like balls. Preheat pan to medium-high and add enough coconut oil to shallow fry.
Shallow fry your nuggets, turning every 2-3 minutes, until golden brown on the outside and soft on the inside. Remove from heat, squeeze lemon, drizzle with avocado oil and serve with aioli if desired. Yum!!
Recipes
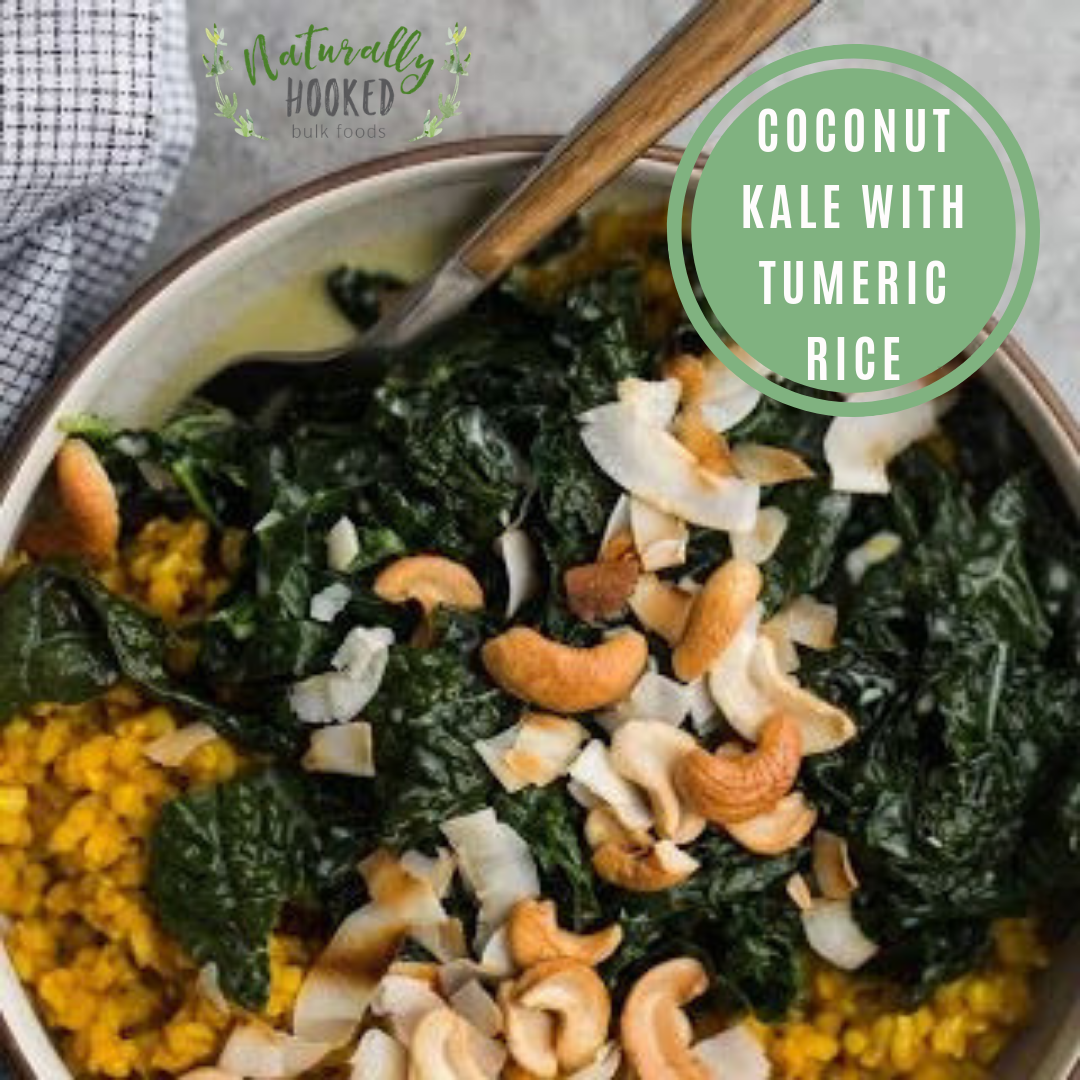
Coconut Kale with Tumeric Rice
by Jason McGinn on Aug 04 2019
Hello, Monday! We love Meatless Monday’s around here. It’s a day to get creative yet keep it simple. This side dish is so healthy yet so delicious. Impress your guests, feed your family or make a batch for you lunches for the week. Your body will thank you!
Coconut Kale with Tumeric Rice
Author: Naturally Ella
Ingredients:
2 teaspoons olive oil
1/4 cup yellow onion (minced)
2 teaspoons minced ginger
1 cup brown rice (short grain)
1 teaspoon turmeric
1 1/2 cups vegetable broth
1/4 teaspoon salt (if needed)
1 bunch of kale
1 tablespoon olive oil
4 cloves garlic (minced)
1/2 cup vegetable broth
3/4 cup full fat coconut milk
salt
toasted cashews (for topping)
coconut flakes (Toasted, for topping)
Instructions:
Heat a medium sized pot over medium-low heat. Add the onion and cook for 4 to 5 minutes, until the onions are translucent and fragrant. Stir in the ginger, cooking for one minute. Next, add in the rice and turmeric, toasting for one more minute. Measure in 1 1/2 cups vegetable broth and bring mixture to a boil, reduce to a simmer, cover, and let cook for 35 to 40 minutes, until the majority of liquid has been absorbed. Remove from heat and allow to sit for 10 minutes.
Prepare the kale by removing the stems and cutting the leaves into 1/4 inch strips. Towards the end of the rice being ready, heat 1 tablespoon of olive oil in a large, wide pot. Add in the garlic, cooking for roughly a minute. Add the chopped kale and stir to coat with the garlic. Add in 1/2 cup vegetable broth, cover, and let kale cook for 5 minutes, stirring occasionally.
Add in the coconut milk and continue to cook greens until tender, roughly 3 to 5 minutes more. Taste and add salt as needed.
Serve greens over a large scoop of turmeric rice and top with toasted cashews and coconut.