Recipes
Recipes
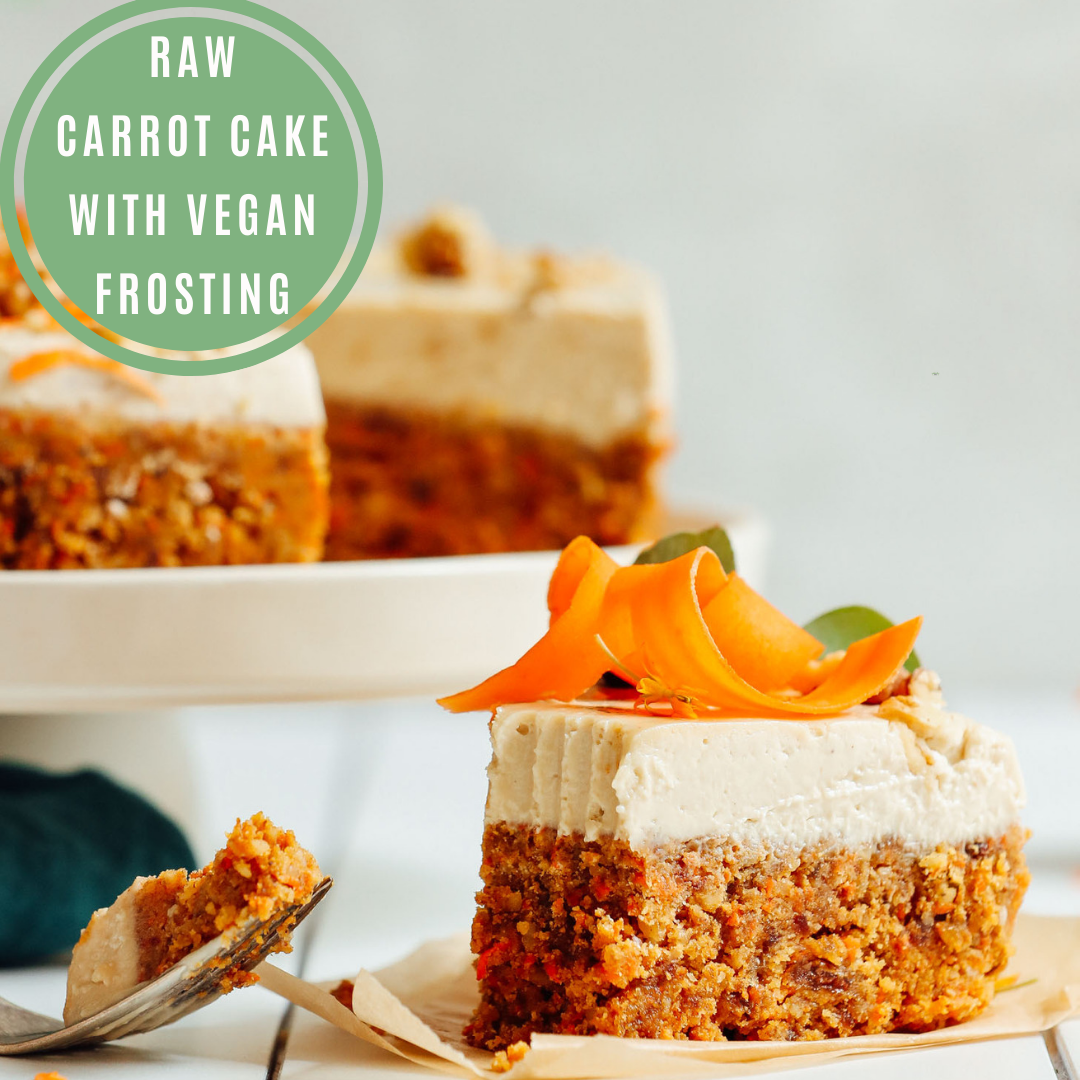
Raw Carrot Cake with Vegan Frosting
by Laurie Deans on Oct 12 2020
Oh carrot cake, what a deliciously sweet & spicy cake. Its a classic cake that nearly everyone has ‘the perfect recipe’ for. And now we have the PERFECT raw recipe.
This recipe consists of some pantry staples so you might even be able to whip this baby up tonight!
Raw Carrot Cake with Vegan Frosting
Author: www.minamlistbaker.com
FROSTING (optional)
1 1/4 cup raw cashews
1/2 cup coconut cream or full-fat coconut milk
2 Tbsp lemon juice
3 Tbsp maple syrup
1 tsp vanilla extract
CAKE
2 cups finely shredded carrots
2 cups packed pitted medjool dates (measured after pits removed)
2 1/2 cups raw walnuts
2 tsp vanilla extract
¼ tsp sea salt
1 1/4 tsp ground cinnamon
3/4 tsp ground ginger
1 pinch nutmeg
1/2 cup coconut flour
1/4 cup raisins
Instructions:
1.If making the frosting (optional), soak the cashews in hot water for 30 minutes - 1 hour. Then rinse and drain. Add to a high-speed blender along with coconut cream, lemon juice, maple syrup, and vanilla and blend on high until very creamy and smooth scraping side as needed. Cover and refrigerate to chill.
2. Using a box grater or the grater attachment on your food processor, grate the carrots and set aside.
3. To a large (at least 7-cup) food processor, add the pitted dates and blend until small bits remain or a ball forms. Remove from food processor and set aside. (Smaller food processors can be used - the ingredients just need to be blended in batches as to not overflow the bowl.
4. To the food processor, add the walnuts, vanilla, salt, and spices. Blend until a semi-fine meal is achieved. Then add dates back in, along with shredded carrots, and pulse in 1-second measurements until a loose dough forms and the carrots are just incorporated. Be careful not to over-blend. You're looking for a pliable dough, not a purée.
5. Transfer mixture to a large mixing bowl. Add coconut flour and raisins and stir to combine. By mixing gently as opposed to blending in a food processor, you can keep a lighter, less dense, more "cake-like" texture. Once well combined, set aside.
6. Prepare a 7-9 inch springform pan (or large cake pan or an 8x8-baking dish with high edges) by adding parchment paper along the bottom and sides. Then add the cake mixture, and spread and press down evenly to pack. Use a flat-bottomed object, such as a drinking glass, to help press everything into an even layer. If the mixture sticks to the glass, wrap it in parchment paper. (NOTE: You could also scoop and roll these into balls to enjoy as cake bites!
7. At this point, you can enjoy the cake by carefully lifting or sliding the cake out of its pan. However, if adding the frosting, pour the frosting on and tap out any air bubbles. Then place on a baking sheet (to keep level) and freeze for 3-4 hours or until the frosting is semi-firm to the touch.
8. To serve, make sure the cake isn't fully frozen so it's soft enough to cut (letting it thaw on the counter for 30 minutes should help). Then use a hot knife to carefully cut out slices and enjoy. Garnish with more nuts, raisins, or other desired toppings (all optional).
9. Store leftovers covered in the refrigerator up to 1 week or in the freezer up to 1 month. It's best enjoy slightly chilled (not frozen). You can let it sit out at room temperature up to 2 hours, but the frosting can begin to get soft.
Recipes
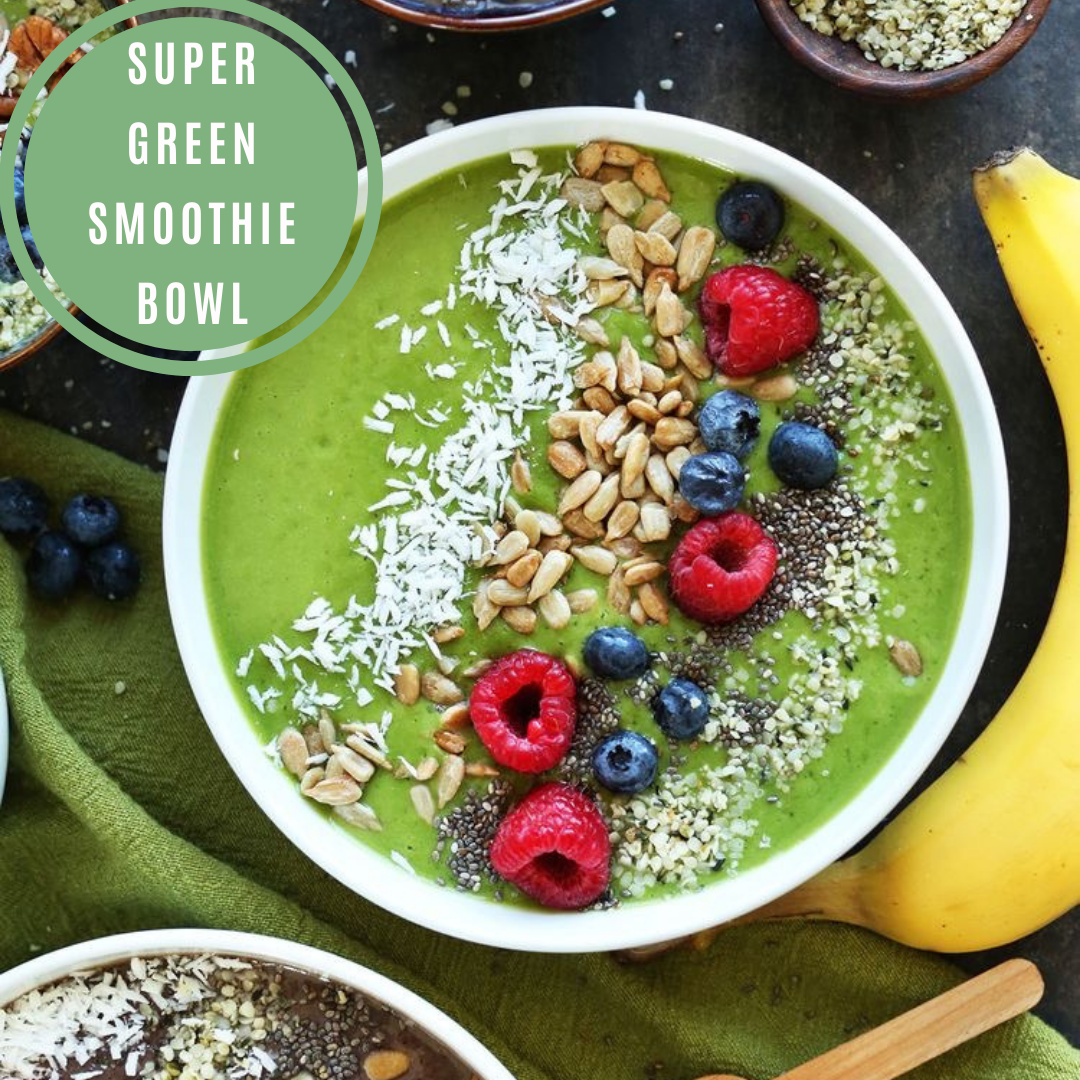
by Laurie Deans on Oct 05 2020
Spring has sprung and we're craving cool, fresh, nourishing & refreshing foods. A green smoothie bowl ticks all of our boxes!
Full of protein, healthy fats, vitamins, minerals, antioxidants, fibre and more. Its refreshing and a great way to start your day, for lunch, a pick me up or even a treat to end the day.
This recipe is low in sugar and high in all of the good stuff.
Super Green Smoothie Bowl
Author: Minimalist Baker
Serves 2
Ingredients:
1/4 ripe avocado
2 medium ripe bananas
1 cup fresh or frozen mixed berries
2 large handfuls spinach
1 small handful kale
1 1/2 - 2 cups unsweetened non-dairy milk
1 Tbsp flaxseed meal
2 Tbsp salted creamy almond or peanut butter (optional)
Instructions:
Add all smoothie ingredients to a blender and blend until creamy and smooth. Add more almond milk (or water) to thin.
Taste and adjust flavor as needed, adding more ripe banana (or maple syrup) for added sweetness, more spinach for a bright green hue, or almond milk for creaminess.
For the green smoothie, I used strawberries, which let the green color come through more. For the purple bowl, I used darker berries (raspberries, blackberries, blueberries).
For more protein, add nut butter! This also offsets / enhances the natural sweetness of the smoothie.
Divide between 2 serving bowls and top with desired toppings!
Best when fresh, though leftovers can be kept in jars in the fridge for up to 1-2 days.
Recipes
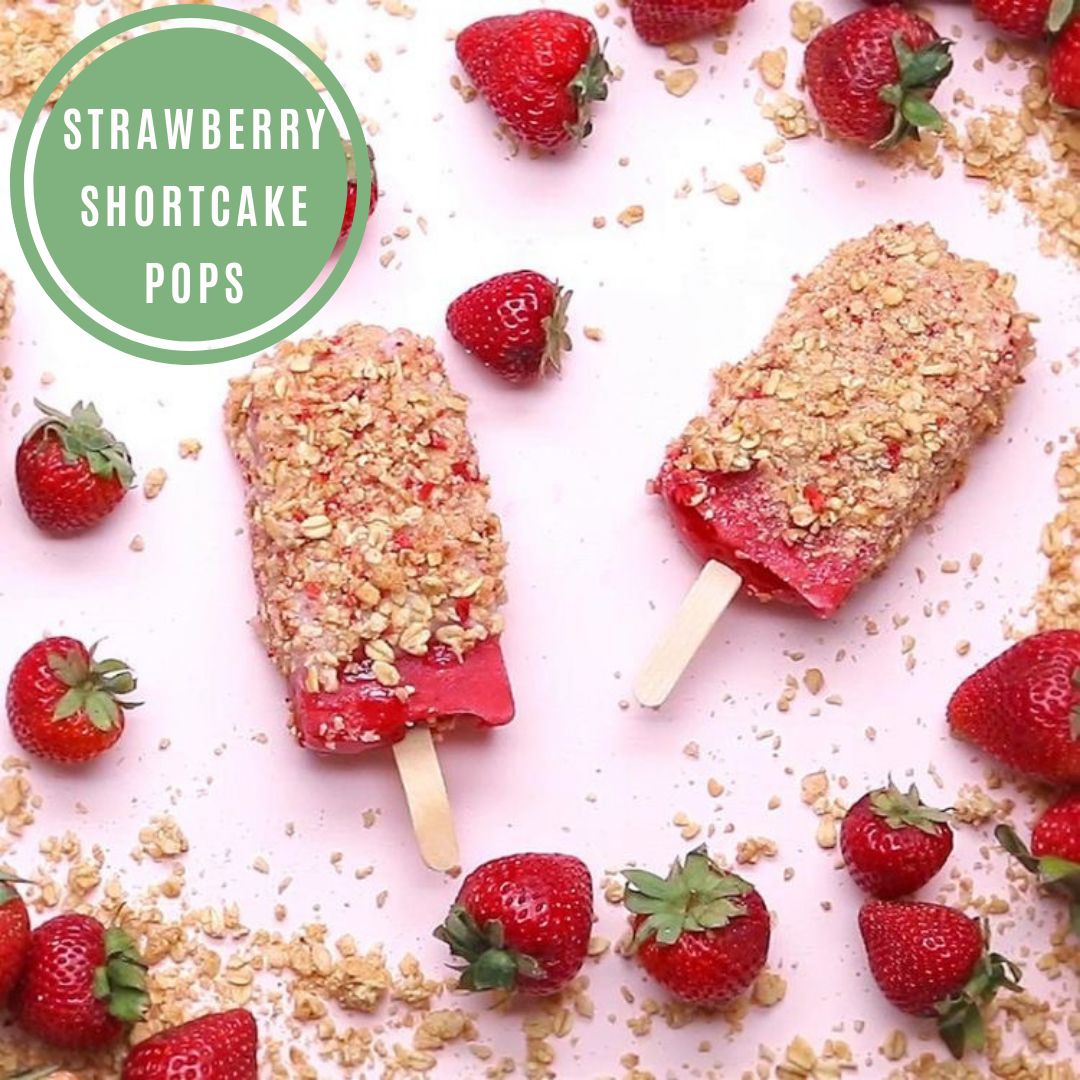
by Laurie Deans on Sep 26 2020
The end of strawberry season certainly has its perks. They're extremely cheap, ready to eat and you can find them anywhere. The only downfall is that they often need to be eaten straight away before one bad strawberry ruins the bunch.
So what can we do with them? Plenty. But given its also school holidays and the heat has arrived early, lets make a delicious frozen treat. The kids will be stocked, so will your bank account and you'll love them too!
Healthy and full of healthy fats to keep you and them full. We're onto a winner here.
Have a fabulous week!
Strawberry Shortcake Pops
Author: John Gara @ Tasty Team
Ingredients:
2 cups strawberry(300 g), stemmed and hulled
1 cup coconut milk(240 mL), sweetened
¼ cup lemon juice(60 mL)
2 tablespoons agave nectar
2 cups dairy-free vanilla yogurt(490 g), for garnish, optional
granola, with freeze-dried strawberry pieces, for garnish, optional
Instructions:
Add the strawberries, coconut milk, lemon juice, and agave nectar to a blender and blend until smooth.
Pour the blended mixture into the ice pop mold.
Freeze until solid, 2-3 hours.
If desired, dip the frozen pops in yogurt, then roll the coated pops in the granola. Place the pops on a parchment paper-lined plate and freeze again for 30 minutes.
The pops will keep in the freezer for up to 6 months in an airtight container.
Enjoy!

Recipes
Mint & Chocolate Cheesecake Bites
by Laurie Deans on Sep 21 2020
Spring has sprung and we're now craving cold, refreshing foods...especially desserts! These raw, vegan cheesecake bites are just that and more.
They're sweet, refreshing, cool and just so delicious. A clean treat that you will love, your guests will love and so will the kids. With the healthy fats on board, they make the perfect after dinner treat. Sure to please the pallet and keep you satisfied. The biggest challenge is stopping at just one!
Mint & Chocolate Cheesecake Bites
Author: Kat at The Loopy Whisk
Ingredients:
For chocolate cups:
1/3 cup melted coconut oil
pinch of salt
1/4 cup maple syrup
1/2 cup + 2 tbsp cocoa powder
For mint "cheesecake" filling:
2 cups cashews soaked in 3 cups of water for at least 2 hours and drained
1/2 cup melted coconut oil
1/2 cup maple syrup
3 tbsp lemon juice
pinch of salt
1/2 cup packed mint leaves (leaves from about 15 to 20 sprigs of mint) (Note 1)
1/2 tsp spirulina (optional, for colour)
1/2 tsp wheatgrass powder (optional, for colour)
Instructions:
For chocolate cups:
Combine all chocolate cups ingredients in a bowl and whisk until you obtain a smooth mixture with the consistency of melted chocolate.
Leave to cool until only slightly warm.
Spoon about 2 tbsp of the mixture into a cupcake case and swirl it around so that the whole case is coated. You might need to swirl the mixture around several times, especially along the cupcake walls (can take a few minutes per chocolate cup).
When sufficiently coated, turn the cupcake case on its head above the bowl and let the excess chocolate drip into the bowl.
After all cupcake cases are coated, place them onto a tray and freeze for at least 1/2 hour.
For mint "cheesecake" filling:
Combine all mint "cheesecake" filling ingredients in a blender and blend until smooth.
Transfer the mixture into a piping bag and pipe into the frozen chocolate cups, until each cup is full up to its edge. (You can also use a spoon to transfer the filling into the cups.)
Freeze the vegan cheesecake bites for at least 1/2 hour.
Carefully remove the cupcake cases. I've found it easiest to first tear away the sides and then remove the cupcake case bottom at the end. Freeze again.
Take the vegan cheesecake bites out of the freezer for at least 10 to 15 minutes before serving. Enjoy drizzled with more chocolate, with whipped coconut cream, or as they are.
The vegan cheesecake bites keep well in the freezer for up to about 2 weeks.
Recipes
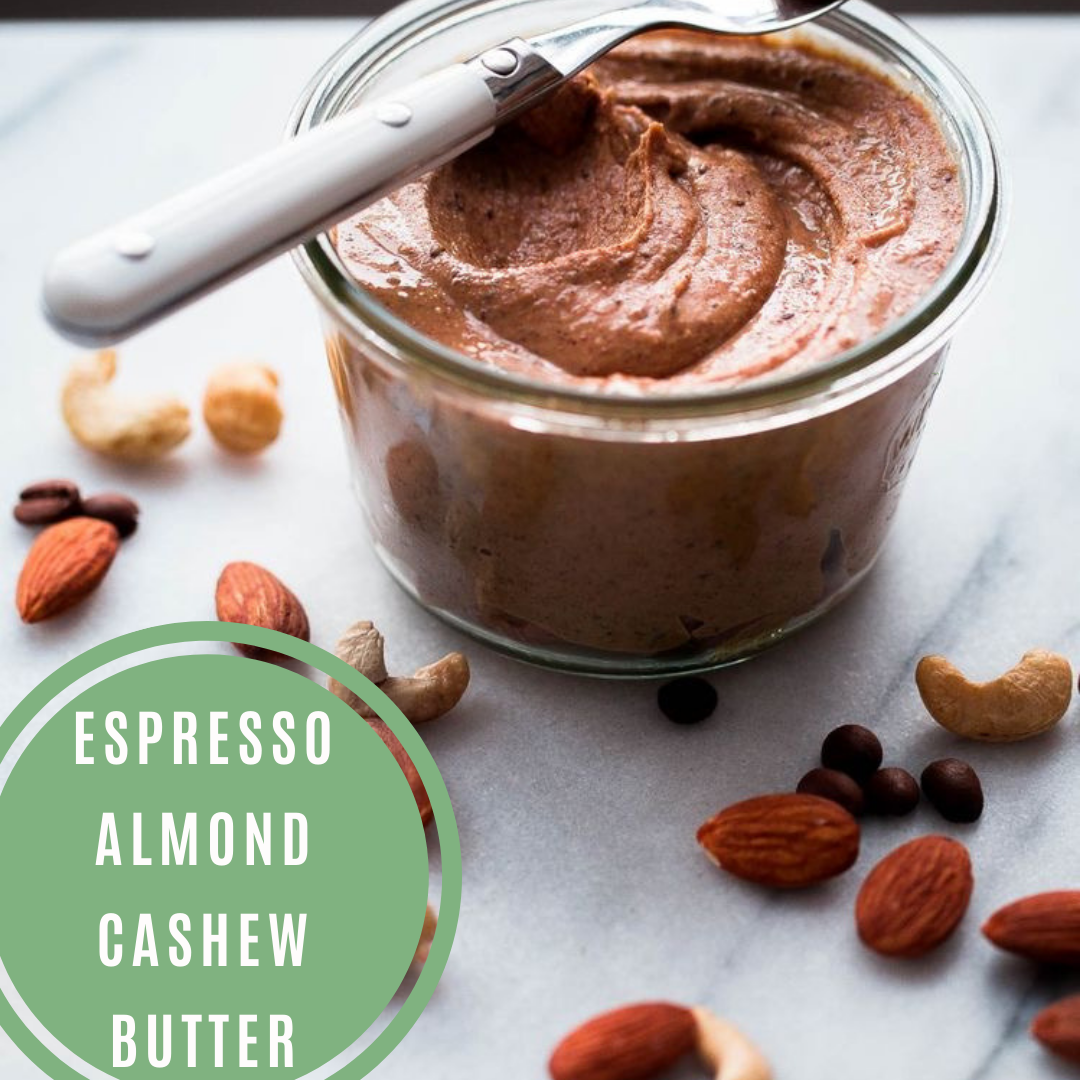
by Laurie Deans on Sep 14 2020
A delicious, creamy & healthy spread that also has caffeine? Sign me up.
This easy recipe gives a delicious twist on a traditional nut butter. Full of your healthy fats, vitamins and minerals that almonds & cashews provide PLUS a delicious twist.
Imagine spreading this tasty little number on your morning toast, on fruit, yogurt, in your smoothie or in your baking. What an all rounder!
Its also easy and yields a great batch. Enjoy!
Espresso Almond Cashew Butter
Author: Laura @ www.abeautifulplate.com
Ingredients:
1 cup (150 grams) raw whole almonds
1 cup (150 grams) raw whole cashews
1 tablespoon whole espresso beans
1 teaspoon vanilla bean paste (or pure vanilla extract)
1/2 teaspoon salt
1 teaspoon pure dark maple syrup (optional)
Instructions:
Preheat the oven 176 degrees with a rack positioned in the center. Spread the almonds and cashews evenly on a half sheet pan. Toast for 10 – 12 minutes, tossing them halfway through, or until the nuts are lightly golden and fragrant.
Allow the nuts to cool for 1 to 2 minutes and then transfer them to a large food processor bowl fitted with a blade attachment. Add the espresso beans. If you have a high-powered blender you can use this instead of a food processor.
Process the nut/espresso mixture until it is coarse and clumpy. Once it clumps, it will form a ball and quickly begin to become smooth. Scrape down the bowl with a spatula every few minutes. Continue processing until the nuts release all of their oils and the butter is loose, smooth, and can easily drizzle from the end of a spoon. Depending on the power of your food processor, this process may take 5 to 15 minutes total.
Add the vanilla bean paste (or vanilla extract), salt, and maple syrup (if using) and process for an additional 30 seconds. Transfer the nut butter to a small glass container, cover, and refrigerate for up to 3 weeks.
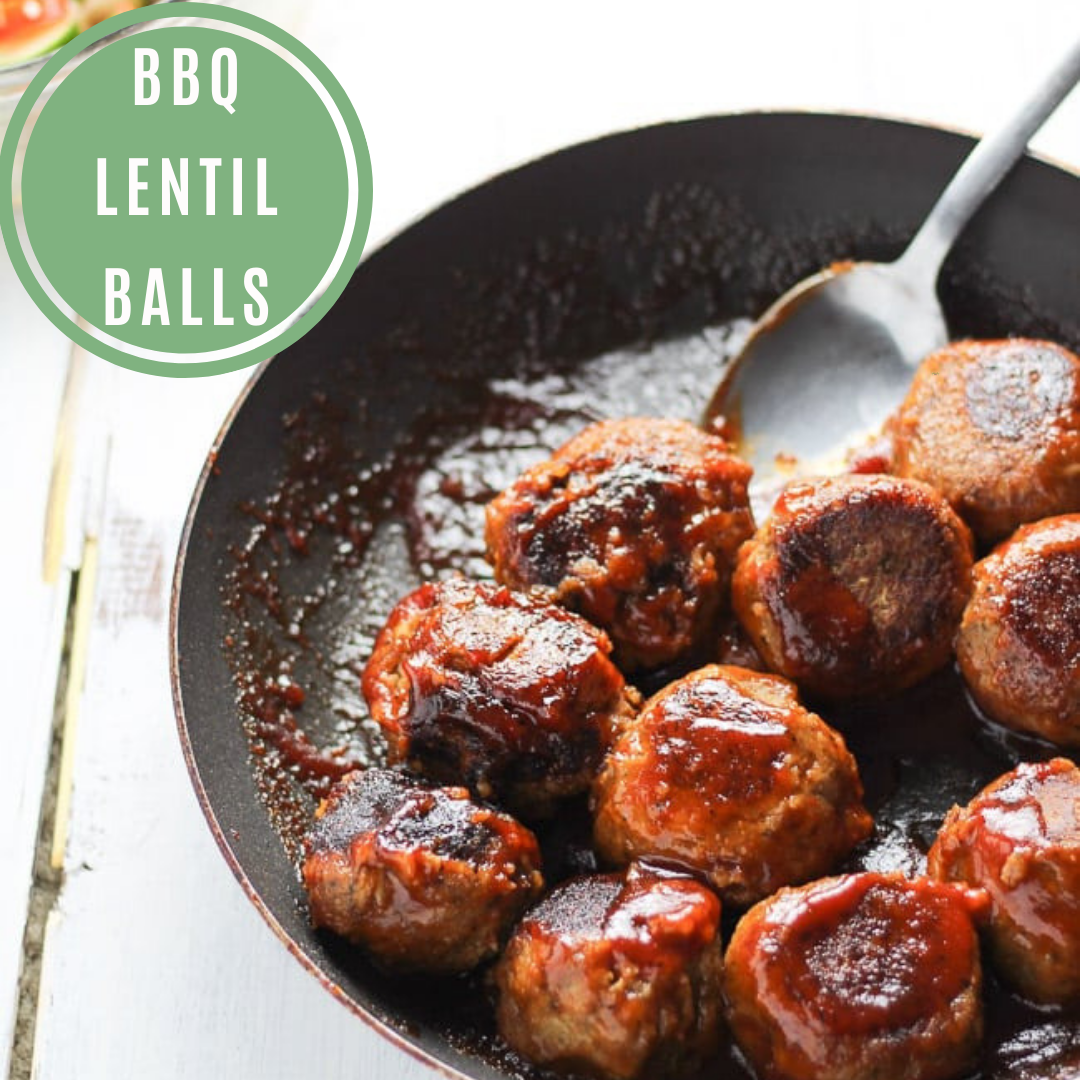
Recipes
by Laurie Deans on Sep 07 2020
We're BBQ sauce lovers around here. Adding that sauce to anything pretty much makes it delicious! Especially for the fussier eaters around our house.
Sauce = satisfied.
This BBQ lentil ball recipe is a great fit. Can be added to salads, noodles, as a starter and even just fantastic as a snack.
They're extremely filling, have protein, fibre and other good stuff on board! Easy enough to make and they yield a big batch. So go on, make these guys tomorrow!
BBQ Lentil Balls
Author: Gina Marie
Ingredients:
1 tablespoon vegan butter
2 tablespoon olive oil, divided
½ medium onion, chopped
2 cups sliced mushrooms (16-ounce package)
2 cups of cooked lentils, divided note 4
1 cup cooked brown rice note 3
½ teaspoon sea salt
¼ teaspoon garlic powder
1 teaspoon dried basil
⅔ cup instant oats
½ cup breadcrumbs
handful parsley and cilantro
2 tablespoons vegan worcestershire
¼ cup Vegan BBQ Sauce
½ – 1 cup extra Vegan BBQ Sauce tablespoon olive oil, divided
Instructions:
Add vegan butter and 1 tablespoon of olive oil to a large pan over medium-high heat. Add chopped onions and mushrooms. Cook until vegetables are fully translucent. Once cooked turn off the heat and set aside.
Take half your lentils and add to a food processor along with your cooked mushrooms and onions. Process until just combined. The mixture will be wet and sticky. It should hold and bind together without a problem.
Take your mixture and add it to a large mixing bowl. Next the other half of your lentils, cooked rice, sea salt, garlic powder, basil, instant oats, breadcrumbs, parsley, cilantro, vegan worcestershire, bbq sauce, and liquid smoke. Mix together until fully combined.
PAN FRYING INSTRUCTIONS
Start to form your lentil balls placing them in a bowl. (I use an ice cream scooper to scoop out mixture). Grab a large 15 inch cast iron pan (or whatever skillet you have on), add 1 tablespoon of olive oil over medium heat.
Once the oil is hot, place, balls in a pan and heat all the way through for about 2 minutes on each side. The lentil balls will form a caramelized coating on each side. Do not leave unattended.
Add ½ to 1 cup of Vegan BBQ Sauce to the pan and turn down the heat. Make sure you coat every lentil ball and simmer for 1 to 2 minutes.
Remove from heat and let cool for 2 minutes. Serve with your favorite sides or as a starter.
BAKING INSTRUCTIONS
Preheat oven to 180 degrees. Start to form your lentil balls placing each one on a pan lined with parchment paper. (I use an ice cream scopper to scoop out mixture).
Brush lentil meatballs with 1 tablespoon of oil (this will help them get that caramelized color as if you were pan-frying them) and extra barbecue sauce (as much as you like).
Place in the oven for about 20 minutes total. After 10 minutes, flipped them on the other side for an even cook. You can brush on an extra layer of BBQ sauce if you like and finish baking.
Once fully cooked, take out the oven and allow it to cool. Serve with your favorite sides or as a starter.
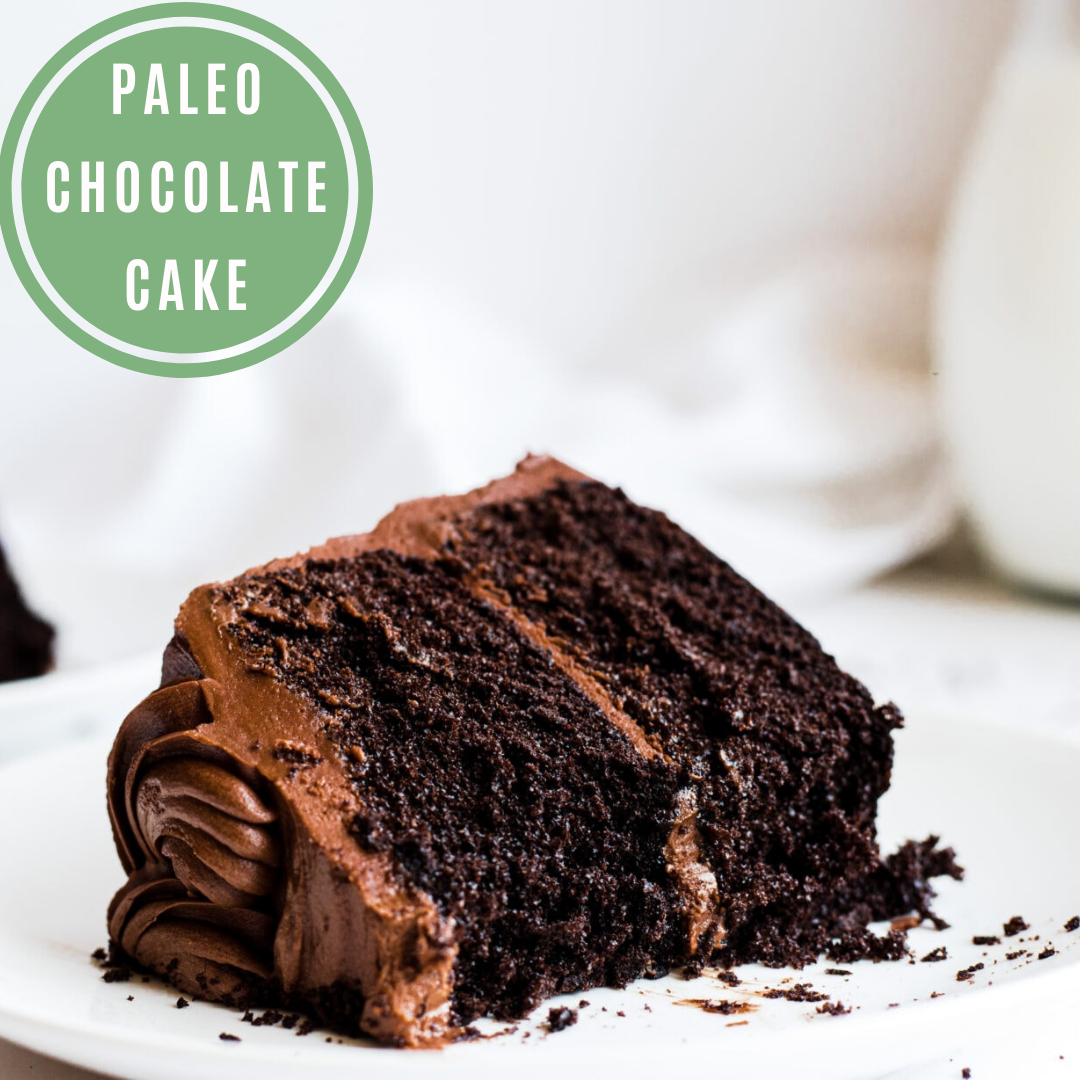
Recipes
by Laurie Deans on Aug 31 2020
Everyone loves chocolate cake. It's a staple for celebration or even for a Sunday treat. With Fathers Day just around the corner, what are you making to celebrate?
This recipe is paleo, dairy free, gluten free yet fudgey and delicious! Its a must try for your family and one I think you'll go back to time and time again. No need to sacrifice texture and flavour here!
Paleo Chocolate Cake
Author: Adrian Harlan
Ingredients:
Cake:
3 cups blanched almond flour
1/4 cup coconut flour
3/4 cup raw cacao powder
1/2 cup unrefined coconut sugar
2 teaspoons baking soda
1 teaspoon fine Himalayan salt
1/2 cup coconut oil, melted
1 cup full-fat coconut milk
3 large eggs, room temperature
2 teaspoons vanilla extract
2 tablespoons raw honey
Middle Layer:
380g can full-fat coconut milk
2 tablespoons raw honey
4 tablespoons raw cacao powder
1/2 teaspoon vanilla extract
Chocolate Frosting:
6 tablespoons full-fat coconut milk
3/4 cup semisweet mini chocolate chips, dairy/soy-free brand
Instructions:
Cake:
Preheat oven at 175 degrees. Grease the bottom and sides of a 7-inch springform pan with coconut oil and line the bottom with parchment paper.
In a large bowl, mix together the almond flour, coconut flour, cacao powder, coconut sugar, baking soda and salt.
In a separate bowl, whisk together the coconut oil, coconut milk, eggs, vanilla and honey.
Using a rubber spatula, gently mix dry ingredients into wet ingredients to form a batter. Do not over mix.
Pour batter into prepared pan and bake until a toothpick inserted into the center comes out clean, approximately 45-50 minutes. If you feel you need to cook it longer, cover cake with aluminum foil to prevent burning the top and lower the heat to 160 degrees. Cook until toothpick comes out clean.
Let cake cool completely then cut horizontally in the middle.
Spread the chocolate ganache over the bottom half of the cake and refrigerate for 30 minutes.
Top with other half of cake, then spread the chocolate frosting over the top and sides of the cake.
Sprinkle top with shaved dark chocolate if desired.
Middle Layer Chocolate Ganache:
In a medium saucepan, bring the coconut milk and honey to a light boil.
Simmer on low heat for two hours, stirring occasionally. Do not cover the pan. You will know you cooked it long enough when the coconut milk is reduced to half and has a thicker consistency and darker color, similar to sweetened condensed milk.
Mix in the raw cacao powder and vanilla extract and stir until all is combined and smooth.
Let it cool and refrigerate until cake is ready.
Chocolate Frosting:
Melt the chocolate chips in a bowl over simmering water (double boiler).
Mix coconut milk with melted chocolate until all is combined and smooth.
Let cool for 5 minutes before icing the cake.
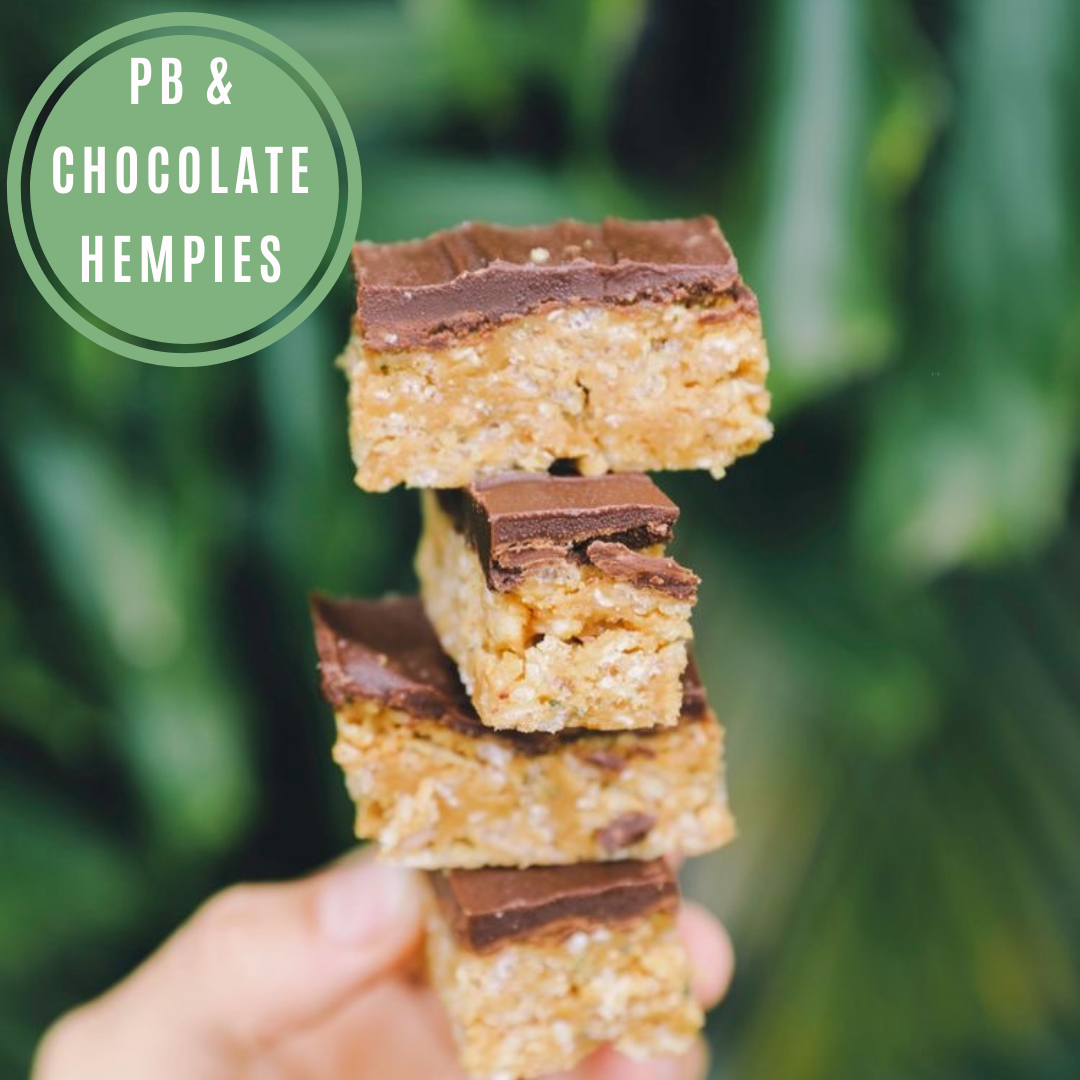
Recipes
by Laurie Deans on Aug 23 2020
Well don’t these look delicious!
We love a great raw recipe that packs in some nutrients along with the flavor. These are no exception. A crowd pleaser and they tick our most important boxes
Quick & easy
Healthy fats on board
Added in the super health benefits of hemp seeds
Super delicious
This one will be a regular in your house, if you can keep them around long enough!
PB & Chocolate Hempies
Author: www.earthyany.com
Ingredients:
BOTTOM
INGREDIENTS
1 1/2 cup smooth natural peanut butter (a good tasting one)
1/3 cup maple syrup
1 tsp vanilla
1/3 cup hemp seeds
3 cups Rice Puffs
TOP
1 1/2 cup vegan chocolate chips
1 round tablespoon peanut butter
Instructions:
Mix peanut butter, vanilla and maple syrup until smooth and then add and mix in hemp seed and Rice Krispies.
Pat into a grease or lined pan.
Melt chocolate and peanut butter together and pour on top and spread evenly.
Put in freeze for 30 min!
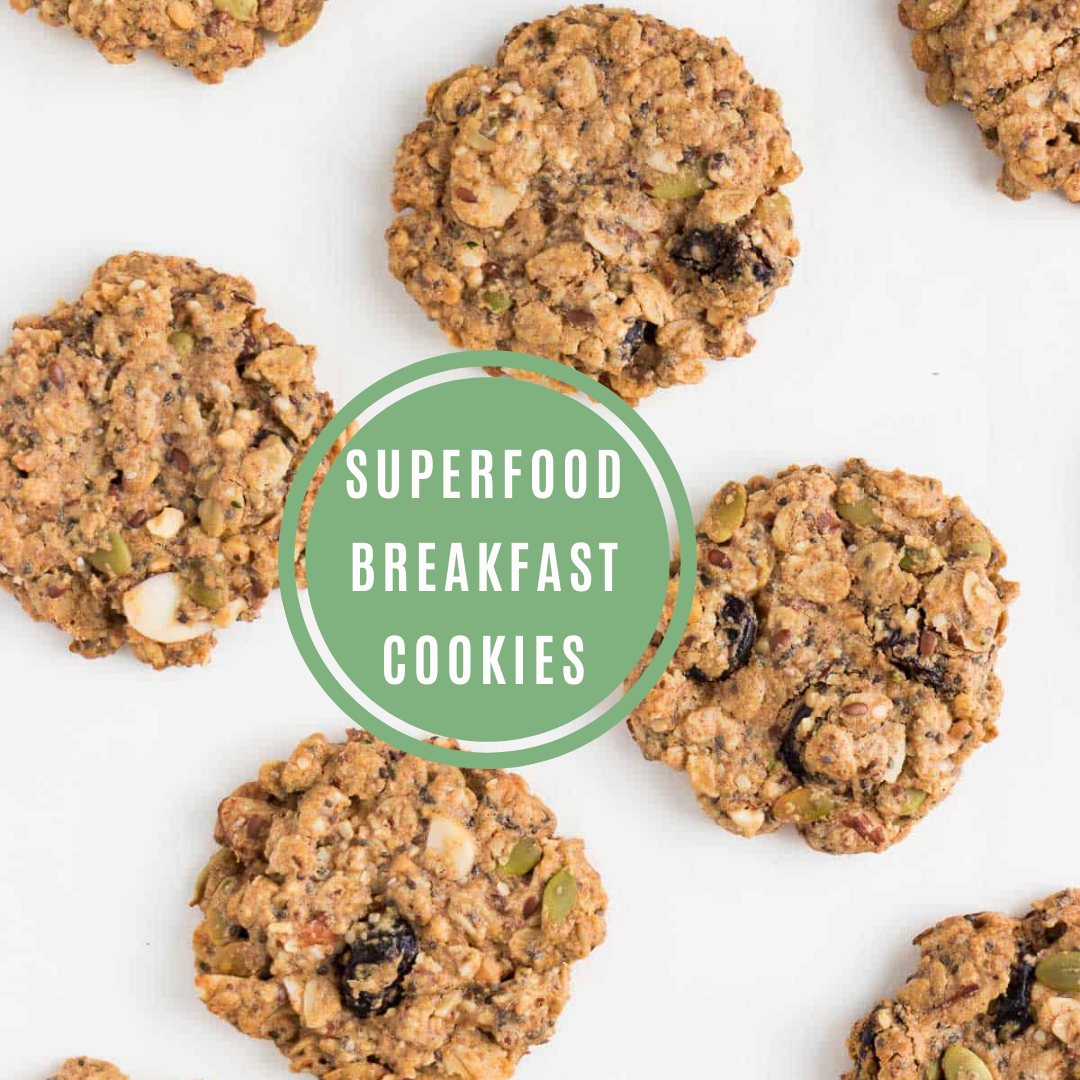
Recipes
by Laurie Deans on Aug 10 2020
There isn't much I love more than a clean recipe, loaded with protein, fat & nutrients that's perfect for a quick breakfast and a snack. This one ticks all of those boxes.
As we know, breakfast is the most important meal of the day. It sets you and your metabolism up for the day so you're off and running. But life gets in the way. If you have little people to manage in the mornings, then even more so. We often get everyone and everything else ready before ourselves, then we're late and our needs become an afterthought.
This recipe has you covered. Easy to transport, will keep your tummy full and is even kid friendly!
Have a fabulous week!
Superfood Breakfast Cookies
Author: www.purelykaylie.com
Ingredients:
1 cup rolled oats
1/2 cup oat flour
1/4 cup pepitas
1/4 cup sliced almonds
1/4 cup dried cranberries
2 tbsp hemp seeds
2 tbsp chia seeds
2 tbsp flaxseed meal (ground flaxseed)
1 tsp ground cinnamon
1 tsp baking powder
1/4 tsp salt
1/2 cup nut butter (almond, peanut, cashew, sunflower)
1/3 cup maple syrup
3 tbsp melted coconut oil*
1/2 tsp vanilla extract
Instructions:
Preheat the oven to 175 degrees C. Line a baking sheet with parchment paper.
Combine rolled oats, oat flour, pumpkin seeds, sliced almonds, dried cranberries, hemp seeds, chia seeds, flaxseed meal, ground cinnamon, baking powder, and salt in a large bowl. Mix together.
In a separate bowl, add nut butter, maple syrup, melted coconut oil, and vanilla extract. Whisk together until evenly combined.
Pour wet ingredients into the dry ingredients. Mix together.
Scoop cookie dough into 12 balls and place on the baking sheet. Press each ball into flat cookies.
Bake for 15-20 minutes or until the edges begin to golden. Remove from oven and cool. Enjoy with a cold glass of almond milk!
Recipes
by Laurie Deans on Aug 03 2020
This one is for the kids, big ones and small ones!
A big hit in our household. It feels like a naughty dinner yet its loaded with veggies, fibre, protein and topped with a lime 'creamy' sauce. The zest just sends this delicious recipe over the top!
Its also quite easy. The only real prep and cooking is with the fries themselves, so get some peeling helpers and you're off and running! Once the kids have had this recipe once, they'll be sure to jump in and help for the next time.
Make this one and let us know what you think!
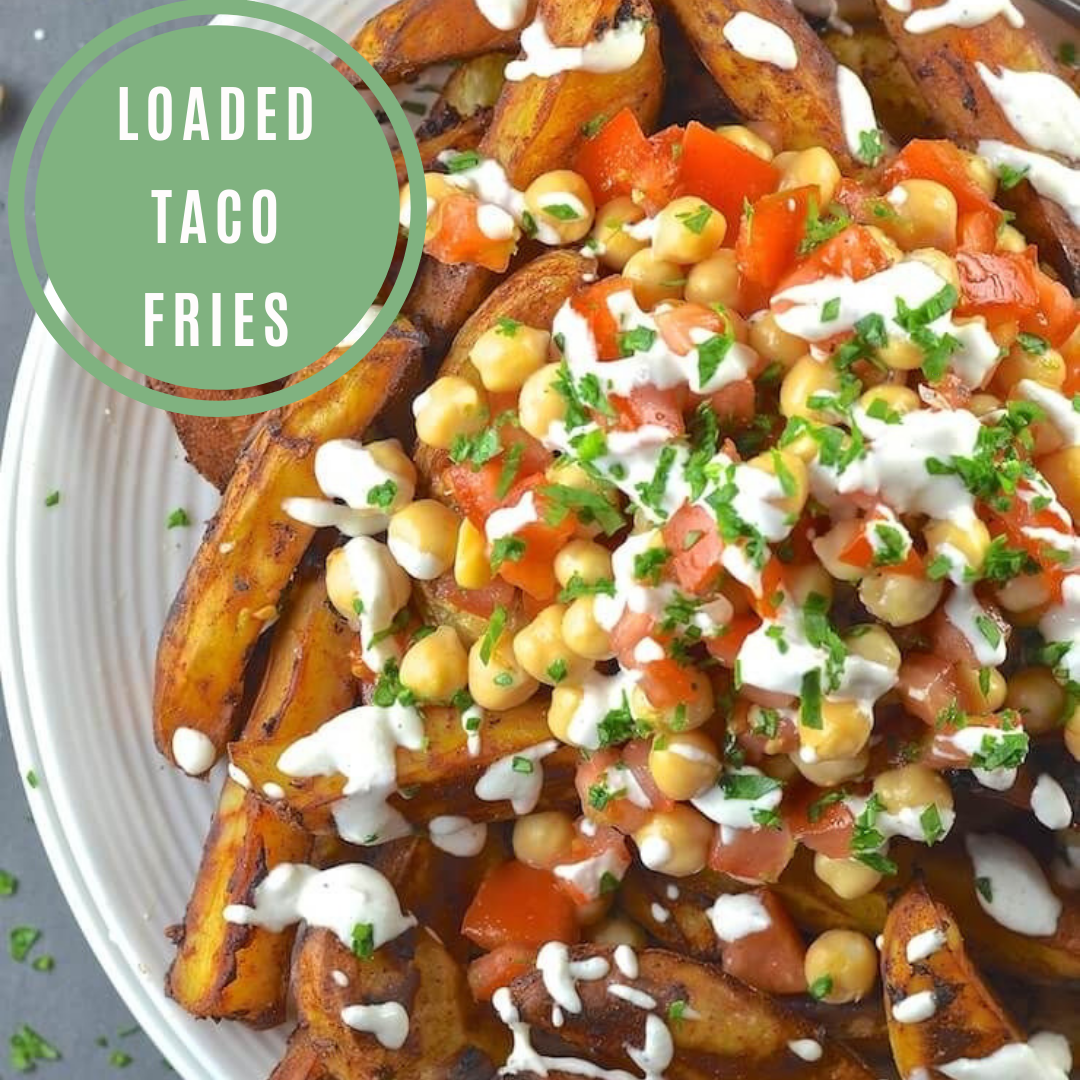
Loaded Taco Fries
Author: Melanie McDonald
Serves: 4
www.avirtualvegan.com
Ingredients:
For the Fries:
1000g of potatoes
1/2 cup of aquafaba (liquid from can of chickpeas)
3 tablespoons of taco seasoning
1 tsp of salt
For the Topping:
1 1/2 cups of chickpeas (be sure to save the liquid)
2 large juicy tomatoes
1/2 red onion chopped finely
finely grated zest from a lime
For the Lime Crema:
1/3 cup of cashews soaked in boiling water for 15-20 minutes
1/3 cup + 2 tbsp of non dairy milk
1 lime
1/2 tsp of salt
Instructions:
For the fries:
Preheat oven to 230°C
Pierce each potato with a fork then place in a microwave and cook on full power. My microwave is 1200w and I cooked my large potatoes for 4 minutes. You want them so that they have some give but aren't soft. (see recipe notes for non-microwave method)
Remove your potatoes from the microwave. Allow to cool a little bit then use a sharp knife and slice them into fries.
Place the cut fries in a bowl and pour over the aquafaba. Stir to coat then sprinkle over the taco seasoning and salt. Make sure they are all coated evenly.
Line a large baking sheet.
Gently tip the fries out onto the tray and spread them out as evenly as you can. Ideally none of them should be touching as they will cook more evenly and get browner and crispier.
Bake for 30 mins then remove from the oven, turn them all over, then bake again for another 30 minutes.
For the topping:
While the fries are cooking, put the drained chickpeas in a bowl, then add the chopped tomatoes and any juice from them, chopped onion, lime zest and juice. Stir well and leave for the flavours to infuse while the fries finish cooking.
For the Lime Crema:
Add the soaked cashews, milk and salt to a blender.
Peel the lime either by hand or with a sharp knife. Discard the peel and put the whole lime in the blender.
Blend until completely smooth.
When the fries are ready pile them on a large plate. Pour over the chickpea mixture, drizzle with the lime crema and sprinkle with chopped parsley.
Recipes
by Laurie Deans on Jul 19 2020
Its officially passionfruit season! Its one of my favourite fruits. Its sweet yet tart and very refreshing. Its also loaded with the ever important Vitamin C to assist with immune support. How perfect for winter with all of those colds & flu lingering around.
Adding passionfruit to your yogurt doesn't end your journey with the seedy fruit! Its fantastic in your baking and especially your raw treats. This recipe looks fancy and hard to master but its actually quite easy with your healthy pantry staples! Just allow yourself a little extra time.
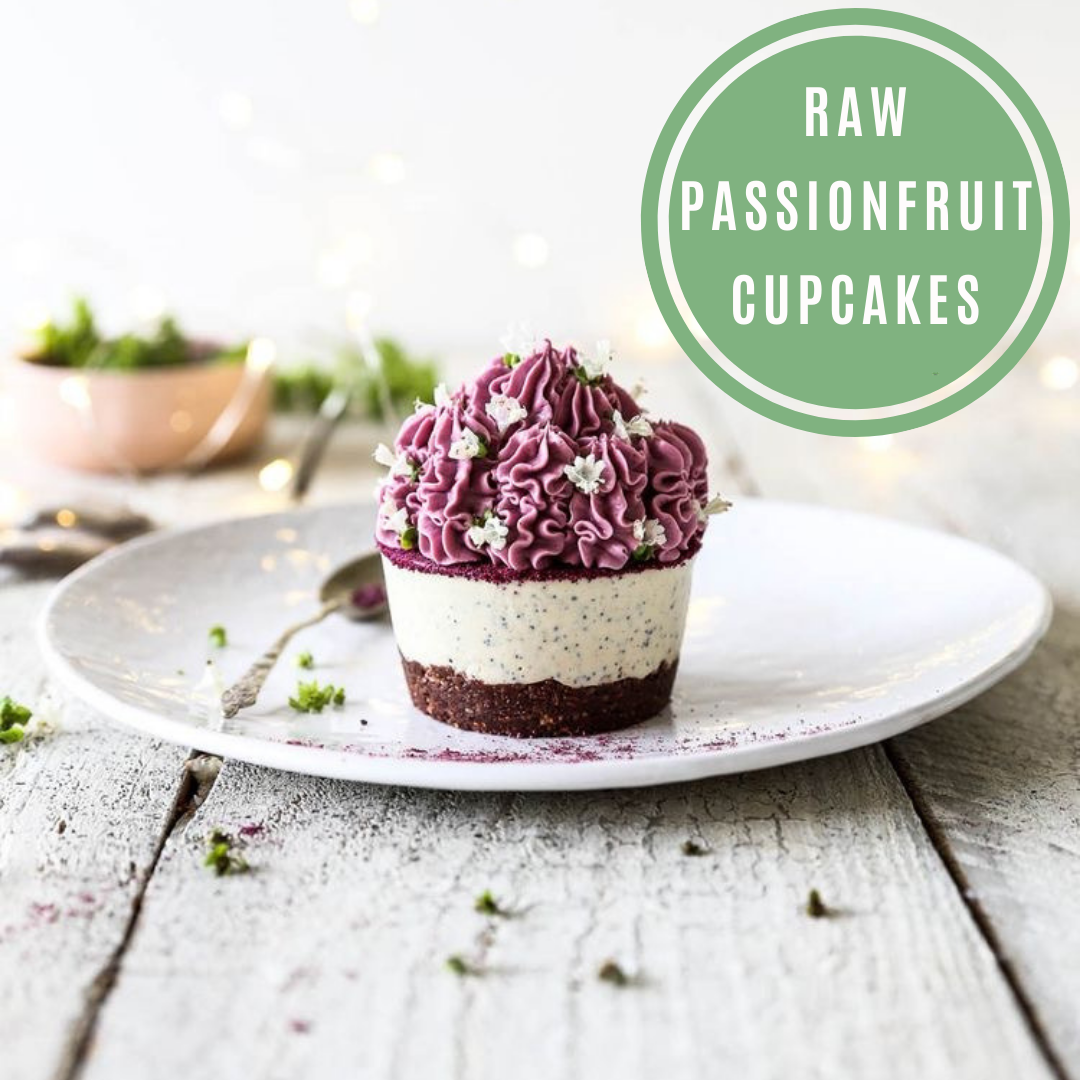
Raw Passionfruit Cupcakes
Author: www.swoonfood.com
Ingredients:
Chocolate Biscuit Base1/2 cup desiccated coconut1/2 cup raw brazil nuts4 Tbsp raw cacao powder1/2 tsp vanilla powder or essencepinch pink Himalayan salt5 medjool dates, pits removed1 Tbsp coconut oil
Passionfruit Cheesecake Filling & Frosting2 cups cashews, soaked1 cup passionfruit pulp (fresh or frozen – approx. 12 fresh passionfruit)1/2 cup coconut milk (or nut milk of choice)1/3 cup rice syrup (or pure maple syrup)2 Tbsp lemon juicepinch Himalayan pink salt1/2 cup coconut oil2 tsp pink pitaya powder (dragon fruit) to colour the frosting
DecorationSuperfood powders e.g. pitaya, rose, beetroot, blue pea, matchaFreeze dried fruits e.g. mandarin, lychee, raspberriesEdible flowers e.g. viola, pansy, lavender, chive blossom, basil blossom, rose petals
Instructions:
Prep Ahead:
Soak the cashews for the passionfruit frosting by placing them in a bowl, cover with filtered water and leave to stand for 2 to 4 hours.
Drain off the water and rinse well. This can be done ahead of time and the cashews stored in the fridge for up 2 days until needed.
Biscuit Base:
Gently melt the coconut oil by placing it in a heatproof bowl set over a pan of steaming water with the heat turned off (this ensures it doesn’t go above 46ºC and remains in it’s raw state).
Place the desiccated coconut, brazil nuts, raw cacao, vanilla and salt into a food processor and blend until the mixture resembles crumbs.
Add the dates (ensuring pits removed) and blend until well combined.
Add the melted coconut oil with the motor is running.
Press the base mixture evenly into either a 6 hole silicone cupcake mould, or 6 cling film lined holes of a standard cupcake tin.
Place in the fridge for at least half an hour to firm up.
Filling/Frosting:
Gently melt the coconut oil using the method above.
Place the soaked and drained cashews into a high speed blender with the passionfruit, coconut milk, rice syrup, lemon juice and salt. Blend until super smooth and creamy.
Add the melted coconut oil gradually through the top of the blender with the motor running until well combined and smooth.
Pour half the mixture onto the prepared bases and return to the freezer to set.
Add the pink pitaya powder to the remainder of the filling mix until you reach your desired frosting colour.
Transfer this frosting to a bowl and place into the fridge or freezer to firm up. You’re looking for a thick consistency that holds it’s shape when piped.
Dust the tops of the cupcakes with a superfood powder of your choice if desired (I used misty day plant potions pretty brew which is a rose based powder).
Transfer the frosting to a piping bag with a fluted nozzle and pipe pretty swirls on top.
Decorate: Finish off by dusting with extra superfood powder, freeze dried fruits and edible flowers if desired.
These raw passionfruit cupcakes will keep in a sealed contained in the fridge for up to 5 days, or in the freezer for one month.
Recipes
by Laurie Deans on Jul 13 2020
What is more 'winter' than toasted marshmallows on the fire? Not much I say! Finding that perfect vegan marshmallow is no easy task so we've hunted down a recipe for you to try.
So go find yourself the perfect toasting stick, get some firewood and a chair as we have the BEST vegan marshmallow recipe for you! It might take a little bit of work but oh is it ever worth it.
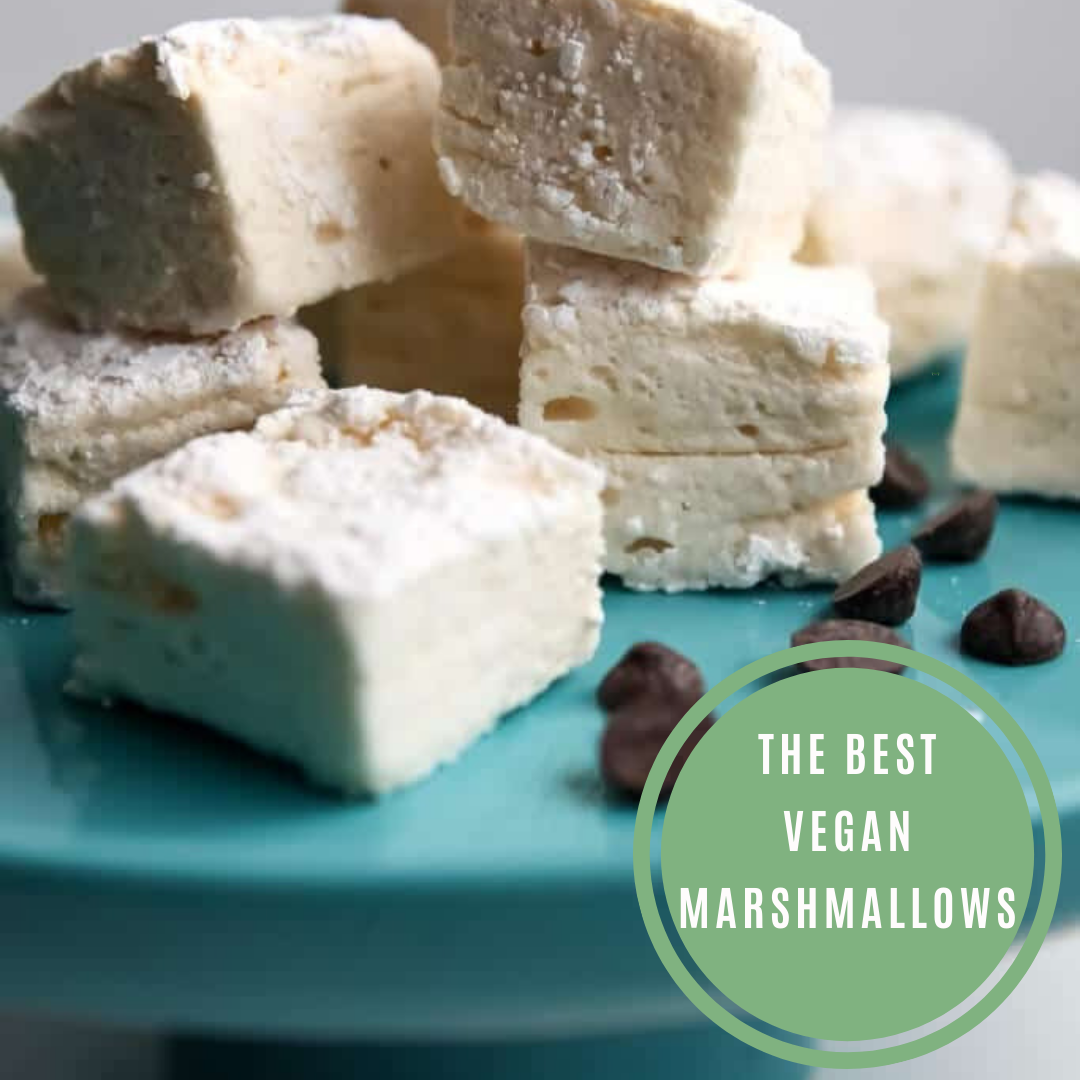
Vegan Marshmallows
Author: Monica Davis | The Hidden Veggies
Ingredients:
1/2 cup aquafaba (the liquid from a can of chickpeas)
1/4 tsp cream of tartar
2 tbsp vanilla
2/3 cup water
1 tbps agar agar powder (not flakes)
1 1/4 cup sugar
1/2 cup powdered sugar for dusting
Instructions:
Get your mold ready:
Dust the bottom of an 8"x 8" pan with powdered sugar and set aside.
Make your fluffy aquafaba:
Put the aquafaba in a mixing bowl with the cream of tartar and mix on high for 6 minutes until very fluffy.
Add some vanilla extract and whip for 3 more minutes until it is white again and it forms very stiff peaks. In a small saucepan, combine water and agar agar and bring to a boil.
Make your agar agar syrup:
Boil the water and agar agar for 3 minutes stirring frequently.
Add sugar and boil for another 3 minutes stirring constantly over medium-low heat. (Be careful not to cook it too hot or you will burn or caramelize the sugar).
Mix everything together.
Turn off the heat and add the hot sugar mixture into the beaten aquafaba.
Add this mixture slowly while beating aquafaba with a mixer set to low for about 30 seconds. This will turn the fluffy white mixture a little shiny.
Quickly pour it into the pan that has been dusted with powdered sugar.
Cooling and drying your marshmallows:
Dust the top of the marshmallows with powdered sugar and let sit and cool for at least an hour.
Cut into 1" squares and dust all sides with powdered sugar.
Turn your oven to 150°F (66°C). Once it reaches that temperature, turn it off and set your cubed marshmallows in the warm oven for about an hour to dry out a little.
Recipes
by Laurie Deans on Jun 28 2020
Well winter has certainly arrived this week! As much as we love a change in season, a change in foods, a change in clothes- it can be quite cold in the mornings and at night. When we need to warm up, we often reach for less than ideal comfort foods or sugary warm drinks, so why not warm up with a healthy hot chocolate with a twist?
Hot chocolate can be a very healthy treat that also fills you up. When made with raw cacao, hot chocolate adds incredible vitamins, minerals, anti-inflammatories and antioxidants (40 times to that of blueberries) to your body.
Magnesium & calcium
Iron & copper
Zinc & potassium
Add in some Tumeric and what else do you get? A dose of curcumin, which is a very powerful anti-inflammatory and antioxidant).
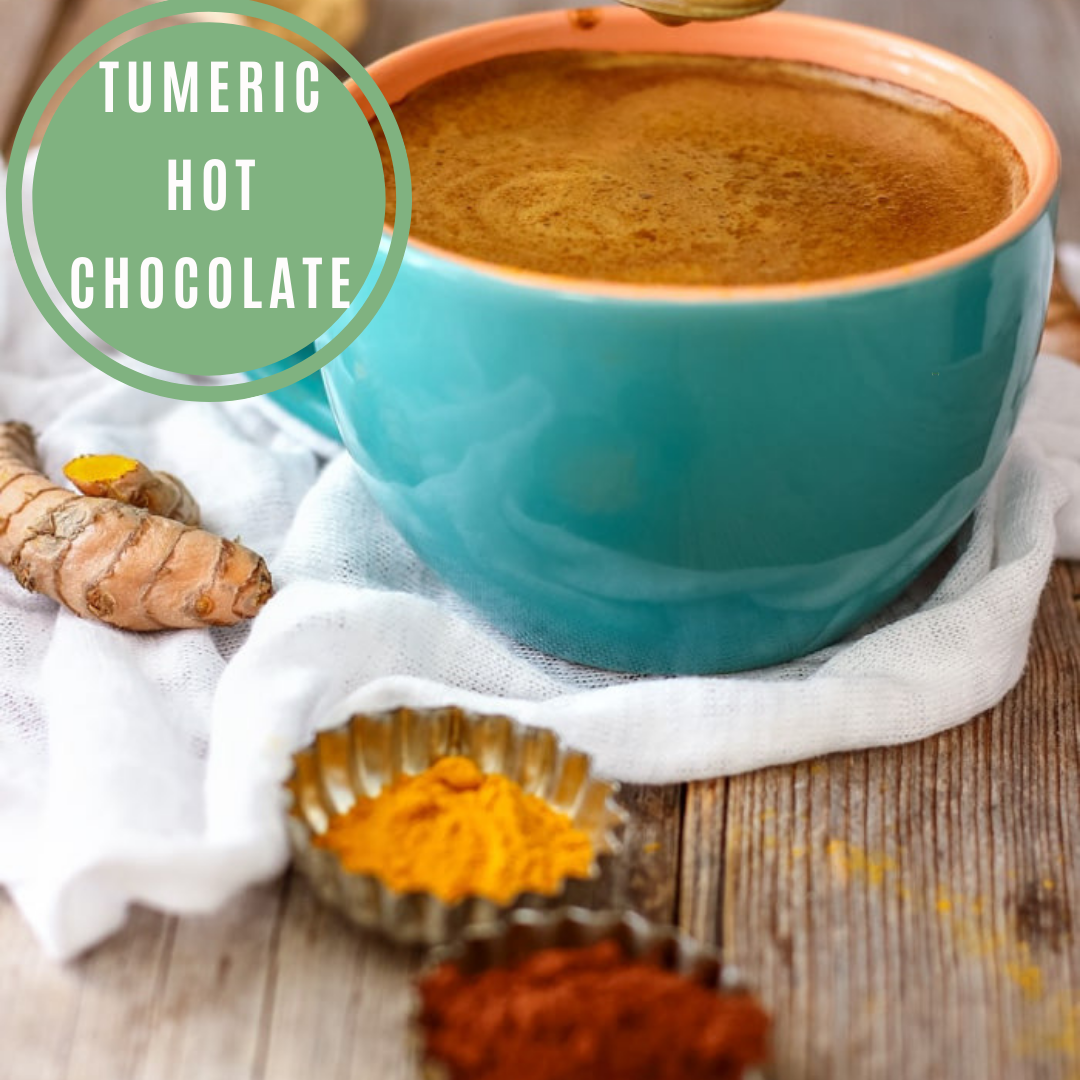
Tumeric Hot Chocolate
Author: Julia @ www.happyfoodstube.com
Ingredients:
1 cup Milk of choice
1½ tablespoons Raw Cacao Powder
1 teaspoon Ground Turmeric
2 teaspoons Coconut Oil , to help absorb the turmeric
A Pinch of Black Pepper , to help absorb the turmeric
A Pinch of Cayenne Pepper
2 teaspoons Honey (adjust to your sweetness preference)
Instructions:
Pour milk in a sauce pan. Add cocoa powder, turmeric and coconut oil. Mix everything with a whisk until combined and bring to a boil.
Turn off the heat, add a pinch of black pepper and cayenne pepper and give it a stir.
Pour in a mug. Let it cool down a bit before adding honey.
Serve warm.
Notes:
Honey can be substituted with sugar, agave syrup or maple syrup.
Coconut oil and black pepper are important here as they help your body absorb turmeric.
Cayenne pepper can be omitted.
Recipes
by Laurie Deans on Jun 12 2020
Oh Autumn, the change in pace (hello darker mornings and sleep-in’s), the change in wardrobe (getting there), snuggly blankets at night and those warming, nourishing foods. We love a good change of season!
Warming vegetarian food is just as good (if not better) than the cold stuff. We use lots of spices, flavors, seasonal produce and broths to stock up on the nutrients we miss out on during the summer months.
This risotto recipe is simple, nourishing & oh so delicious!
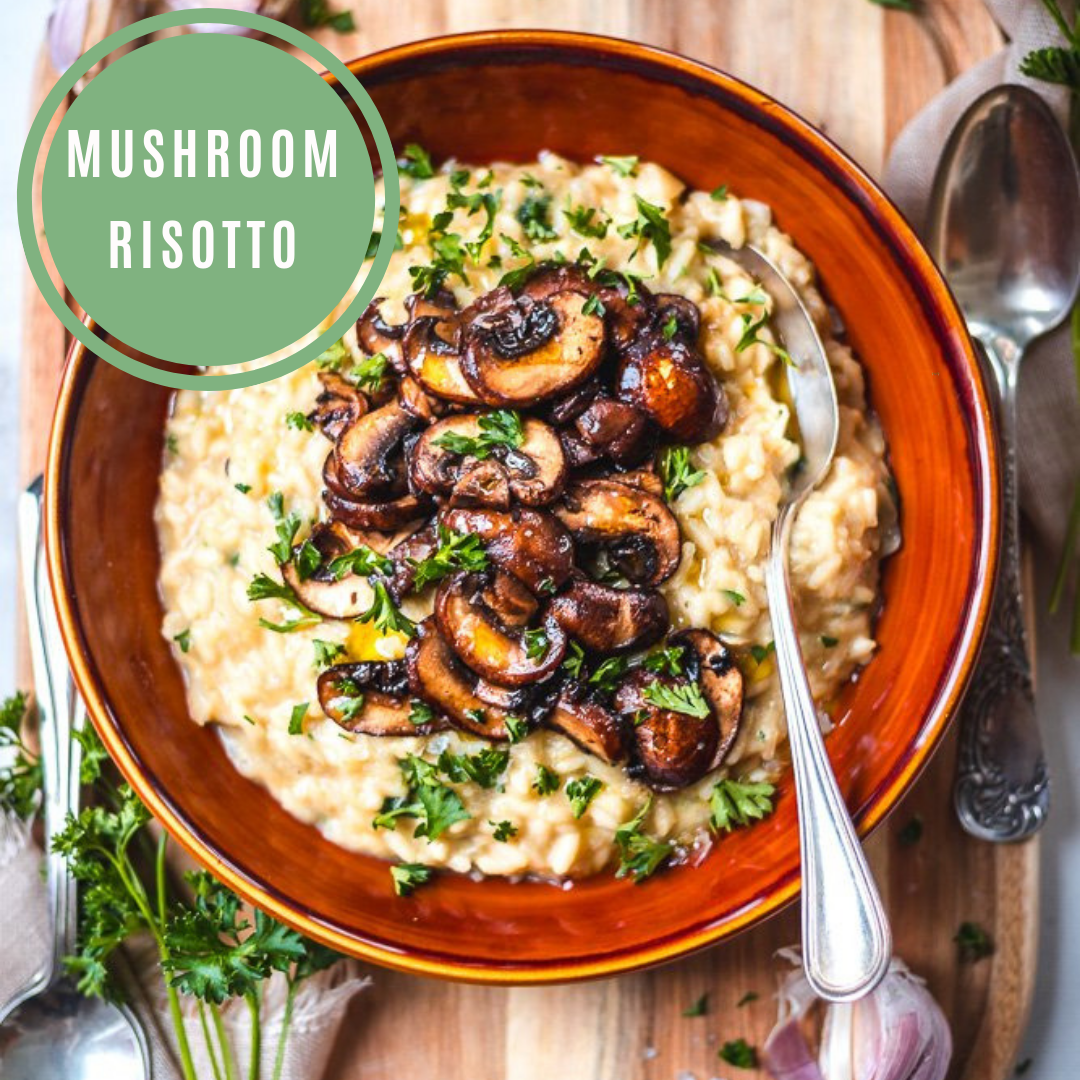
Mushroom Risotto
Author: Hannah Sunderani
Ingredients:
Ingredients
For the risotto:
1 yellow onion
3 cloves garlic
2 tbsp coconut oil
pinch sea salt
1 1/2 cup arborio rice
5 cups vegetable broth
1/2 cup nutritional yeast
1/3 cup parsley , chopped
For the balsamic mushrooms:
16 oz cremini mushrooms (1 small box)
2 tbsp coconut oil
pinch sea salt
1 tbsp balsamic vinegar
Instructions:
Dice onion and garlic and add to large pot with coconut oil and sea salt. Bring to medium heat and cook stirring often, until onion turns translucent (approx. 10 mins).
Pour in arborio rice and toast until grains become lightly perfumed (2-3 mins). Then pour in vegetable broth, starting with 2 cups, and adding more in splashes as it thickens, (I used 5 cups total). Cook for 20-30 minutes, stirring often until risotto is desired texture, (soft and pleasantly chewy). Add nutritional yeast and stir to combine.
While risotto is cooking, cook your balsamic mushrooms. Slice mushrooms and add to a skillet with coconut oil and sea salt. Bring to medium heat. Cook mushrooms (approx. 10 mins). Then reduce heat to low and add balsamic vinegar, cook for another 2-3 minutes.
Add balsamic mushrooms to cooked risotto. Sprinkle with chopped parsley and stir to combine. Serve risotto in bowls.
Recipes
by Laurie Deans on Jun 06 2020
Gnocchi is a big favourite in our household. The soft and chewy, melt in your mouth texture partnered with the versatility of the meal makes it a winner.
Gnocci is great as a noodle substitute in your favourite pasta dish, as a side to one of your favourite meals, or simply with some olive oil and fresh herbs on its own.
With a little bit more time, making gnocchi is relatively easy and even something the kids can help make. Here is a fabulous recipe to get you started!
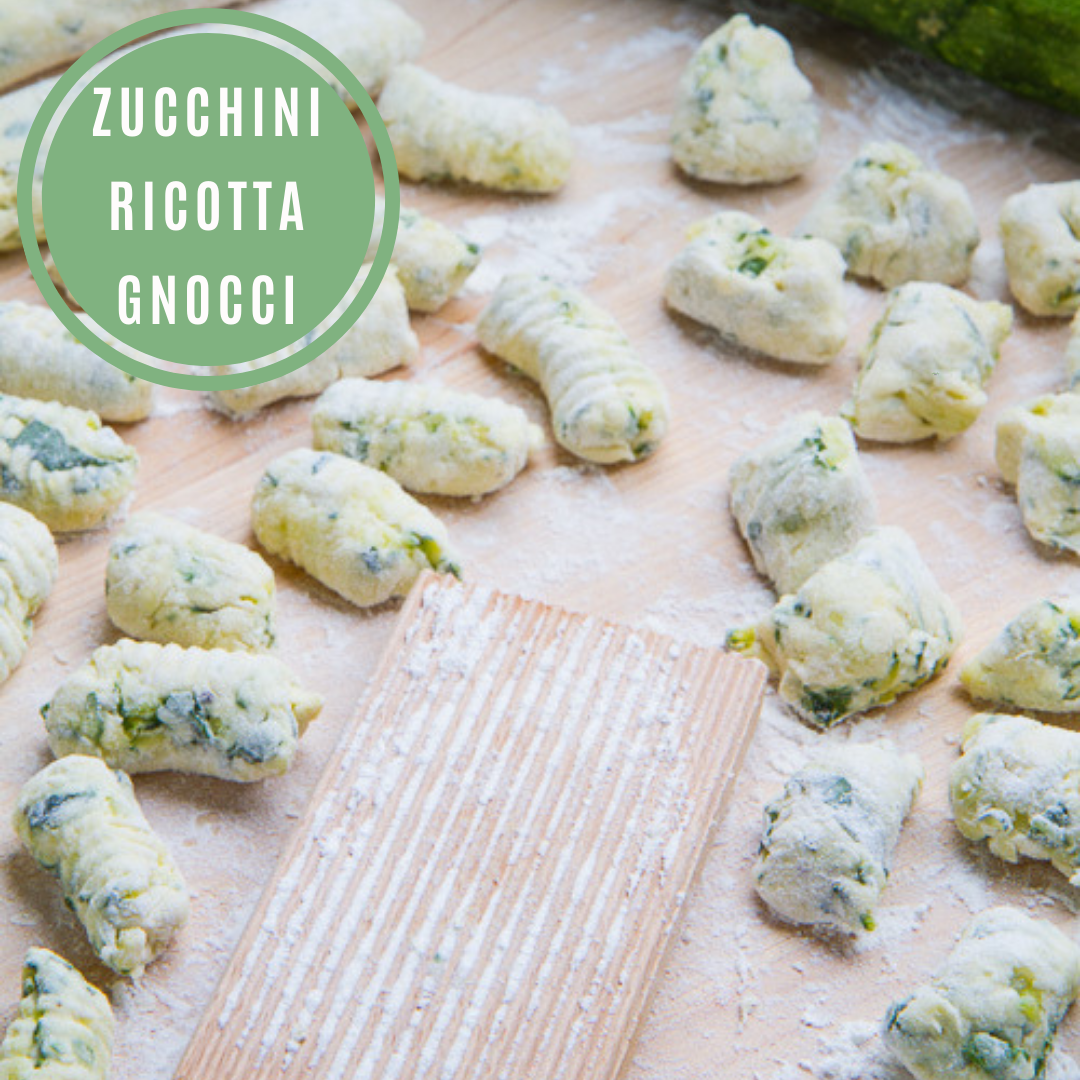
Zucchini Ricotta Gnocchi
Author: www.closetcooking.com
Ingredients:
4 cups zucchini, grated
1 tablespoon salt
1/4 cup loosely packed basil, sliced (optional)
2 teaspoons lemon zest (optional)
1 1/2 cups ricotta
2 egg yolks
1/4 cup pecorino or parmesan, grated
1/4 teaspoon pepper
1 cup flour
Instructions:
Mix the zucchini and salt, let drain in a colander for 20 minutes, place in tea towel and squeeze out as much liquid as possible.
Mix the zucchini, basil, lemon, ricotta, egg, cheese and pepper and then mix in enough flour to form a dough that is not too sticky to work with.
Divide the dough, roll into 1 inch thick strings, slice into 1 inch pieces and roll over gnocchi board or fork using enough flour that the dough does not stick to everything.
Cook the gnocchi in boiling water until it floats, remove and enjoy in your favourite sauce.
Note: The trick to a nice light a fluffy gnocchi is to use as little flour as you can but the less flour that you use the more sticky the dough is and the harder it is to work with. Another problem with adding too little flour is that the gnocchi may fall apart when cooked. It is a good idea to test the gnocchi by cooking a couple, pulling them out as soon as they float in the boiling water, to make sure that they are holding together. The amount of moisture left in your zucchini and the different amounts of moisture in different batches of ricotta makes it difficult to pinpoint the exact amount of flour required for each batch of gnocchi so it is best to start with a little and keep adding until the dough gets tot he right consistency.
Recipes
by Laurie Deans on May 27 2020
Cheese is one of those things that I would never want to give up. It really is life around here. We are lucky enough to not have any sensitivities to dairy but we do try to reduce our dairy consumption and we love to experiment with vegan recipes.
Trying new twists on old favourites shows our kids (and us) that trying new things is exciting! After all, variety is the spice of life!
This cashew Boursin recipe is easy with only 5 ingredients. Its super tasty and a great trick up your sleeve for when you're hosting some guests with dietary needs.
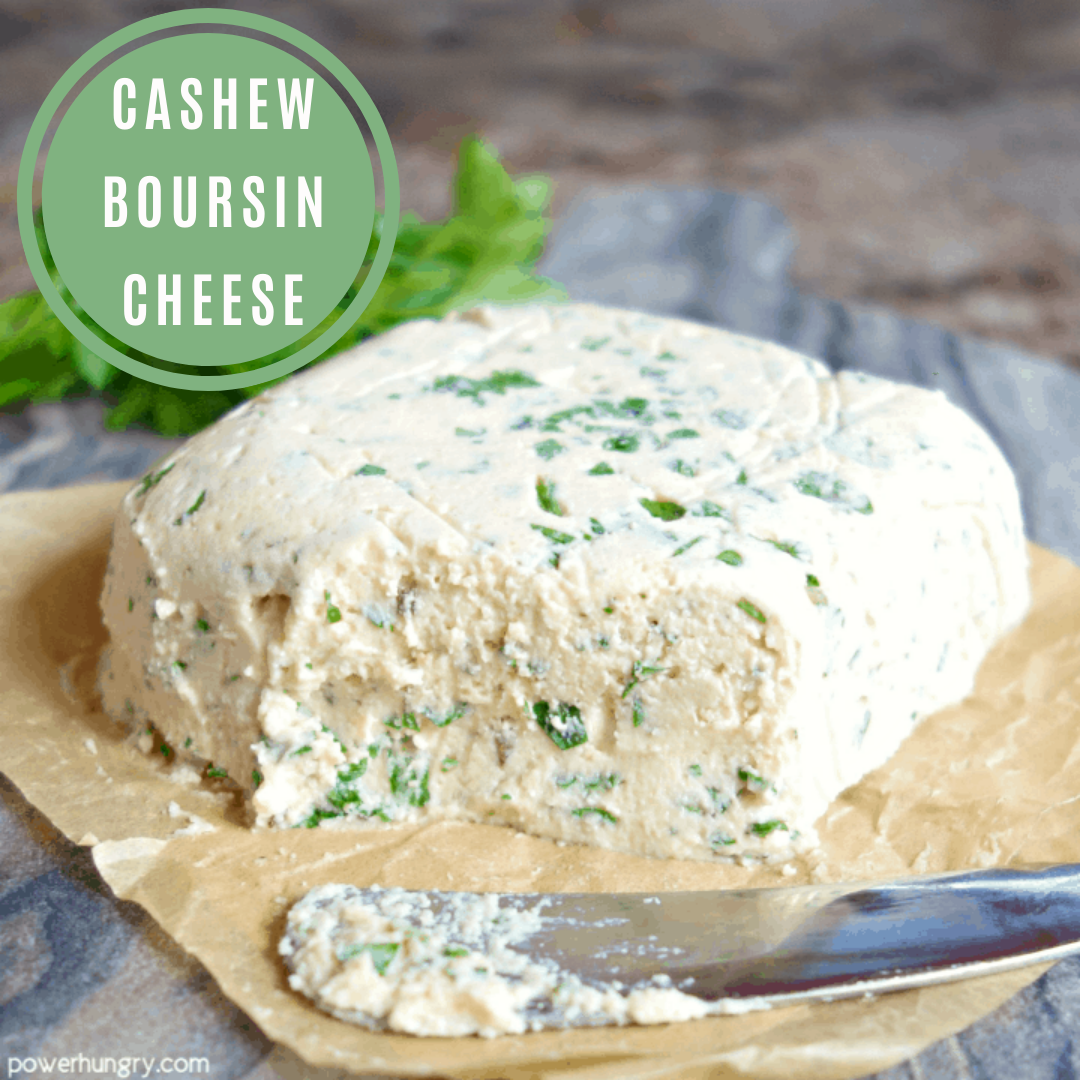
Cashew Boursin Cheese
Author: Camilla at PowerHungry
Ingredients:
1 cup raw cashews
3 and 1/2 tablespoons nondairy milk
2 and 1/2 tablespoons freshly squeezed lemon juice
2 teaspoons garlic powder
fine sea salt
3 to 4 tablespoons chopped fresh herbs
Instructions:
Place the cashews in a mason jar or glass bowl. Add 2 cups (500 mL) boiling water. Let stand for 15 to 20 minutes until very plump. Drain and rinse the cashews.
In a small food processor or handheld blender and process the cashews, milk, lemon juice, garlic powder, and 1/4 teaspoon salt.
Stop and scrape the sides and bottom of container multiple times until the mixture is very smooth and creamy-looking (be patient, this will take a good amount of stopping, starting, and scraping–about 3 to 4 minutes).
Scrape the cheese into a small bowl and stir in the herbs, to taste. Adjust the salt to taste.
Spoon into a small round or square dish that has been lined with cheesecloth or plastic wrap. Pack in the cheese and firmly enclose with the wrap or cloth. Refrigerate at least 4 hours until cold and firm.
Remove cheese from form and unmold onto a small plate. Enjoy with vegetables, crackers, bread, and more!
Recipes
by Laurie Deans on May 20 2020
In case you didn’t know, we are all about quick, easy and budget friendly recipes that make people swoon. We love a good dairy free, refined sugar free recipe that also tickles our healthy-bone.
Finding vegan recipes that also adhere to our sweet tooth pretty much makes our world spin. Anything with peanut butter? Even better. So here is our new favorite- the peanut butter cookie dough. It only has 3 ingredients, it’s vegan and so easy that you can’t believe you didn’t think of it yourself.
Enjoy!
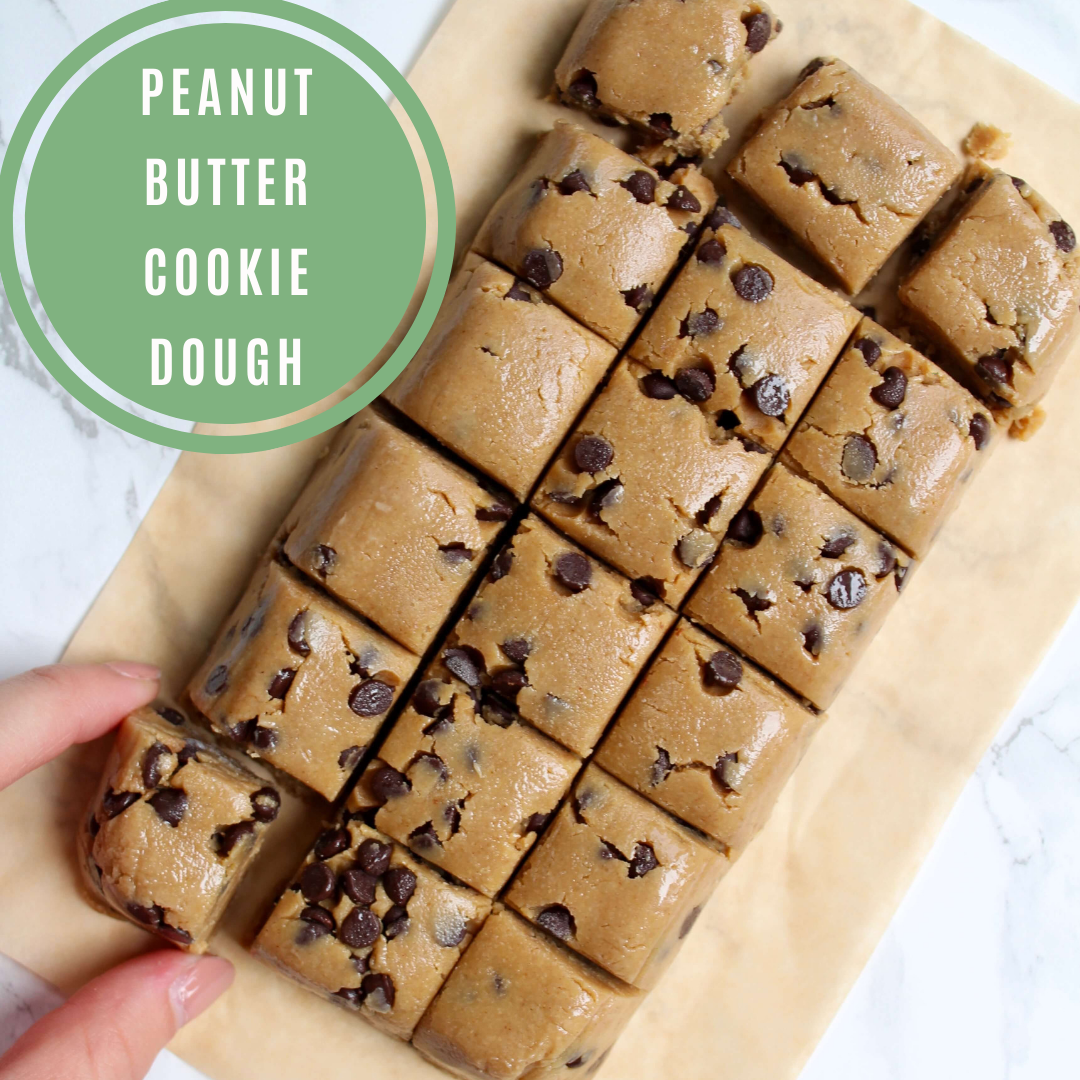
Peanut Butter Cookie Dough
Author: Six Vegan Sisters
Ingredients:
1/2 cup maple syrup
1/2 cup natural peanut butter
1 cup oat flour
Any extra additions we used mini chocolate chips
Instructions:
In a saucepan, heat the maple syrup on medium-high until it begins to bubble.
Remove from heat and whisk in the peanut butter.
Pour into a bowl with the oat flour. Mix until combined.
Let the dough chill completely, then add any toppings (If you do not let the dough chill, your add-ins could melt!).
To form, press the chilled dough into a lined loaf pan. Carefully remove the dough (so that it keeps its shape) and flip it over (so the rounded corners face up). Using a knife, cut slits into the dough that almost reach the bottom, creating 18 pieces that are connected on the bottom. Freeze.
Once frozen, you will be able to break off a piece every time you need a treat!
Recipes
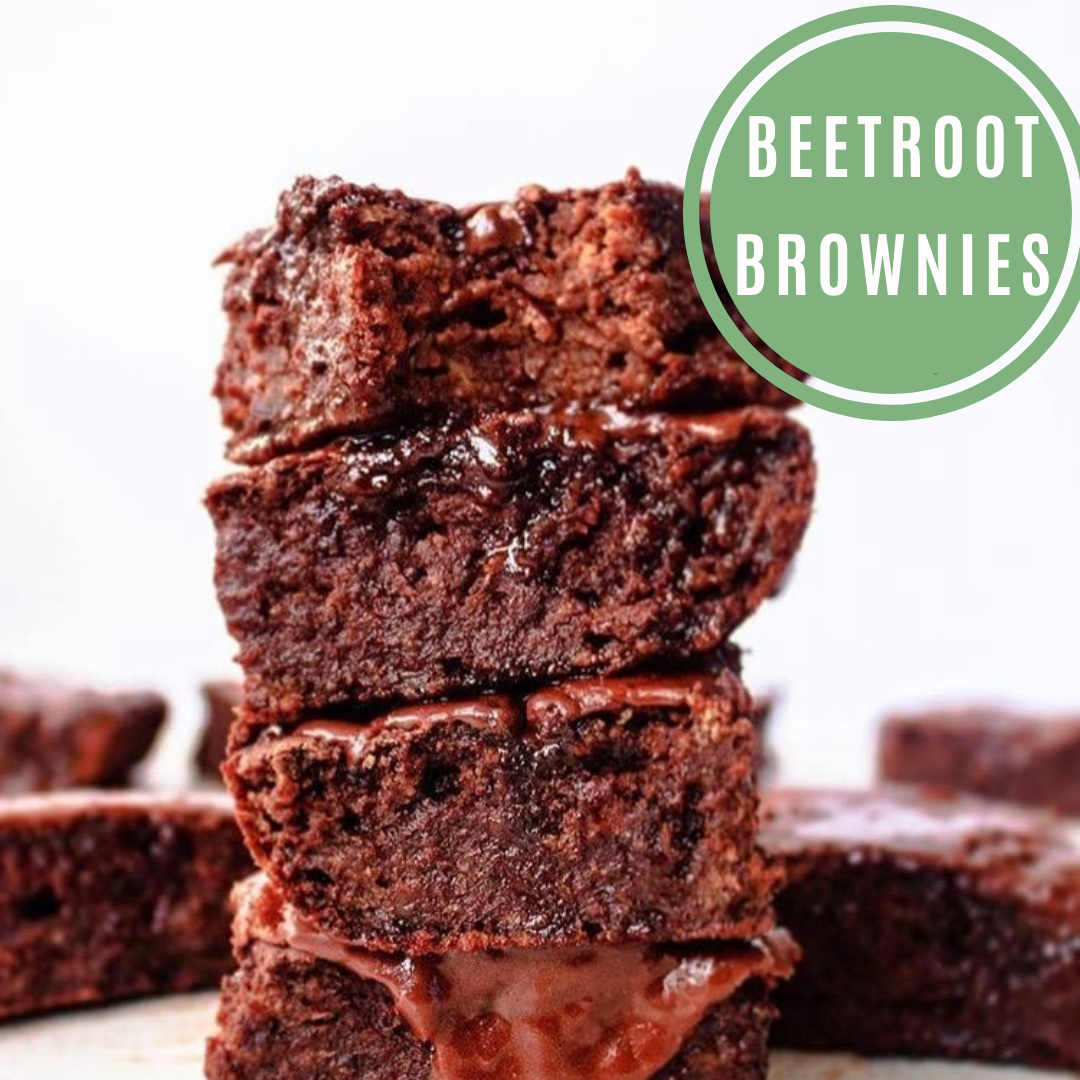
by Laurie Deans on May 14 2020
How good is a warm, gooey, chocolate brownie? Not much tops that in my eyes. But how about one that actually has some nutrients on board? Now introducing you to the beetroot brownie.
Moist and chewy
Oh so fudgy
Chewy & chocolatey
The taste of beetroot disappears once its baked, making this the perfect treat for the family (even the fussy ones).
Beetroot Brownies
Author: www.plantbaseddiary.com
INGREDIENTS:
3 medium cooked beetroots
30 g flaxseed meal
90 ml beetroot water from cooked beetroot
3 tbsp coconut oil
1/4 cup almond milk
1 tbsp vanilla extract
1/4 cup cornstarch or arrowroot starch
100 g oats
250 g wholemeal self-raising flour
1 tsp baking powder
1/4 tsp bicarbonate soda
1/4 tsp salt
1/4 ground cinnamon
15 g Cacao nibs
50 g Cacao powder
Fudge Topping:
30ml coconut oil melted
1tsp vanilla extract
1tsp corn starch or arrowroot starch
15g cacao powder
INSTRUCTIONS:
Preheat the oven to 180 degrees C, and lightly oil a small baking tray max 10″x10″
In a small bowl, stir together beetroot water and flax meal to make vegan flax eggs. Leave it for about 10 minutes to thicken
Slice the beetroot into cubes and put in the blender. Blend for a few minutes to make beetroot puree.
Transfer the puree into a mixing bowl, and add the remaining ingredients and mix by hand or using hand mixer.
Add the flaxseed mixture (beet water and flaxseed meal and mix in the batter
Pour the brownie batter into the baking dish and smooth it evenly.
Place in the oven and bake for 30 -40 minutes. Allow brownies to cool for 30 to 40 minutes before slicing them into pieces.
After the brownies have cooled down, In a small bowl, stir together coconut oil, vanilla extract, cornstarch (to thicken), and cocoa powder. Pour and spread over the brownies and cut into even pieces.
Enjoy!
Recipes
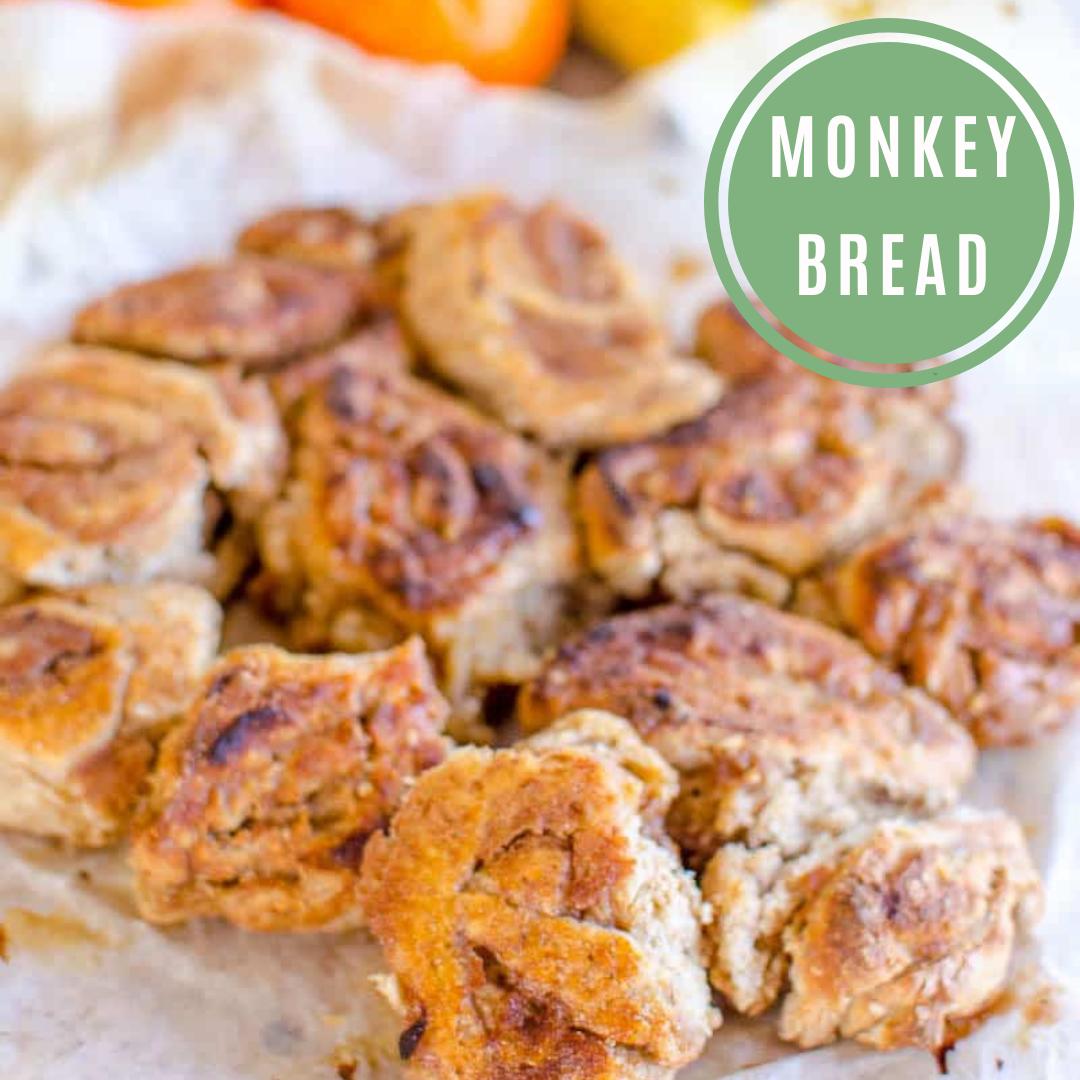
by Laurie Deans on May 03 2020
Have you ever tried monkey bread? This childhood classic is a sweet, sticky pull apart treat for kids to enjoy together. Its fun and interactive and so delicious!
The recipe we grew up with was loaded with brown and castor sugar but we have found a healthy version that's just as magical. This is perfect for birthday parties (imagine post covid), Sunday afternoons or an after dinner treat. Try it once and it will be a regular in your household.
Monkey Bread
Author: www.mykidslickthebowl.com
Ingredients:
1.5 cups self-raising wholemeal flour
1 cup Greek style yoghurt
2 Tbsp peanut butter
2 medium bananas
1 tsp cinnamon
2 dates
Instructions:
Mix the yoghurt and flour for the dough, it will come together into a ball with a bit of mixing
Knead the dough for 5 mins on a floured board (I use standard flour for kneading rather than wholemeal)
Roll the dough into a rough rectangle (similar to an A4 piece of paper, dough should be approx 0.5-1cm thick
Place the rectangle so that the long edges are parallel with you
Spread the peanut butter on the dough, leaving approx 2 inches along one edge (the long edge furthest away from you)
In a blender purée the bananas, dates and cinnamon
Spread the banana mixture over the peanut butter
Now roll the dough so that you create a long pinwheel sausage filled with the banana filling.
Slice the sausage into 1.5-2cm thick slices
Place these into a baking paper lined dish. You want the pinwheels to be touching each other but for the dish to not be completely packed
Bake at 180 degrees Celsius (360 Fahrenheit) for 15-20 minutes or until golden
Leave to cool
Serve, it is lovely to serve slightly warm
Recipes
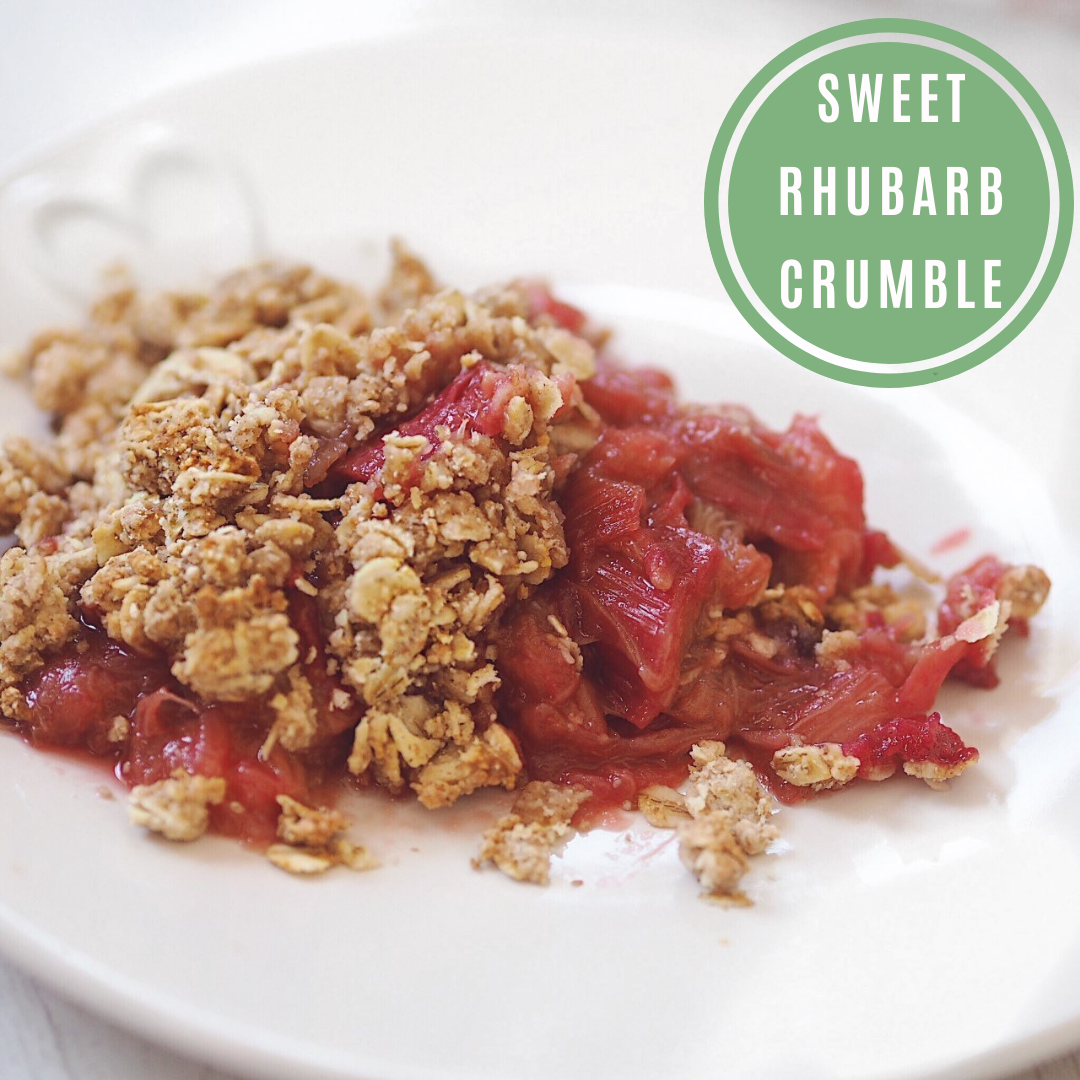
by Laurie Deans on May 03 2020
This past weekend has certainly reminded us that winter is well on its way. The cold mornings and cool afternoons bring in a fresh new energy. We can bring out the warmer clothes, blankets and doonas. Sit by the fire and bring on the warming, comfort food recipes!
Rhubarb is in season and what a recipe to feature the fruit (which is actually a vegetable) than a good old fashioned crumble. Of course, our recipes are refined sugar free but still oh so delicious. Whip this one up for a special dessert and the crowd will go wild!
Sweet Rhubarb Crumble
Author: www.nourishyourglow.com
Ingredients:
For the Rhubarb Filling
1 bunch (400g) rhubarb, washed, trimmed and cut into chunks
juice of one lemon
a generous pinch of ground ginger
4 tbsp Maple Syrup
For the crumble
1 cup flour (I used spelt)
1 tsp cinnamon
3 tbsp coconut oil
1 cup rolled oats (find uncontaminated here)
3 tbsp maple syrup
Instructions:
Preheat the oven to 200°C
Chop the rhubarb into 2cm pieces and place in a saucepan with the maple syrup, ginger, and lemon juice. Cook gently until the rhubarb softens, around 5-10 minutes.
Mix the ingredients for the crumble together rubbing them together with your fingertips until a crumble mixture forms.
Once the rhubarb mixture is ready transfer to a baking dish and top with the crumble mixture.
Cook for 15-20 minutes or until golden brown