Recipes
Recipes
by Laurie Deans on Apr 27 2020
We've never been more aware of how important our health is than now. Filling our bodies with whole, clean food keeps our immune systems strong and helps to keep us mentally and physically strong.
A common misconception is that eating well is expensive. It certainly doesn't have to be. We are so lucky in Australia to have an abundance of seasonal, fresh fruits and vegetables that can help keep the cost down while still eating the good stuff.
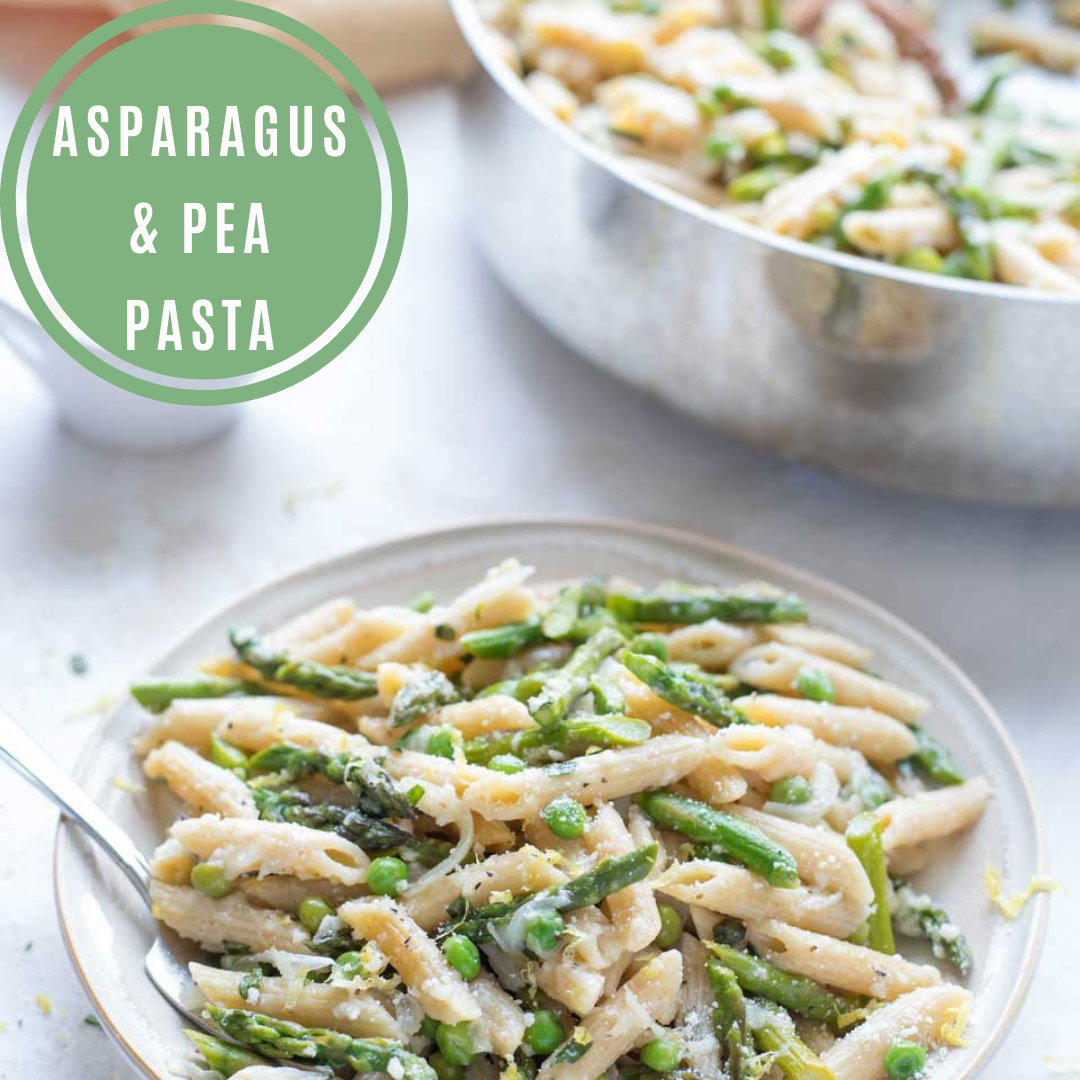
This recipe is healthy, budget friendly and only uses one pot!
Stay healthy, friends.
Asparagus & Pea Pasta
Author: Shelly at Two Healthy Kitchens
Ingredients:
1 tablespoon olive oil
2 large shallots (4 ounces / 115 grams), thinly sliced (about 1 cup)
1 1/2 teaspoons kosher salt, divided
3/4 teaspoon freshly ground black pepper, divided
450 grams asparagus, sliced diagonally into 1-inch (2.5-cm) pieces
340 grams short, whole-wheat pasta (such as penne rigate, fusilli, or rigatoni)
3 cups (720 ml) water
1 cup (135 grams) frozen peas
2 tablespoons fresh lemon juice, plus 1 teaspoon finely grated lemon zest
55 grams finely grated parmesan cheese (about 1/2 cup)
2 tablespoons unsalted butter
1 tablespoon chopped fresh tarragon leaves
Instructions:
Heat the oil over medium heat in a large, straight-sided sauté pan or large pot.
Add the shallots, 1 teaspoon salt, and 1/2 teaspoon pepper. Cook, stirring often, until the shallots are starting to soften, 4-6 minutes.
Add the asparagus, pasta, water, and peas. Cover and bring to a boil.
Reduce heat to a gentle simmer and cook, stirring here and there, until the pasta is just tender, 11-14 minutes.
Remove from the heat when there's still a little water left – you're looking for just enough to create a sauce. Stir in the lemon juice and zest, parmesan cheese, butter, and tarragon, and season with remaining 1/2 teaspoon salt and 1/4 teaspoon pepper.
Serve hot.

Recipes
by Laurie Deans on Apr 20 2020
Anzac biscuits are an Aussie staple, an icon in itself. They're soft and chewy on the inside, and golden and crispy on the outside. They're sweet and oh so delicious! This healthier version doesn't compromise on any of those things. They're still just as delicious as you know and love!
The best part about them is how easy they are to make. These guys are the perfect recipe for kids to get their hands in and help. Talk about two birds with one stone!
Let us know what you think.
Healthier Anzac Biscuits
Author: www.betterwithcake.com
Ingredients:
1/2 cup rolled oats (Use gluten free if sensitive, you could also sub quinoa flakes if you prefer to make paleo friendly)
1/3 cup shredded coconut
1/2 cup flour (use gluten free if sensitive – paleo friends – sub almond flour – I like to use Otto’s cassava flour or Bob’s red Mills paleo baking blend here )
1/2 teaspoon Bicarbonate of soda
1/4 cup coconut sugar
2 Tablespoons butter/ghee
1 Tablespoon maple syrup
1 Tablespoon boiling water
Instructions:
1. Line a baking tray with baking/parchment paper (or a silpat mat) and set aside.
2. Preheat oven to 150’C (300’F)
3. Place oats, coconut, flour and sugar into a medium size bowl and stir to combine. Set aside.
4. Place butter into a small saucepan over low heat, add maple syrup and allow to melt.
5. Remove melted butter/maple syrup mix from heat and add baking soda, then boiling water and stir to combine and pour immediately into your oat/flour mix and stir to combine.
6. Spoon a heaping scoop of batter into your hands and shape into rounds then place onto prepared baking sheet. Repeat until all batter has been used (we got 10 decent sized biscuits/cookies).
7. Bake for approx 8-10 minutes, until golden.
Recipes
by Laurie Deans on Apr 06 2020
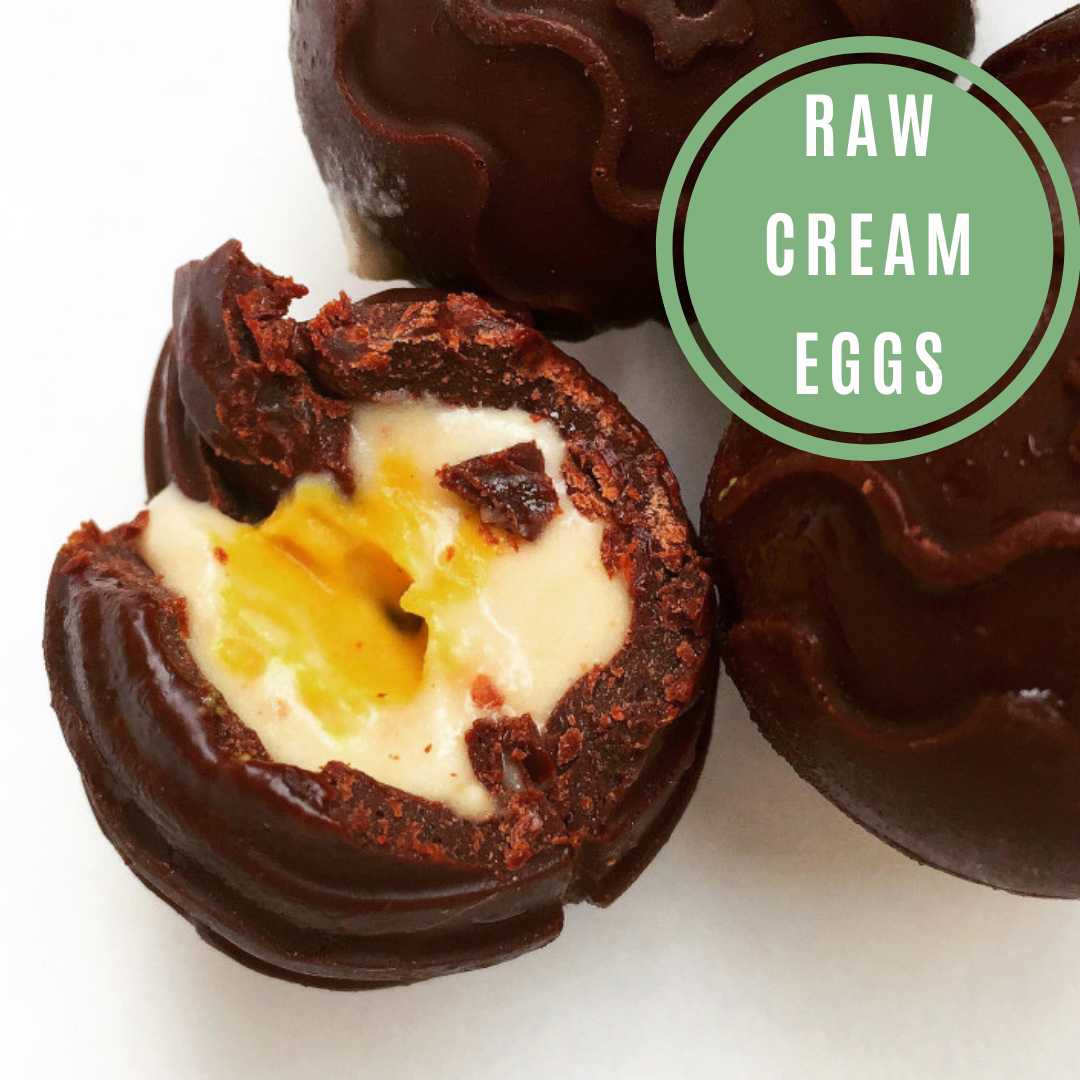
With all of this craziness going on right now it’s easy to forget that it’s Easter this weekend! Since a lot of us have more time time fill at home, why not dive into an exciting new recipe to try? This raw cream eggs recipe is a bit more time consuming than our usual recipes but they’re delicious and worth the effort!
Stay safe and stay healthy everyone x
Raw Cream Eggs
Author: Georgina Young
Ingredients:
For the chocolate shells:
150g cacao solids (a.k.a. cacao liquor/paste)
150g cacao butter
4.5 tbsp/67.5ml raw honey/maple syrup
¼ tsp vanilla powder (optional)
For the white creme filling:
25g cacao butter
80ml coconut cream
2 tbsp/30ml maple syrup
1 tbsp/15ml coconut oil
1 tbsp/15ml cashew butter (or coconut manna/oil)
1 tbsp/15ml vanilla extract
For the yolk creme filling:
4 tbsp/60ml of the white creme filling
½ tsp maca powder
½ tsp ground turmeric
Instructions:
OK, let’s start with the nitty gritty – the shells. In a large mixing bowl (in fact one wider than your moulds) add your cacao solids and butter, raw honey and vanilla powder. Place the bowl over a pan of water on a low heat, creating a bain-marie. Stir the contents frequently using a spatula, making sure to scrape down the sides ensuring that everything melts evenly. Once melted remove the bowl from the heat and allow to cool for a few minutes before pouring into your silicone jug. Set aside your mixing bowl as you will need this later.
Very carefully pour the chocolate from your jug into each indentation of your mould(s). Honestly do pour this as slowly and as carefully as you can until the chocolate fills the indentations fully but does not overflow. If it does overflow do not worry, simply scrape away using a spatula otherwise your shells will be incredibly hard to remove, so don’t be lazy and not scrape the excess otherwise you will find yourself having to re-make a whole batch. Before transporting your mould(s) over to the freezer open the freezer door! That’s tip number 1! To transport your mould hold each side firmly and gently pull them away from yourself to create enough tension to keep everything in the mould steady and level.
Pop the mould(s) into the freezer for about 5-10 minutes or until you see that they have an outer ring of chocolate that has set at about a thickness of 5mm. Remove the moulds carefully using the technique I stated before and then turn the mould upside down over your large mixing bowl that you had set aside earlier. Pour until as much excess has come out and take a look at what your shells look like. I had a little problem with the top edges of the shells becoming too thin so you may want to set the mould back into the freezer for 30 seconds before removing and swirling the chocolate around the mould much like you would with one of those little mazes with the balls bearings in that you get in crummy Christmas crackers. If you find that the chocolate will not move carefully scrape around using a teaspoon until you have cleared out a suitable sized cavity. Place into the freezer for up to 2 hours before filling. You may remove the shells before hand if you wish but you will have to work quickly as raw chocolate melts fast. If you are doing this now look at my tips for removing the shells in step 6.
Now prepare the mixture for your creme white filling. Add all of the ingredients for your white creme filling into a small heat proof bowl over a bain-marie on a low heat until fully melted. You will want to stir the ingredients occasionally. Remove from the heat and transfer 4 tablespoons of the mixture into a small cup. Stir in the maca powder and turmeric into your 4 tablespoons of mix and stir until evenly distributed. Place both mixes into the freezer and freezer for one hour to an hour and a half until very thick. Make sure that you stir your mixes every 15 minutes so that it freezes evenly.
Now it’s time to fill your eggs! Remove the egg moulds from the freezer and press in a small amount of white creme filling into each half shell followed by a little ball of the yolk creme filling. You can roll these mixes in your hands but work fast otherwise it will melt into a liquid quickly. Once filled return to the freezer for another 10 minutes to set again.
Remove your moulds from the freezer and carefully pull away the outer edges of the indentations around the chocolates before carefully pushing the bottom of the shell upwards. Once all halves have been removed place back into the freezer again for 5 minutes so that you don’t melt the mix.
Remove the eggs from the freezer and using a heated butter knife (I just placed mine over the stove for a few seconds) melt the inner rings of the egg shells before firmly yet gently pressing the two halves together. Place each egg in the freezer individually before starting the next. Repeat until each egg has been sealed! If you find that the eggs aren’t sealing well you could pipe a little melted chocolate into the gaps or even gently brush some on with the edge of a knife! And that is it, quite a few hours of hard work for some super yummy eggs! Store them in the fridge so that the chocolate doesn’t melt but leave out at room temperature for 15 minutes before eating them!
Recipes
by Laurie Deans on Mar 30 2020
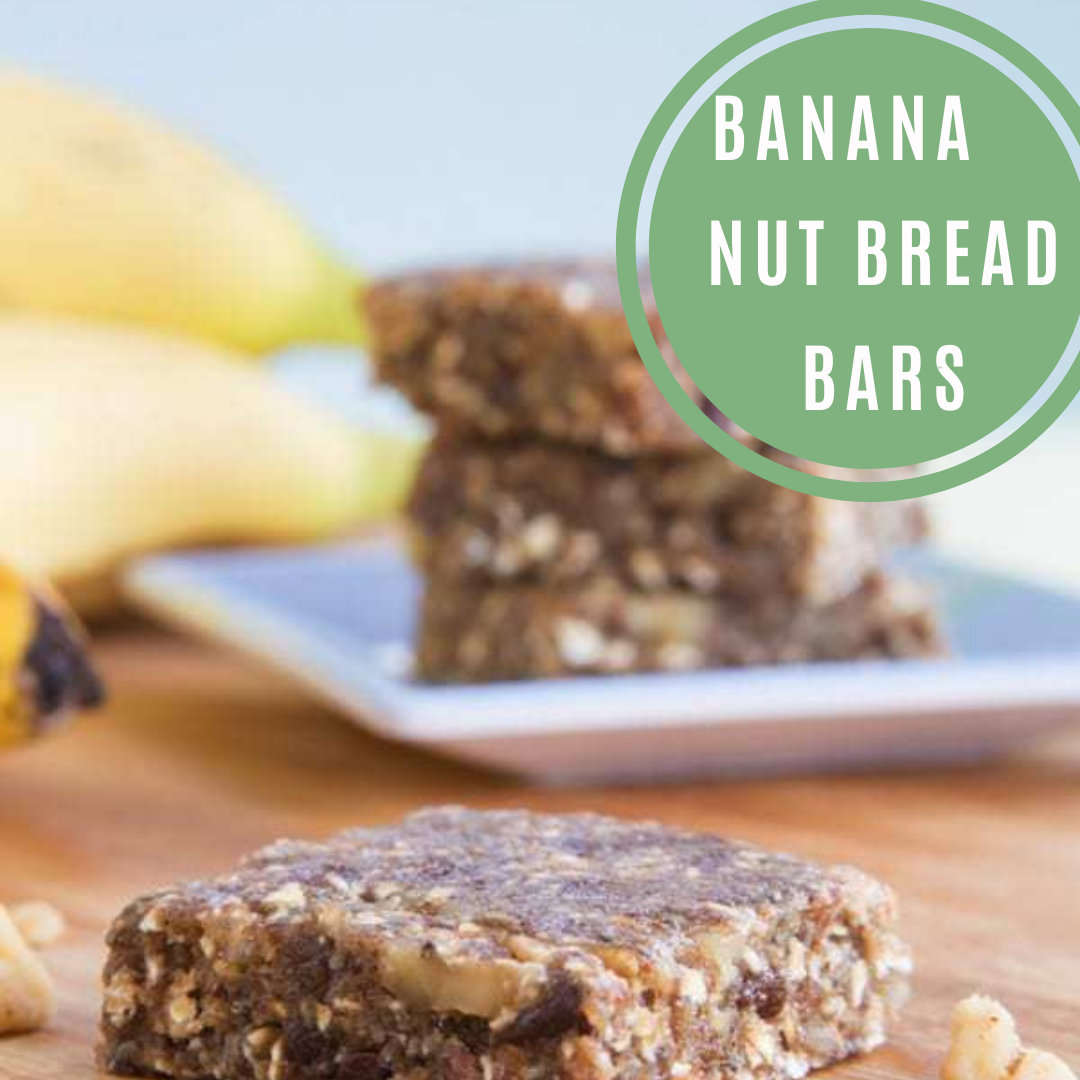
Staying home seems to mean snacks, snacks and more snacks. If you're lucky enough to be trapped with kids, you and/or them are in the kitchen what feels like every hour fetching something to eat. Recipes that are loaded in healthy fats and protein will help distance those snacks while boosting brain power to keep up with that distance work and learning!
This healthy recipe is loaded with nutrients to help keep that hunger at bay while providing nutrition that keeps you strong and healthy. They're also easy, budget friendly and super delicious. What a winner!
We hope you're all staying healthy and sane during this crazy, uncertain time x
Banana Nut Bread Bars
Author: Brianne @ Cupcakes & Kale Chips
Ingredients:
1 very ripe banana
1 cup pitted dates
1 cup uncooked rolled oats gluten free, if needed
¼ cup ground flax seed or flax meal
2 Tablespoons chia seeds
½ teaspoon vanilla
½ teaspoon cinnamon
¼ teaspoon nutmeg
¼ teaspoon Kosher salt
½ cup chopped walnuts
¼ cup mini chocolate chips
Instructions:
Line a 8x8 or 9x9 square pan with wax or parchment paper.
Place all ingredients except walnuts and chocolate chips in a high-powered blender (such as a Blendtec) or food processor, and process until the mixture forms a thick mass.
Break up slightly with a spatula, add walnuts to the mixture, and pulse until the nuts are slightly chopped and distributed.
Break up the mixture one more time, add chocolate chips and pulse a few times to distribute the chips, or simply stir in the chips.
Press the mixture into the prepared pan. You can cover the top with more paper and press an equal sized pan to roll the top with a glass to flatten completely.
Place in freezer until firm, as this will allow you to slice them easier. Otherwise they are quite sticky. Slice into bars or squares and store the bars in the refrigerator.

Recipes
by Laurie Deans on Mar 24 2020
This crisis thats unfolding infront of us is forcing us to change the way in which we live. We are innovating yet simplifying at the same time. While much of this crisis is traumatic in so many ways, getting back into the kitchen and forcing us to be more self-sufficient is a positive thing.
Here is an easy recipe for making your own spelt bread at home. Enjoy!
Everyday Spelt Bread
Source: www.thecookingspoon.org
Ingredients:
2 teaspoons active dry yeast
3/4 cup warm water
1/2 cup milk at room temperature
2 tablespoons honey
3 1/2- 4 cups whole grain spelt flour
2 tablespoons extra-light olive oil
1 teaspoon salt
extra olive oil or melted butter for brushing loaf
Instructions:
Combine the warm water, yeast and honey in a large jug, and let it sit and “proof” for 10 minutes. Add the milk and stir.
Place the flour in the bowl of your mixer, fitted with the kneading hook, pour the water yeast mixture into the bowl of flour with the motor running on the lowest setting. Add the salt and olive oil. Once incorporated you can turn the mixer setting on higher. Knead for about 7 minutes.
Cover the bowl with a damp cloth and let the dough rise for 45-60 minutes in a warm place. It should double in size.
Grease a loaf tin with melted butter.
Turn the dough out on a floured surface and knead a few minutes. Shape into a loaf and place in loaf tin.
Let rise again for 30 minutes covered with an oiled piece of plastic wrap.
Preheat your oven to 200 C/400 F , remove plastic wrap and place loaf on a rack in the middle of the oven. Bake the loaf for about 45 minutes turning half way, tap the loaf to see if it’s fully baked, it should sound hollow. Once baked , brush the crust with some butter. This is an optional step but I love the way the crust gets a bit softer and glossier. Let it cool in the pan for a few minutes before removing it to cool completely on a wire rack.
Recipes
by Laurie Deans on Mar 22 2020
Boosting your immunity naturally is on a lot of peoples mind at the moment and rightfully so. This worldwide crisis has certainly opened our eyes to the importance of looking after ourselves. We are more aware of what we ingest and our hygiene practices and how that has a drastic affect on our health.
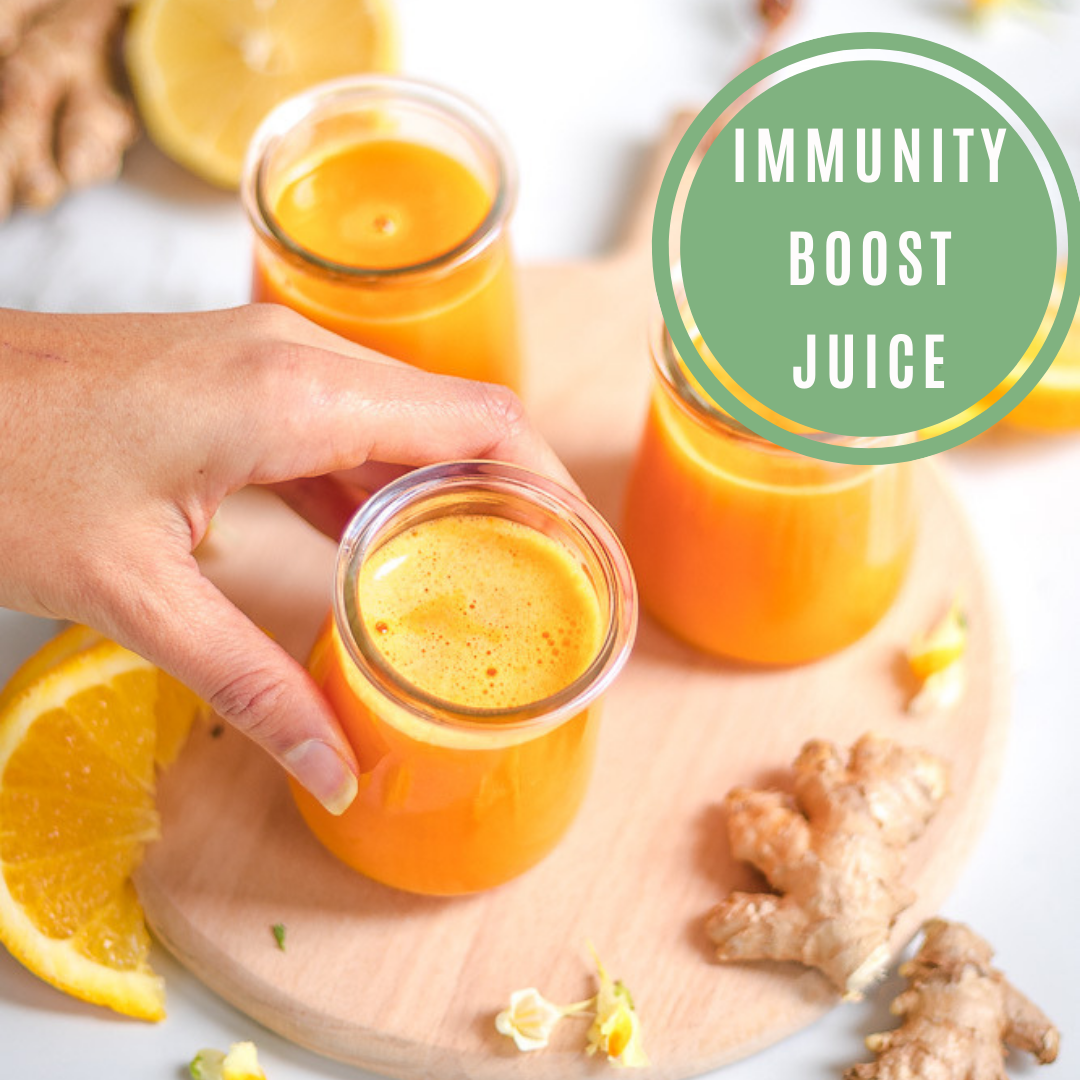
This immunity boost juice recipe is a great start at building and maintaining a healthy immune system. This recipe is produces 3 serves at 1/2 cup of juice per serve. Enjoy!
Immune Boost Juice
Author: Hannah Sunderani
Ingredients:
2 oranges
1 lemon
2 carrots (or 1/4 cup (60 ml) 100% carrot juice if not using juicer)
3 tbsp fresh ginger root , chopped
2 tbsp fresh turmeric root , chopped
1 tbsp manuka honey (or local honey or agave)
1 tbsp warm water
Instructions:
If using a juicer:
Carefully cut skins away from lemon and orange. Chop carrots into large chunks. Chop ginger and turmeric into small pieces.
Using a juicer add oranges, lemon, carrots, ginger and turmeric.
Mix together honey and warm water and pour into juice to sweeten, mix well. Chill juice in fridge.
When ready to drink, divide juice between small cups (1/2 cup per serving). Sip and enjoy.
If making by hand:
Juice lemon and orange with a hand juicer and pour into a medium/large jar. Add 1/4 cup (60 ml) carrot juice.
Mix together honey and warm water, and pour into juice to sweeten. Mix well.
Peel and chop ginger and turmeric into thin slices. Add to juice and let steep for a couple hours, or overnight depending on how strong you like the spiced flavours. Keep juice chilled in fridge, sealed tightly.
When ready to drink, divide juice between small cups (1/2 cup per serving). Use a small strainer to catch any slices when pouring. Sip and enjoy.
Recipes
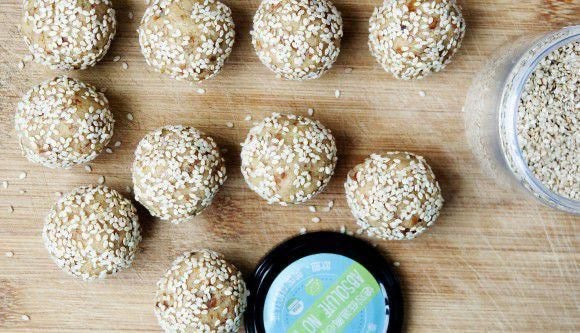
by Laurie Deans on Mar 17 2020
Loading up on the nutrient rich, healthy foods has never been so important. These protein bites help keep your immunity strong and assist with feeling better if you've become unwell.
These bliss balls offer vitamins, minerals, antioxidants and more. Healthy snacking at its finest! They're also quick and easy.
Lemon Ginger Protein Bites
Author: www.sidechef.com
Ingredients:
1 cup Cashew Butter
1 tablespoon melted Coconut Oil
2 teaspoon freshly grated Fresh Ginger
1 tablespoon zested Lemon
1 teaspoon Lemon Juice
2 tablespoon Maple Syrup
1 scoop Hemp Protein Powder
1/2 cup Unsweetened Shredded Coconut
to taste White Sesame Seeds
Instructions:
STEP 1
Place the Cashew Butter (1 cup), Coconut Oil (1 tablespoon), Fresh Ginger (2 teaspoon), Lemon (1 tablespoon), Lemon Juice (1 teaspoon), Maple Syrup (2 tablespoon), and Hemp Protein Powder (1 scoop) into a food processor and pulse until a paste forms.
STEP 2
Add the Unsweetened Shredded Coconut (1/2 cup), and pulse a few more times to combine it.
STEP 3
Using your hands, roll the mixture into 30-gram balls and coat them in White Sesame Seeds (to taste).
STEP 4
Refrigerate for at least 1 hour.
STEP 5
You can also store them in your fridge for up to 1 week, or freeze for over a month. Enjoy!
Recipes
by Laurie Deans on Mar 16 2020
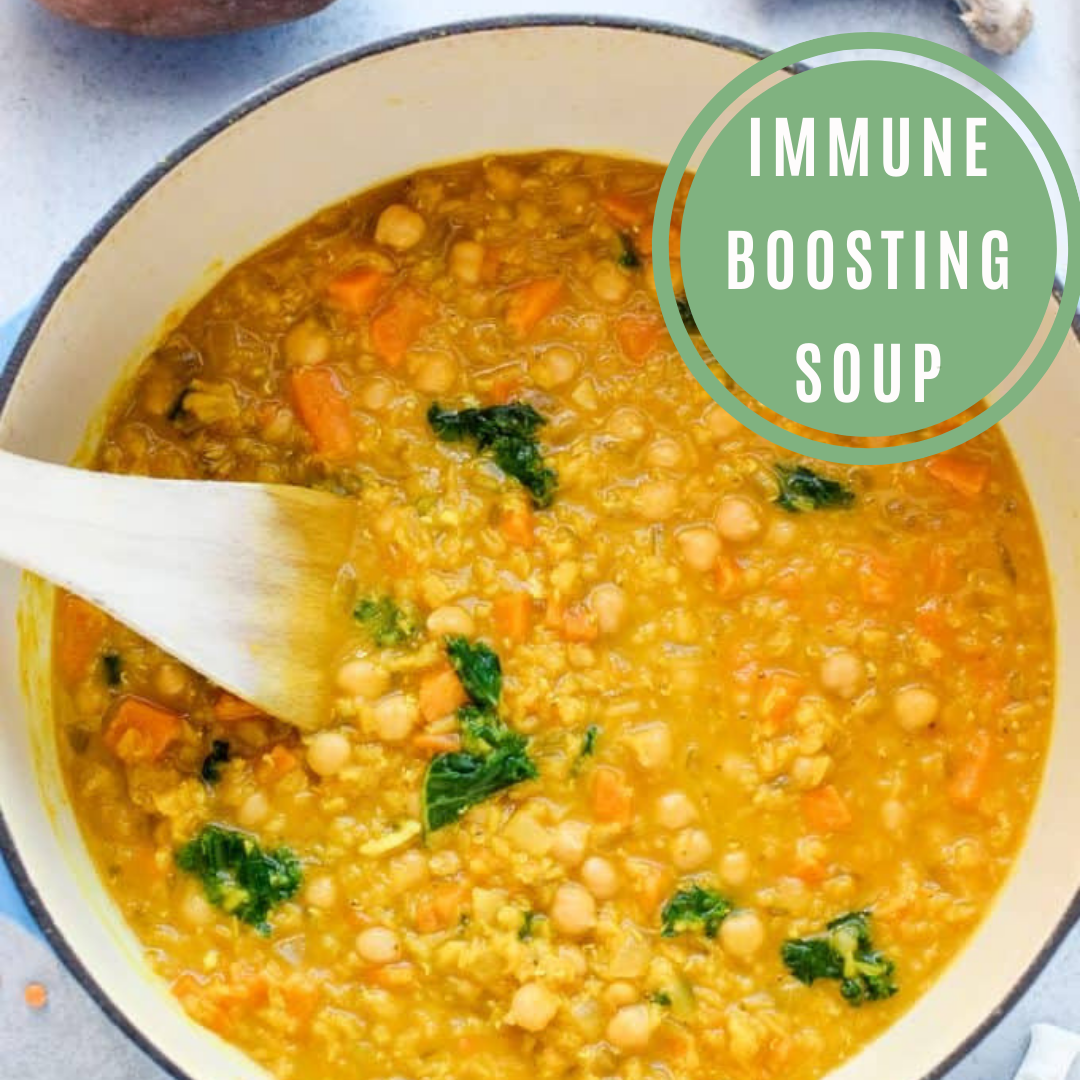
We’re living in some crazy times right now. Whether you’re shacked up in self isolation or business as per usual, boosting your immune system is imperative for your health, your families and your communities.
We know that boosting your immune system starts in your kitchen. Here is a fantastic recipe for a soup loaded in essential vitamins and minerals to support a healthy immune system.
Take care of yourselves and one another x
Immune Boosting Soup
Author: Liz Thomson
Ingredients:
1 tablespoon olive oil
1 yellow onion, diced
6 cloves garlic, minced
1/2 teaspoon freshly grated ginger
1 teaspoon turmeric
½ teaspoon paprika
1 tablespoon lemon juice
1 large sweet potato, (about 1/2 lb) diced into ½” cubes
1 15oz can chickpeas, rinsed and drained
1 cup red lentils, uncooked and rinsed
5 cups vegetable broth
1/2 cup kale, destemmed and torn into 1” pieces
Salt to taste
Instructions:
In a large pot or dutch oven, heat the olive oil over medium heat for 1 minute.
Add the onion and cook over medium heat for 8 minutes, stirring occasionally.
Add the garlic and ginger and continue to cook for 1 minute until fragrant.
Add the turmeric and paprika and continue to cook for 1 minute.
Add the lemon juice, sweet potatoes, chickpeas, red lentils, and vegetable broth and bring to a boil.
Once the soup begins to boil, reduce the heat to low and simmer for 15-20 minutes until the sweet potato is soft.
Add kale and continue to cook for 2-3 minutes until the kale has softened and wilted slightly.
Season with salt to taste.
Recipes
by Laurie Deans on Mar 09 2020
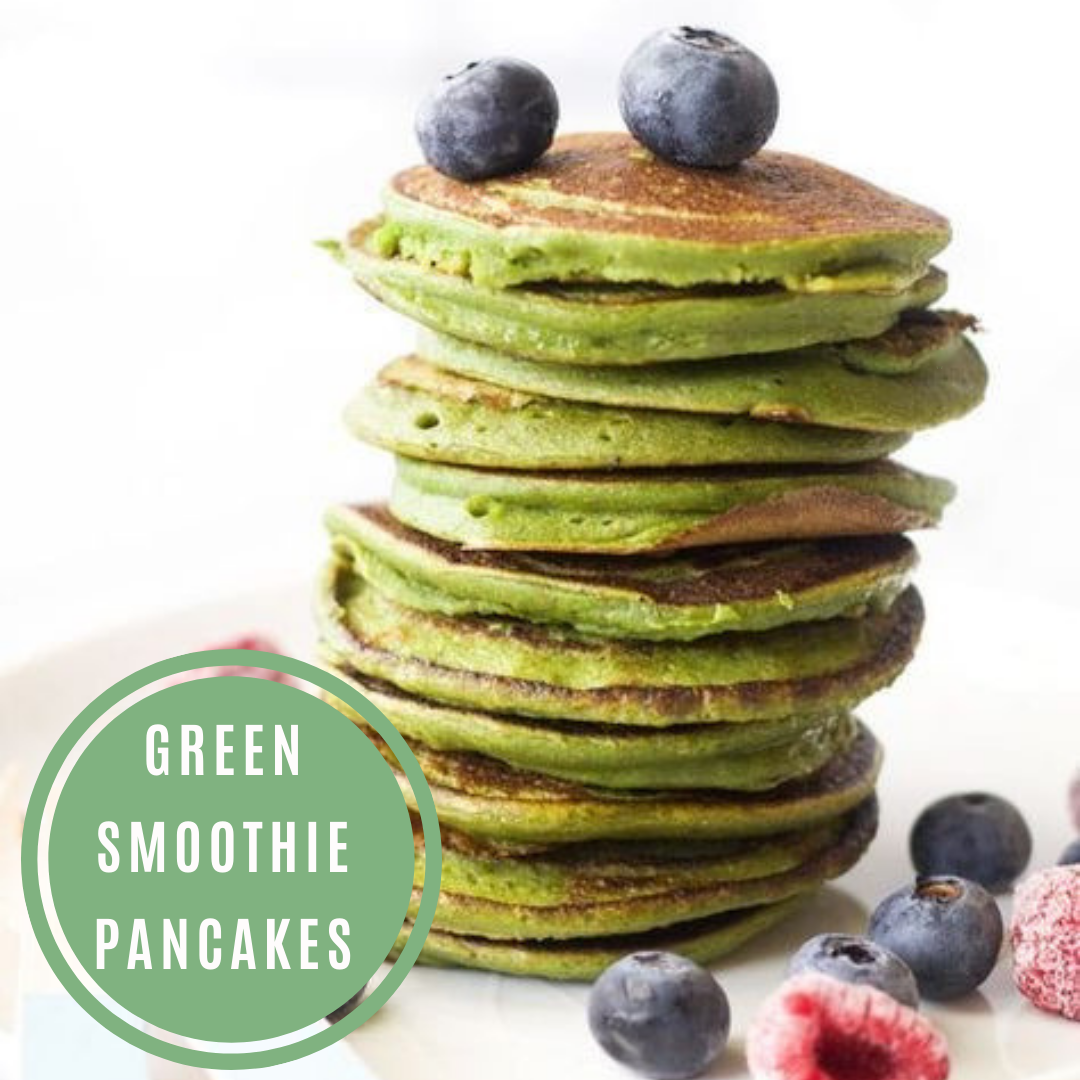
We tend to meal prep and plan for our dinners, but not as much thought is put into prepping for breakfast. Given that breakfast is the most important meal of the day, we've found one of our favourite recipes that will keep you eating breakfast all week.
Green smoothie pancakes are an excellent way to add more iron into your diet. You can add in extra protein if you'd like, or keep them as is. They also make a great portable snack!
Substitute for a gluten free flour or a flax egg to make this simple recipe vegan. Top with fresh fruit, yogurt or some maple syrup. Yum!
Green Smoothie Pancakes
Author: www.healthylittlefoodies.com
Ingredients:
2 ripe bananas
80g 2 cups Spinach
1 egg
1 cup 120g wholemeal /spelt flour
1/2 cup 125ml milk of choice
1 tsp coconut oil
Instructions:
Add all the ingredients to a blender and blend until a smooth batter is formed. *Note 1
Heat the coconut oil in a frying pan over a medium / high heat.
Once hot add two tablespoon of the mixture to the pan to form 1 pancake. (I usually make a few at the same time)
Heat for 1 to 2 minutes until bubbles form on the surface of the pancake. Flip and cook for a further minute.
Delicious with greek yoghurt and fresh fruit.
Recipes
by Jason McGinn on Mar 01 2020
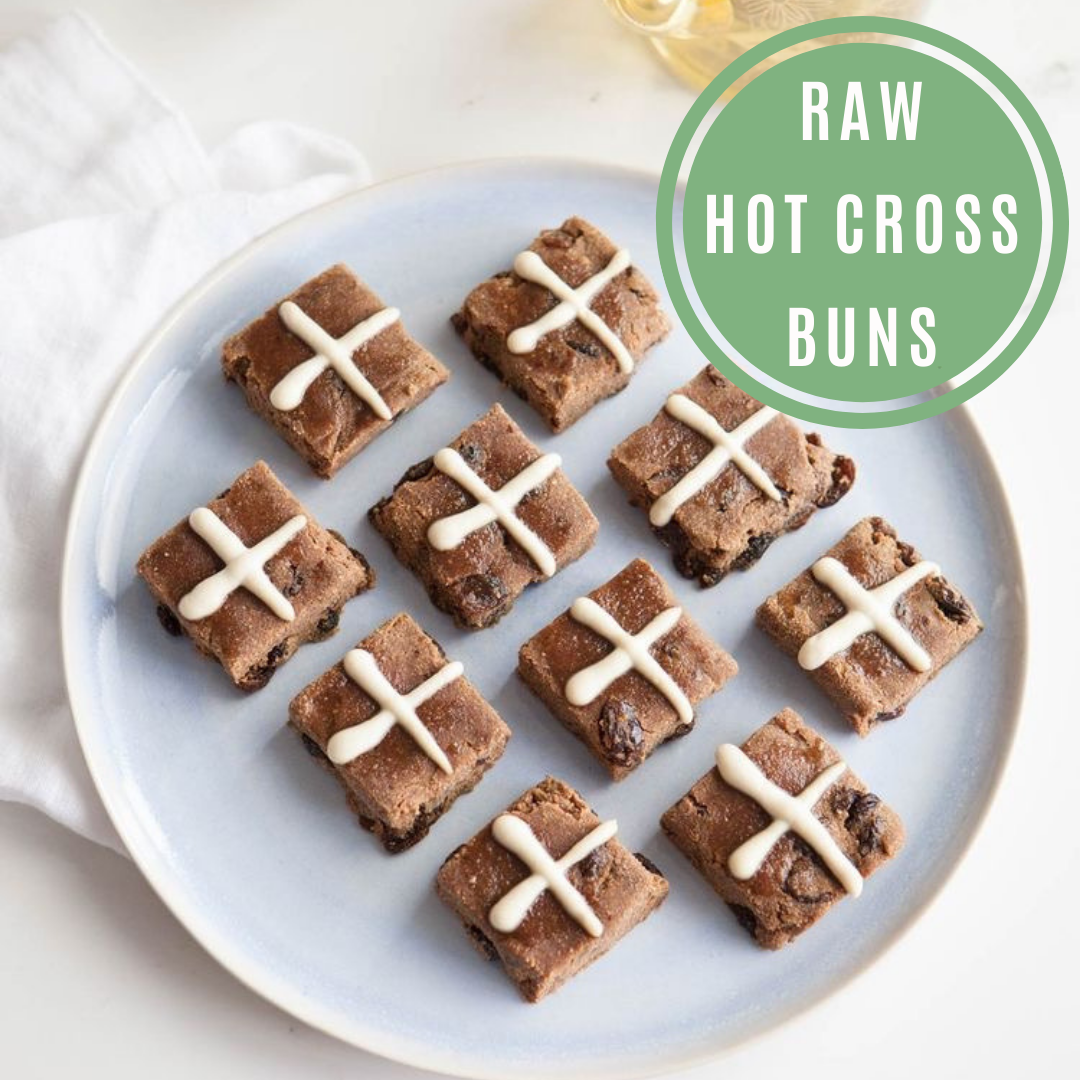
It wouldn't be Easter without hot cross buns being at nearly every corner of the supermarket. They have such a following with that delicious, warm spicy flavour.
However, they don't do much for our diet or our waistline. This recipe is so easy. Its vegan, gluten free and refined sugar free. Easy enough to enjoy at home and to bring to your family Easter!
Here is the recipe below. Take a photo and be sure to tag us with your results!
Raw Hot Cross Buns
Author: Naturopath Lauren Glucina
https://ascensionkitchen.com/raw-hot-cross-buns/
Ingredients:
BUNS:
1½ cups almond meal
½ cup coconut flour
¼ cup + 2 tablespoons coconut sugar
1 heaped tablespoon cacao powder
¾ cup grated apple
5 large Medjool dates pitted (about 78g)
¼ cup psyllium husks
¼ cup + 2 tablespoons almond milk
1 cup sultanas
1½ teaspoons cinnamon powder
1 teaspoon mixed spice
Zest of half an orange
Couple of good pinches coarse sea salt
CROSS:
1/2 cup cashews soaked in water for 2-8 hours (till soft)
1/4 cup water
Juice of half a lemon
1 tablespoon 100% pure maple syrup
2 tablespoons coconut oil liquid
1 teaspoon vanilla extract
Pinch of coarse sea salt
Instructions:
BUNS:
Place all but sultanas in a food processor and whiz till a dough forms.
Transfer to mixing bowl, mix in sultanas.
Press mixture into an 8inch square baking tin lined with baking paper, let sit for 10 minutes, remove, then cut into 16 even squares.
Place squares on a dehydrator tray.
Baste with maple syrup.
Dehydrate for 1 hour at 135˚F, then turn down to 115˚F for another 4-5 hours.
CROSS:
Drain cashews, blend everything in blender till smooth.
Spoon mixture into a piping bag, then pipe on crosses over the dehydrated buns.
Store in an airtight container for about a week.
Recipes
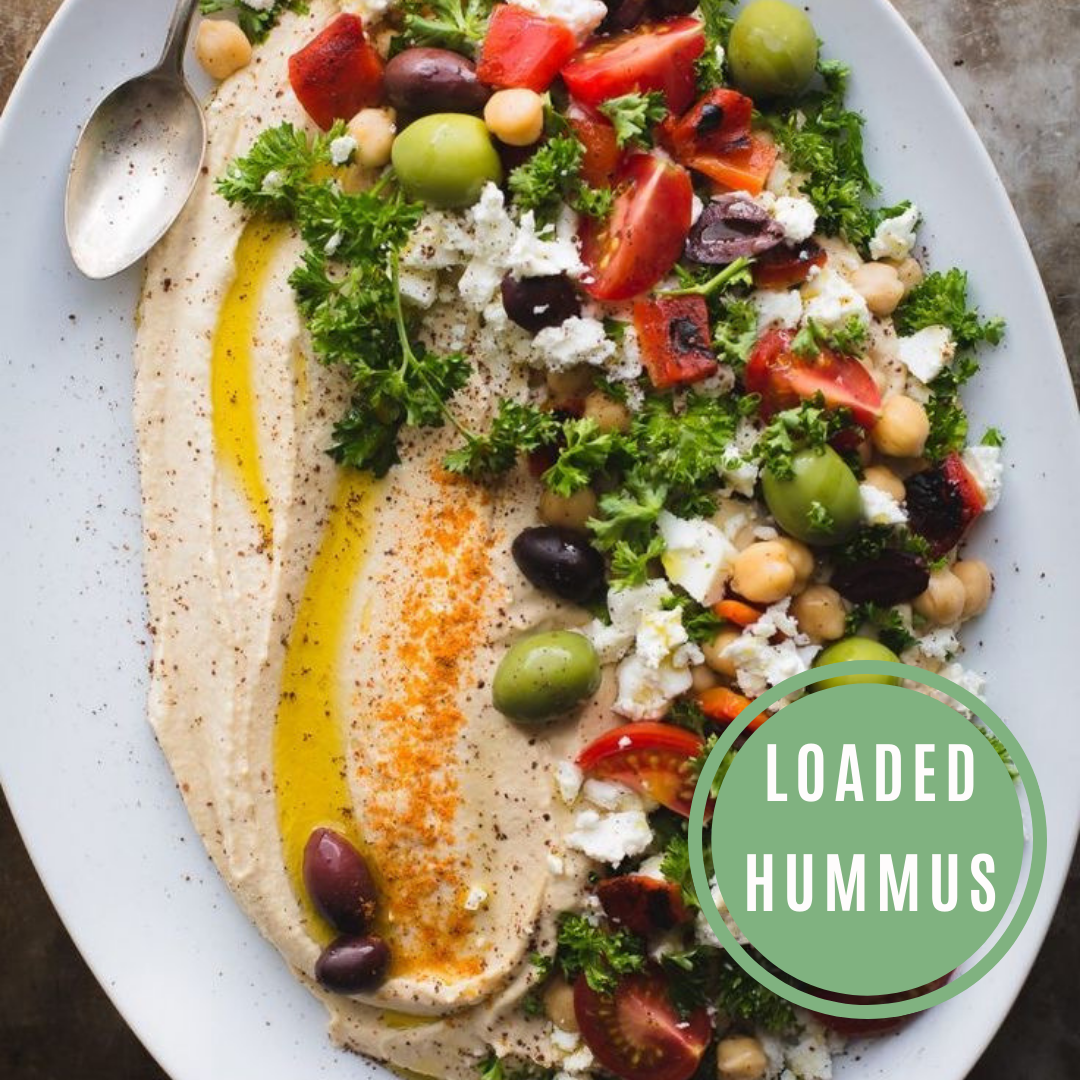
by Laurie Deans on Feb 24 2020
Calling all entertainers! Who has seen this new trend taking over the entertaining game?
Loaded hummus is drool-worthy. Its taking dips to a whole new level while keeping it clean and healthy (or as healthy as you want). Partner it with some crackers, pita bread, sourdough, raw veggies and more. The sky really is the limit here.
Here is a recipe for a seriously delicious hummus and some toppings to make this baby fully loaded!
Loaded Hummus
Author: Taste Love and Nourish
Ingredients:
two cans of chickpeas, drained and rinsed
1/2 cup tahini
1/4 cup fresh lemon juice
1/4 cup cold water more or less, as needed
1 -2 medium cloves garlic roughly chopped
1/2 teaspoon ground cumin
1/8 teaspoon cayenne
1/2 teaspoon Himalayan salt
extra virgin olive oil
Toppings:
feta cheese crumbled (omit to keep this vegan)
Kalamata olives
Castelvetrano olives
roasted red capsicum diced
tomatoes cut into wedges
fresh parsley chopped
additional chickpeas
ground sumac
cayenne
extra virgin olive oil
Instructions:
In a blender or food processor, add all of the ingredients except the olive oil and the toppings. Blend on high speed until smooth. In a high speed blender, this should take 45 to 50 seconds. In a food processor, blend for about 1 minute.
Spread the hummus onto a serving platter and top with your favorite toppings and a generous drizzle of extra virgin olive oil.
Recipes
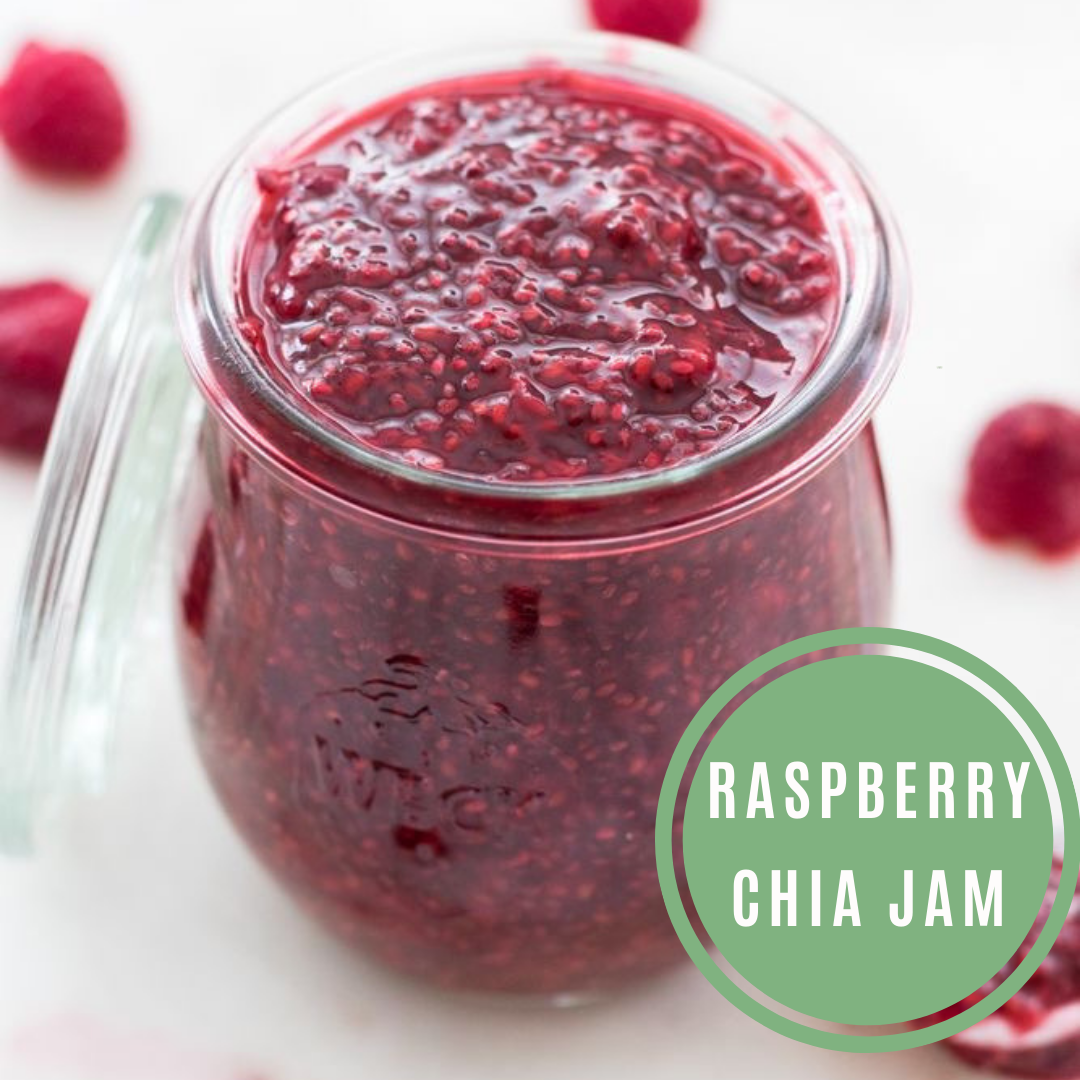
by Jason McGinn on Feb 17 2020
You guys, chia jam is our jam. Its so easy to make, is super delicious and the kids love it on everything. It adds some serious nutrients to the dish as well. I'm talking:
Omega-3 fatty acids
Fiber
Antioxidants
Iron & calcium and more!
Not to mention the nutrients in whichever fruit you decide to base the jam around. You can make virtually any fruit come to life in this jam recipe but a favourite for us is raspberry. We love the balance between tart and sweet and the punch of red makes it seem even more appealing!
Here is the super simple recipe for you. Try adding the jam to your toast, muesli, yoghurt, smoothies, dessert- the sky is the limit!
Enjoy xx
Raspberry Chia Jam
Author: Eating by Elaine
Ingredients:
1.5 cups frozen unsweetened raspberries
2 tablespoons black or white chia seeds
3 tablespoons pure maple syrup
1/2 teaspoon vanilla extract
Instructions:
Add the frozen raspberries and maple syrup to a small saucepan over medium heat and cook uncovered until the raspberries start to break down and release their juices. I like to use a potato masher to help things along and get it nice and smooth.
Add the rest of the ingredients, reduce the heat to low and stir until well combined.
Let simmer for a couple of minutes on low heat while stirring. This allows it to thicken a bit. Transfer to a small glass jar and let cool comple
Recipes
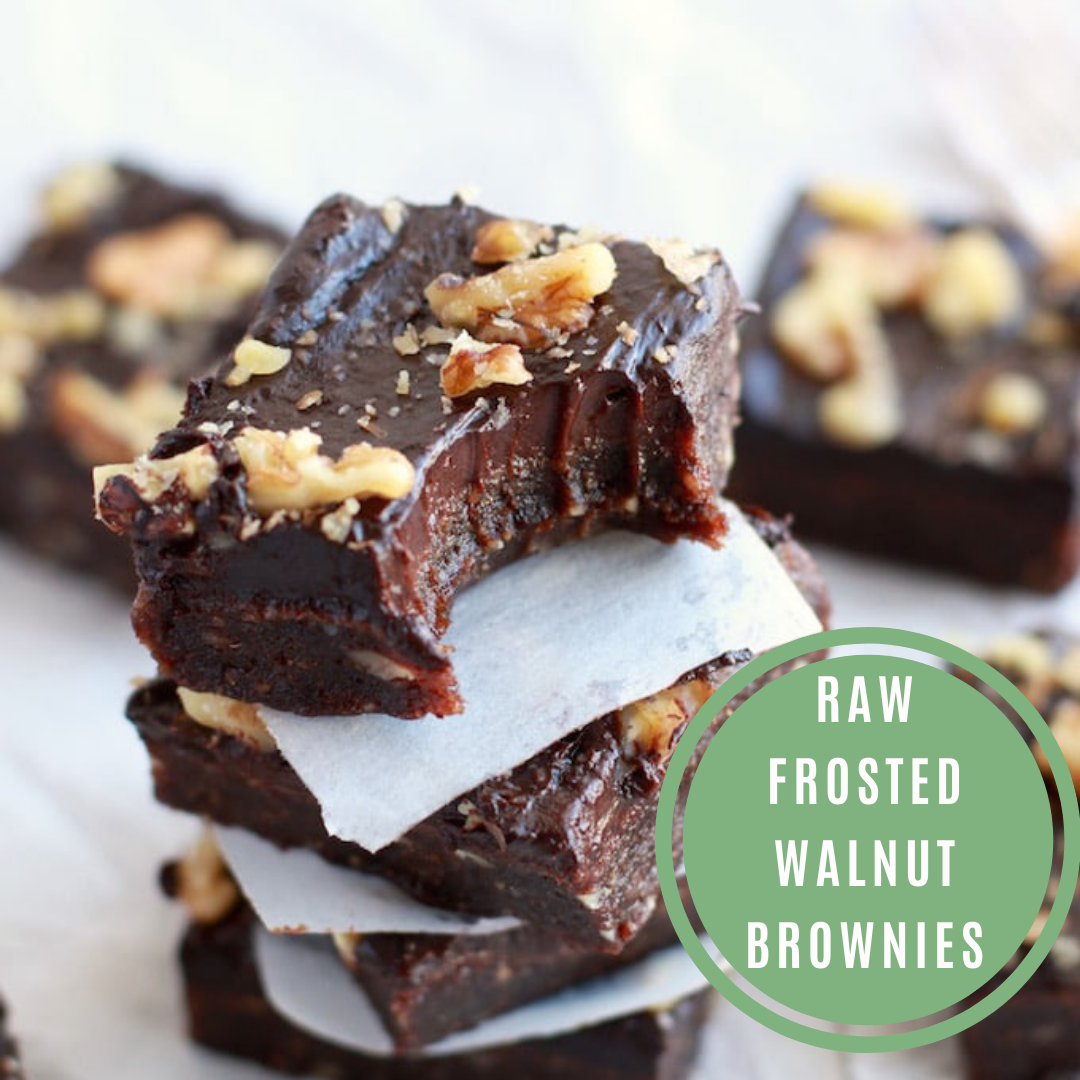
by Jason McGinn on Feb 10 2020
If you’re looking for a new recipe to try that’s raw, refined sugar free, gluten free that’s also chewy, rich and with a little bit of crunch...stop looking. You’ve found it.
This recipe also adds some omegas, antioxidants, potassium and fibre to your life while making your tastebuds dance at the same time. Be sure to save this one, you'll want to make it time and time again.
Raw Frosted Walnut Brownies
Author: Nutrition in the Kitch
Ingredients:
Brownies:
2 cups pitted dates (very soft, or soak for 10 minutes in hot water then drain)
¼ cup cacao powder
1 tablespoon unsweetened almond milk
1 tsp pure vanilla extract
¼ tsp sea salt
2 cups raw walnuts
Chocolate Frosting:
Flesh of 2 ripe avocados
¼ cup raw honey or pure maple syrup
¼ cup cacao powder
1 tsp pure vanilla extract
Toppings:
⅓ cup crushed raw walnuts
¼ teaspoon sea salt (optional)
Instructions:
Add the dates to a food processor and process on high to break into smaller pieces.
Add in the cacao, vanilla, almond milk, and sea salt and process again until a dough-like texture is achieved.
Using a spatula, scrape the dough from the processor and transfer to a bowl.
Next, add in the walnuts and pulse until crumbly.
Add the dough mixture back to the food processor with the walnuts and process so that the walnuts can blend together with the dates until everything is well combined (you may need to use a spatula to scrape the sides periodically), this is the brownie mixture.
Line an 8x8 baking pan with parchment paper and transfer the brownie mixture to the pan and press firmly and evenly into the pan.
Place the pan in the freezer to set and then prepare the chocolate frosting.
Rinse the food processor and wipe clean, then add in all of the frosting ingredients and process on high until completely smooth.
You may also need to use a spatula to scrape the sides periodically as you blend together the frosting ingredients.
Transfer the frosting to a bowl and set in the fridge to chill for 20 minutes as the brownie batter continues to set.
After 20 minutes, remove the brownie pan from the freezer and spread the frosting evenly over the brownie layer.
Sprinkle the crushes raw walnuts over the frosting and sea salt if using.
Return the pan back to the freezer for another 20-30 minutes to set, or until the frosting is mostly firm to the touch.
Once frosting is the right consistency, remove the pan from the freezer and cut into 9 brownie squares.
Enjoy!
Recipes
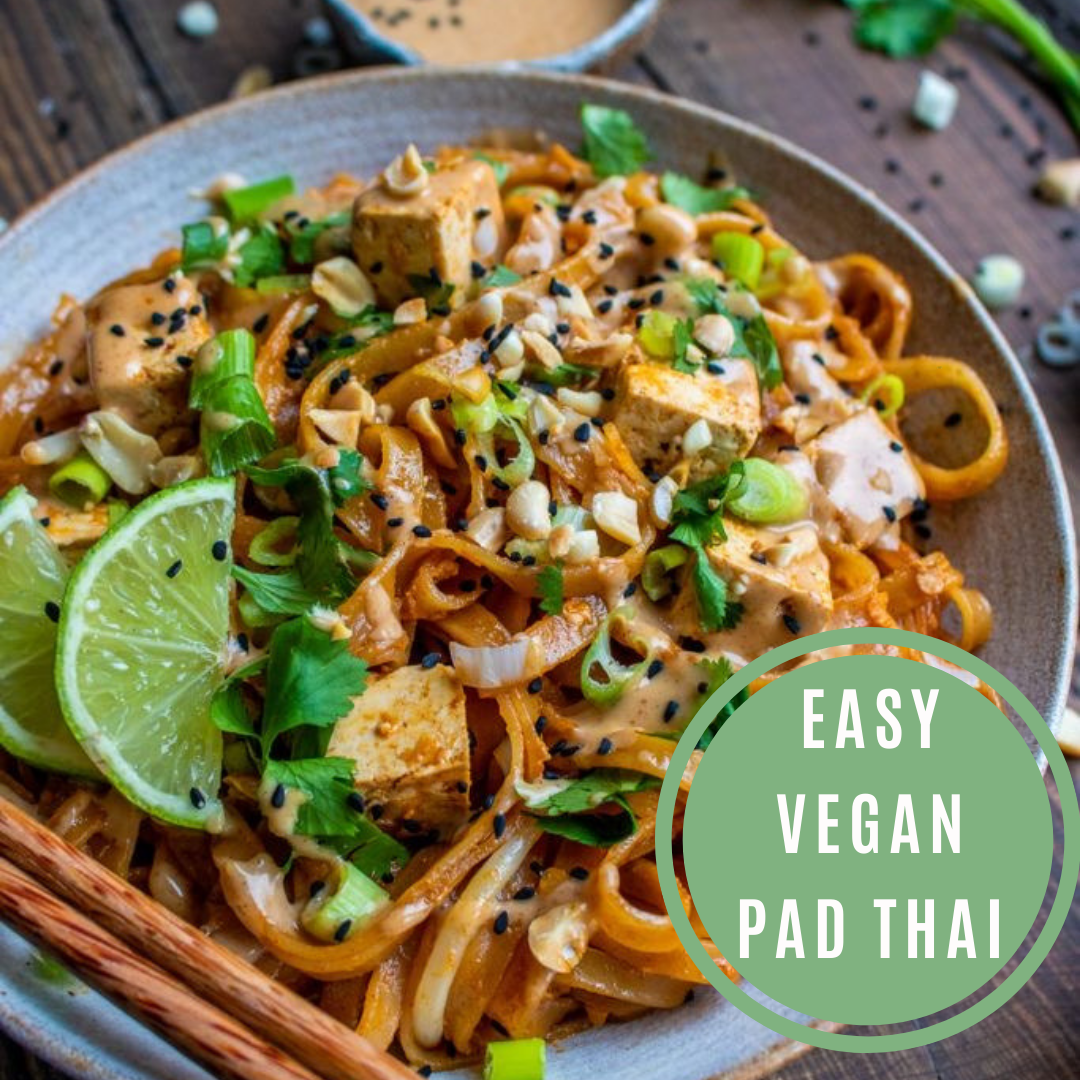
by Jason McGinn on Feb 03 2020
Oh how much we love Thai food! Its a real treat in our household to order takeaway Thai. Last week we wanted Pad Thai but I decided to try a new recipe, one that offers the delicious taste and is healthier for us and our bank account. We aimed for a successful Meatless Monday recipe and weren't we pleasantly surprised!
Its easy and made with simple enough ingredients that most of you will have in your pantry or will use for other recipes.
This recipe serves 2-3 people so be sure to double for a bigger family & if you want leftovers for lunches. Believe me, you will.
Enjoy!
Easy Vegan Pad Thai
Author: www.happyskinkitchen.com
Ingredients:
About 200gr of rice noodles
3 tbsp of toasted sesame seeds oil
3 garlic cloves, minced
A small piece of ginger, finely grated
1/4 cup of soy or Tamari sauce
2tbsp of brown rice vinegar
2 tbsp of coconut sugar
1/2 tbsp of paprika
About 1/2 cup of cubed extra firm tofu
3 spring onions – chopped + extra for sprinkling
1 cup of bean sprouts
1/4 cup of unsalted peanuts – lightly roasted and roughly chopped
1/2 lime cut into slices
An handful of fresh coriander – roughly chopped
A sprinkle of sesame seeds
For the peanut sauce:
1/2 tbsp of siracha or hit sauce
1 cup of canned coconut milk
2 tbsp of soy sauce or Tamari sauce
1/2 cup of runny and unsweetened peanut butter
1 tbsp of coconut sugar
Instructions:
1. Cover the rice noodles with boiling water and let them sit for 15 minutes.
2. In the meantime, make the peanut sauce. Combine all the ingredients in a small saucepan and slowly bring it boil. Reduce the heat and let it simmer for 2-3 minutes until the sauce thicken. Remove from the heat and set on the side.
3. Heat a large frying pan or a wok over medium-high heat and stir fry the ginger and garlic for 2-3 minutes. Add in the drained noodles and cook for another 2 minutes until they have soften.
4. Add the soy sauce, coconut sugar, vinegar and paprika and keep stirring. Add the tofu in and mix well to combine all the ingredients. Cook for another 2-3 minutes.
5. Add more soy sauce, chopped spring onions, chopped peanuts, bean sprouts and keep on stirring to prevent the ingredients sticking to the bottom of the pan. Add a dash of water if it looks too dry. Cook for another 3 minutes.
6. Remove it from the heat and serve it with chopped spring onions, coriander, lime slices, sesame seeds and drizzle the peanut sauce on top.
Recipes
by Jason McGinn on Jan 27 2020
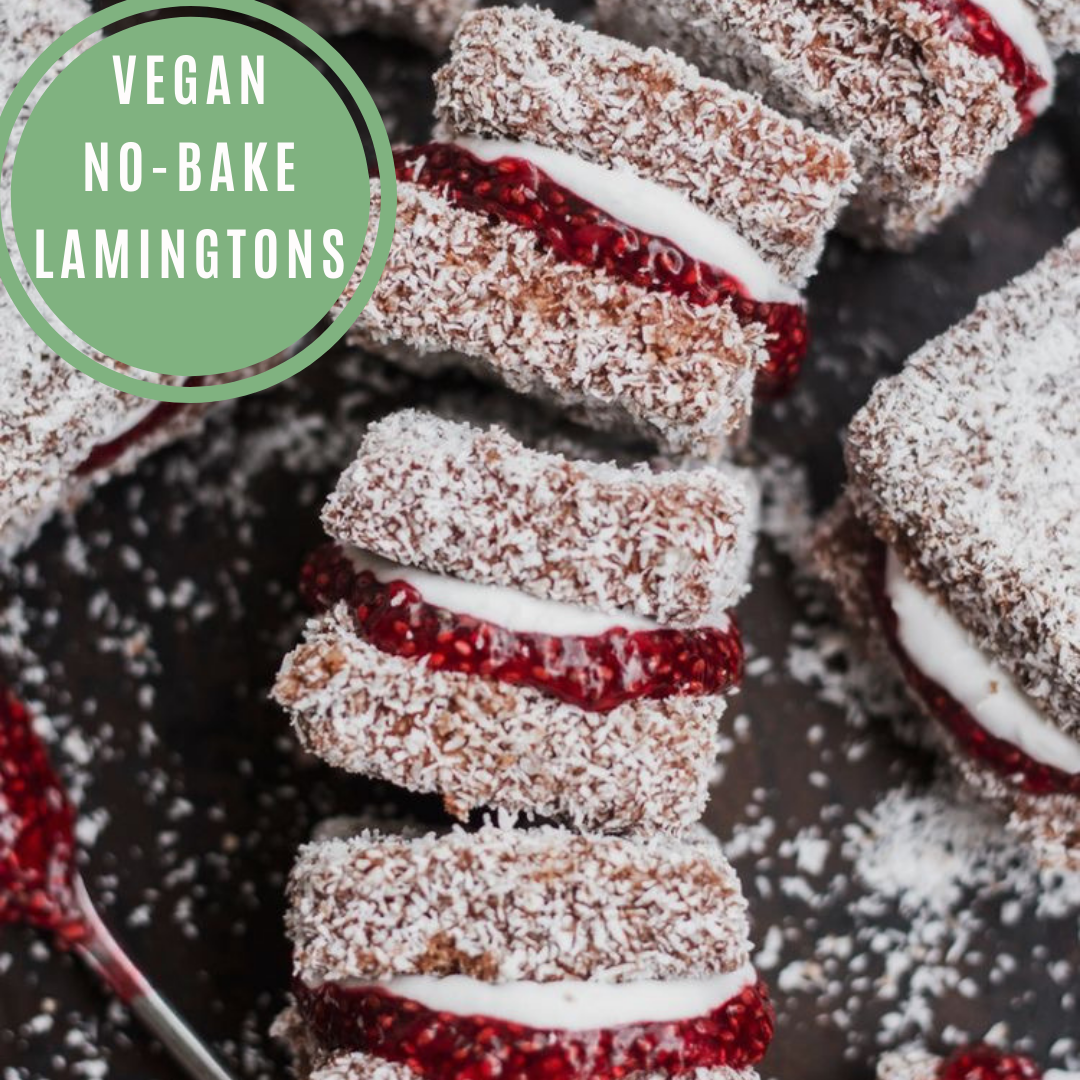
What an Aussie classic! Lamingtons are quite the treat and loved nearly country-wide. So what about those of us who do life a little healthier? Well we have a sugar-free, no-bake, vegan recipe just for you!
This no-bake recipe is simple enough with some basic healthy ingredients that you likely already have hanging out in your pantry. If you're missing a few, click on the ingredient and you can order directly from this website, straight to your door.
Vegan No-Bake Lamingtons
Author: Pheobe Ann Conway, www.pheebsfoods.com
Ingredients:
Lamingtons
1 1/2 cups dessicated coconut + extra for coating
1/4 cup almond meal
1/2 cup coconut flour
3 tbsp coconut oil
1/2 cup coconut cream
1 tsp vanilla
2-3 tbsp stevia or sweetner of your choice
Chocolate Coating
1/2 cup coconut oil
1/4 cup cacao butter buttons
2 tbsp stevia
3 tbsp cacao powder
pinch of salt
1/2 cup raspberry chia jam – I used 1/3 a cup the natvia raspberry jam + added in 1 tbsp extra chia seeds to thicken it
whipped coconut cream – optional
Instructions:
Place all of the lamington ingredients into a food processor and blend until sticky
Press this mixture firmly into a lined square or rectangle baking tin and place into the freezer to set
Melt together the coconut oil and cacao butter in the microwave then stir in the cacao powder, stevia and salt
Take the lamingon mix out of the freezer and slice into small squares
Dip each into the chocolate sauce mix using a fork and coat immediately in extra shredded coconut
Place the squares back into the freezer to set
Add a tsp of the chia jam and a tsp of coconut cream to one side of the lamington and sandwich it together with a second square
Once all the lamington’s have been made you can eat them immediately or store in the fridge or freezer
Recipes
by Jason McGinn on Jan 20 2020
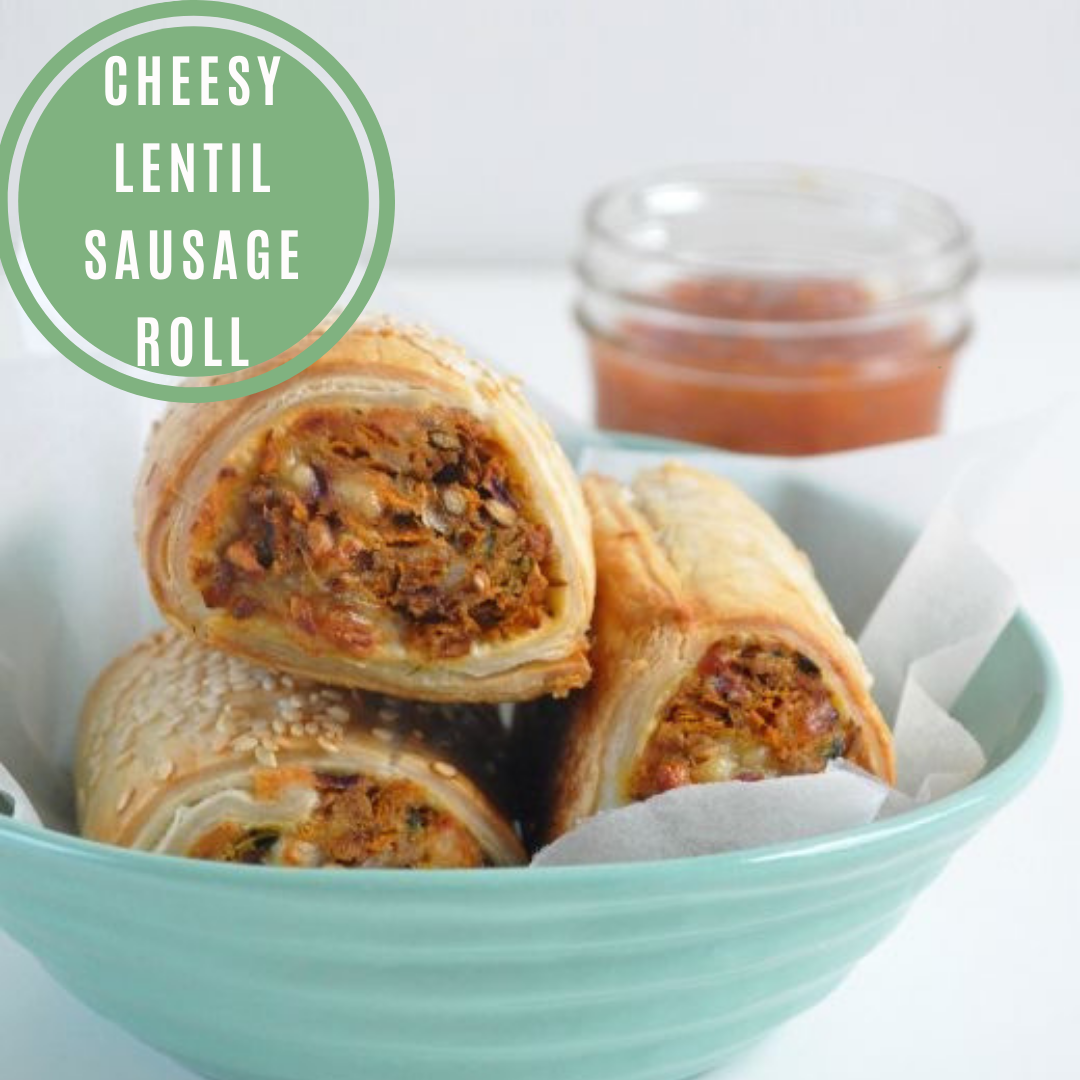
A healthy twist on an Aussie classic is just what we need to wrap up these school holidays. Perfect for lunch for the kids, dinner with a side dish or to entertain some friends. This recipe is easy enough, uses simple ingredients yet blows us away with its deliciousness. You'll never look back!
Cheesy Lentil Sausage Roll
Author: www.emeraldandella.com.au
Ingredients:
2 tablespoons olive oil
2 onions (red or brown), finely chopped
4 cloves garlic, crushed
¼ cup chopped fresh thyme or rosemary leaves
1 large zucchini, grated
2 large carrots, grated
2 x 400g cans lentils, rinsed and drained
2 tablespoons smokey paprika
1 egg, beaten + 1 extra for brushing
1 cup dried breadcrumbs
3 cups grated cheddar cheese
6 sheets puff pastry
1½ tablespoons sesame seeds
tomato chutney to serve
Instructions:
Heat the oil in a large frying pan over low heat. Add the onions, garlic and herbs. Cook, stirring, for 8-10 minutes, until tender. Add the zucchini, carrot, lentils and paprika. Season well. Cook, stirring, for 8-10 minutes, until the vegetables are soft. Set aside to cool slightly.
Preheat the oven to 200°C (fan-forced). Stir the egg, breadcrumbs and cheese through the lentil mixture.
Place one sixth of the mixture along one edge of a pastry sheet. Shape into a log. Roll up pastry to enclose. Repeat with remaining mixture and pastry.
Place sausage rolls seam-side-down on baking trays lined with baking paper. Brush with the extra egg. Sprinkle with sesame seeds. Bake for 25 minutes, until puffed and golden. Serve with tomato chutney.
Recipes
by Jason McGinn on Jan 13 2020
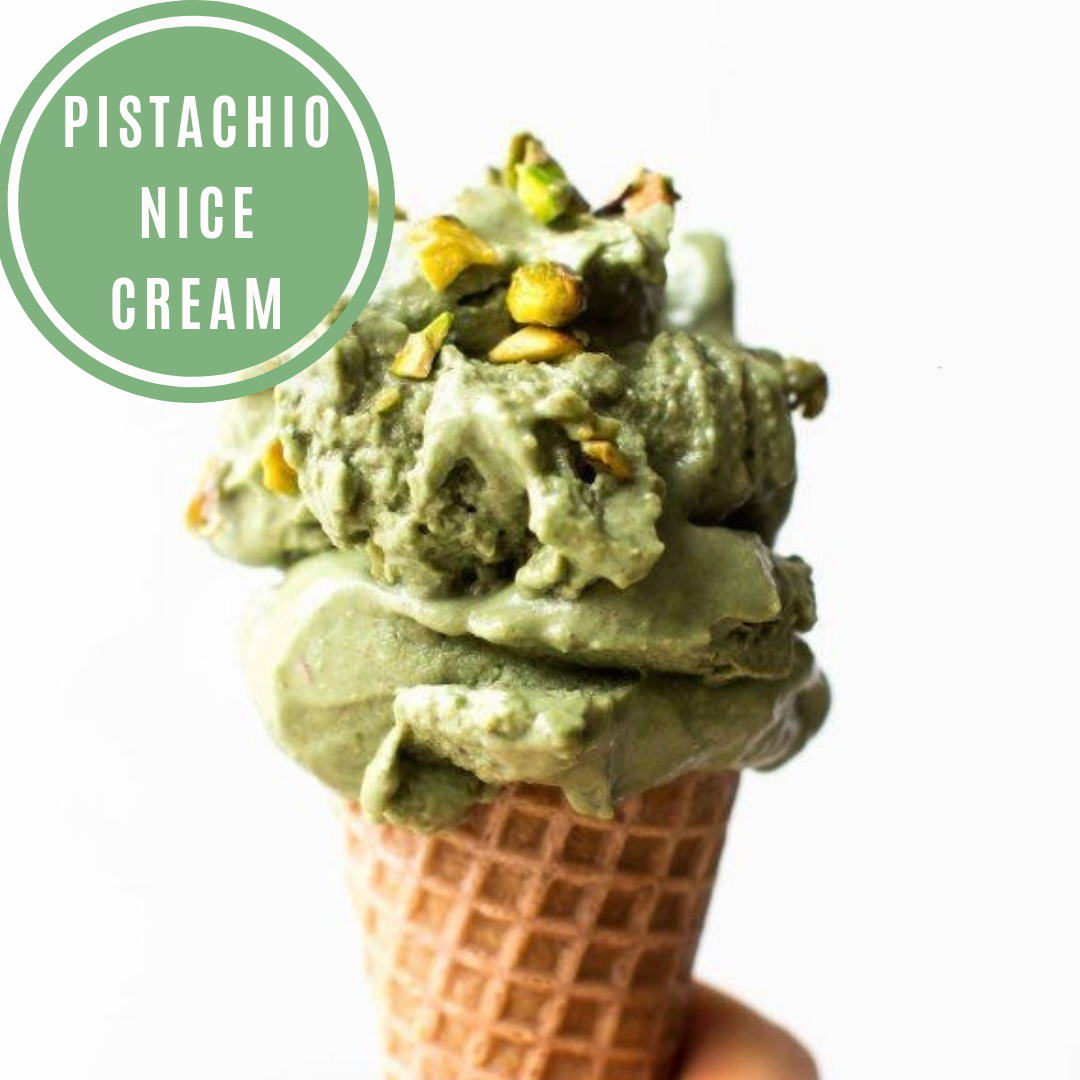
Have I ever told you that meatless monday is my favorite day of the week? It lets us be creative while keeping our diet nutritious and delicious. Cooling off while also treating yourself to a vegan delight just got even better. This super easy and super delicious pistachio nice cream recipe might become your new summer favorite. It’s simple, creamy and sweet yet nutty. It’s perfect. Enjoy!
Pistachio Nice Cream
Author: www.feastingonfruit.com
Ingredients:
2 1/2 cups non-dairy milk
1 large avocado
1 cup unsalted pistachios, shells removed
1 cup Medjool dates
Optional: 1/2 tsp almond extract
Optional: 1/4 tsp spirulina (for color)
Instructions:
Combine the milk, avocado, pistachios, medjool dates, and almond extract in a blender. Blend on high until smooth.
Add the spirulina slowly to achieve a pretty green color, tasting as you go and being careful not add too much or it will taste salty and ocean-y.
Pour the mixture into a loaf pan, top with chopped pistachios, and freeze overnight.
Remove from the freezer and let thaw for 10-15 minutes or until soft enough to scoop. Or if you want it SUPER creamy, break into chunks and re-blend until smooth.
Scoop into bowls or cones. Enjoy!
Recipes
by Jason McGinn on Jan 06 2020
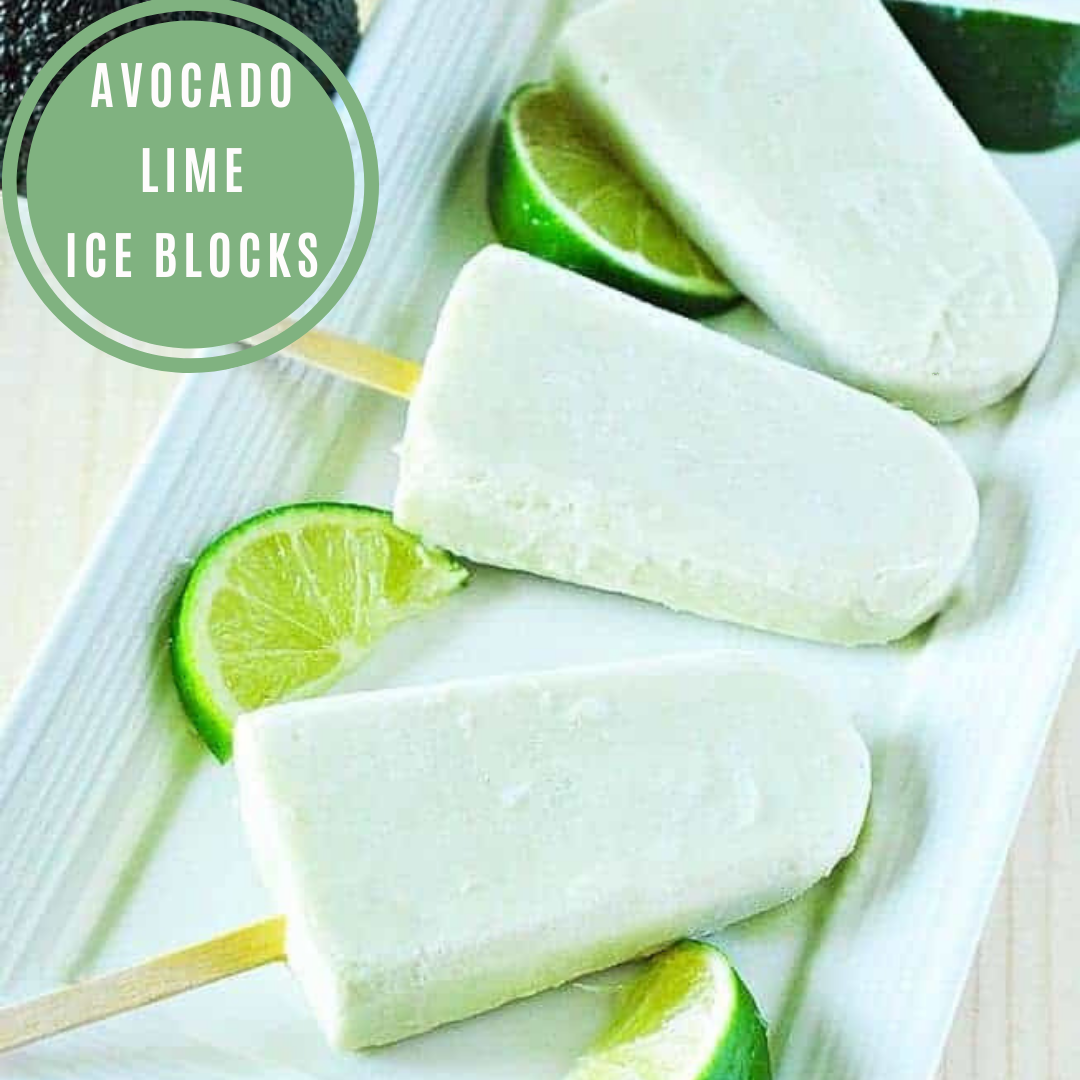
We love summer holidays! Hot days, warm nights and making memories with our little people. Having our kids and their friends around means lots of mouths to feed and a lot more often. This is why we choose to snack consciously. to avoid the endless cycle of ‘I’m hungry’, we ensure our kids are getting healthy fats with each snack. This keeps them full longer so less trips to the kitchen! This recipe by Healthier Steps keeps them cool & fed with nutrients and delicious flavor. What a winner!
Avocado Lime Ice Blocks
Author: www.healthiersteps.com
Serves: 8
Ingredients:
1 avocado
1 banana
1 cup coconut cream
1/4 cup maple syrup
1/4 cup line juice
1 lime zest
Instructions:
Cut avocado length wise, remove pit, scoop out avocado flesh using a spoon and place in am high speed blender or food processor.
Add banana, coconut cream, maple syrup, lime juice, lime zest.
Process until smooth, scraping down sides.
Pour into popsicle mold evenly, insert popsicle sticks and freeze for about 6 hours.

Recipes
by Jason McGinn on Dec 30 2019
The season of entertaining is nearly all finished, so let’s go out with a bang! If you’re hosting or heading to a New Years Eve party tomorrow, here is a winning recipe to feed to your friends. Or even better if you’re staying home and want to treat yourself. The smoky flavor of this dip is a real winner. It’s creamy, garlicky and oh so delicious. It’s also easy enough to make and even easier to please!
Wishing you all a happy and safe New Years Eve and the best for 2020!
Smoky Roasted Eggplant Dip
Author: www.cupfulofkale.com
Ingredients:
2 eggplants/aubergines (~500g)
3 garlic cloves
3 tbsp lemon juice
1 tsp salt
1 tsp smoked paprika
1 tbsp tahini
1 tbsp extra virgin olive oil
1-2 tbsp unsweetened vegan yoghurt/creme fraiche (optional)
Topping:
Handful flat leaf parsley
2 tsp sesame seeds
6 cherry tomatoes
Instructions:
Preheat oven to 200C.
Slice eggplants in half length ways, pierce the skin a few times and lightly coat in some oil. Place flesh side down on a baking tray and place in the oven for 35 minutes.
The skin should be starting to deflate, be wrinkled and the flesh really soft. Place a knife through to check, leave in for a few more minutes if it needs it.
Leave to cool and then scoop the flesh into a food processor using a spoon, discard the skins.
Add roughly chopped garlic, salt, smoked paprika, tahini, lemon juice and olive oil.
Blend until smooth, taste and season with some pepper. Add the yoghurt if using and blend once more.
Serve straight away or place in the fridge, the flavours will meld if left longer.
Top with chopped parsley, cherry tomatoes and sesame seeds!
Recipes
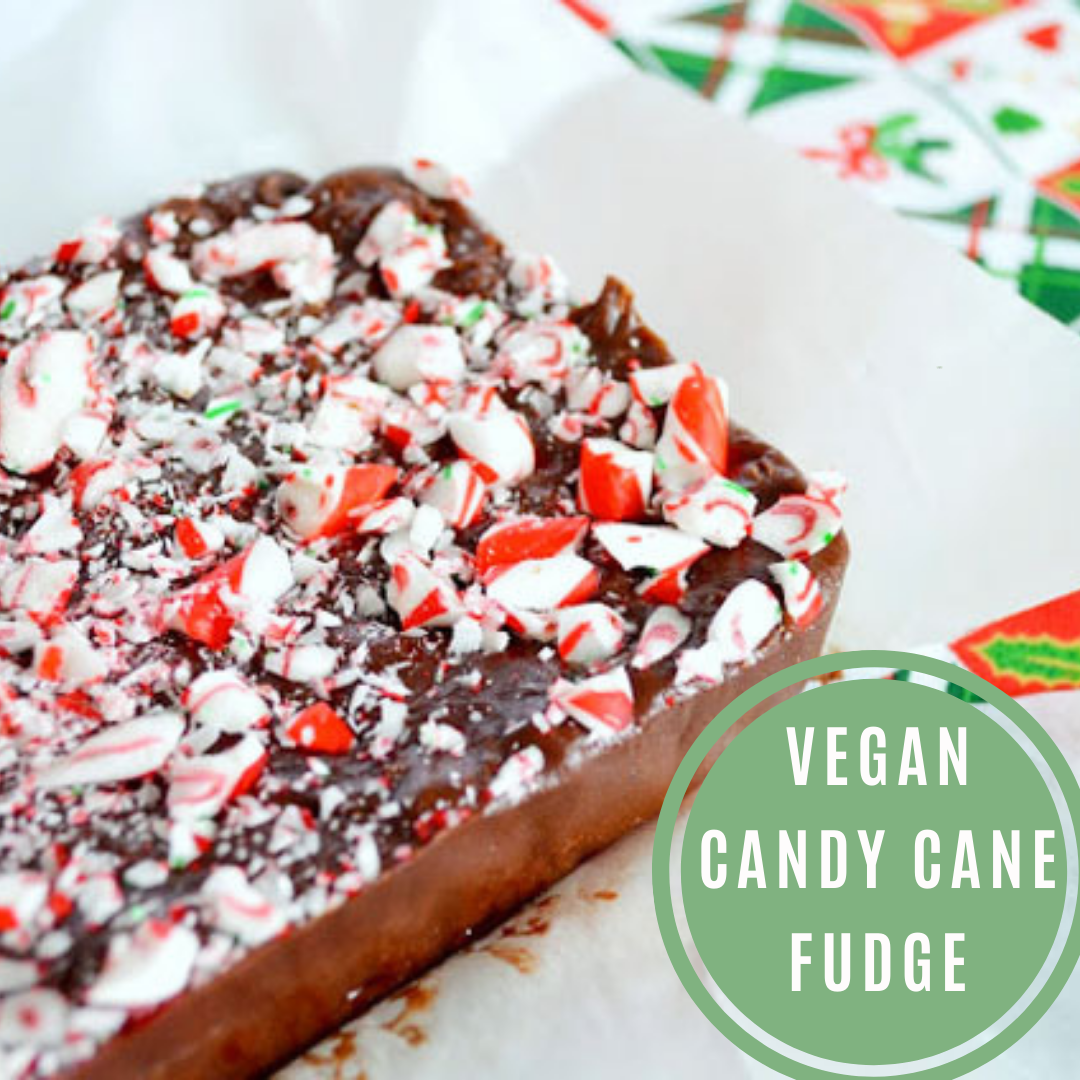
by Jason McGinn on Dec 23 2019
It’s our last meatless Monday until Christmas so we have to go out with a bang! This vegan candy cane fudge will impress the best with its rich flavor and chewy texture. It’s easy peasy and budget friendly.
Merry Christmas from all of us at Naturally Hooked!
Vegan Candy Cane Fudge
Author: Joann McDonald
Ingredients:
6 tbsp nutlex
3 1/2 cups of icing sugar
1/2 cup sifted raw cacao powder
1/2 tsp peppermint flavor
1/4 cup soy milk
2 peppermint candy canes
Instructions:
Line a pan with parchment paper
Crush the candy canes with whichever method you prefer
Put the nutlex, cacao, sugar, peppermint & soy in a heat-proof mixing bowl for a double boiler.
Place bowl over simmering hot water & stir until smooth. Add more soy milk if needed. When the mixture is smooth, pour quickly into the pan.
Sprinkle the crushed candy canes on top and press in gently.
Place in fridge and chill until set.
Enjoy!